
In a position to be taught to make use of Contour in Cricut Design Space? This whole tutorial will educate you each factor it is worthwhile to study using Contour to edit images in Design Space.
You’ll research what the Cricut Contour instrument does, the place to hunt out it, strategies to make use of it to indicate components of your design “on” and “off”. Plus, we’ll cowl steadily requested questions regarding the Contour instrument, and customary errors to watch out for.

The Contour instrument is no doubt one of many 5 necessary design devices for working with layers in Cricut Design Space. Nonetheless if you happen to occur to’re new to Cricut, finding out strategies to make use of all of the Design Space devices could also be overwhelming.
To help, I’ve put collectively a group of articles about using essential devices in Design Space (Slice, Weld, Join, Flatten, and Contour). And instantly’s article is all regarding the Contour instrument: what it does, the place to hunt out it, and strategies to make use of it to edit your images in Cricut Design Space.
The Contour instrument has so many makes use of, and I’m excited to level out you the entire cool points you’ll be able to do with it. After finding out this textual content, you’ll know:
- What the Contour instrument does, and the place to hunt out it.
- The way in which to make use of Contour to cowl decrease traces inside an image
- The way in which to make use of Contour to create multi-colored designs from one image
- Why the Contour instrument will not work, and strategies to restore it.
- The way in which to troubleshoot widespread factors with the Contour instrument
After that, I’ll give you my biggest solutions and strategies for using the Contour attribute in Design Space. I’ll reply some widespread questions on Contour and help restore some widespread Contour errors.
Contour Software program in Cricut Design Space
The Contour instrument is no doubt one of the useful and extremely efficient devices in Cricut Design Space. It means that you could current or disguise particulars inside an image layer to have the ability to determine and choose which components of a design you want to decrease.
Notably, the Contour instrument means that you could disguise explicit particular person contour traces – aka decrease traces – inside an image layer.
When to utilize the Contour instrument?
You’ll normally use the Contour instrument to cowl a portion of an image layer that you just don’t must decrease. Nonetheless there are alternative routes to utilize the Contour instrument, as correctly. For example, you want to use Contour to indicate a single-color image proper right into a multi-color image. Or, you want to use Contour to separate components of your image into completely totally different layers to have the ability to decrease them out on completely totally different mats.
What does the Contour instrument do?
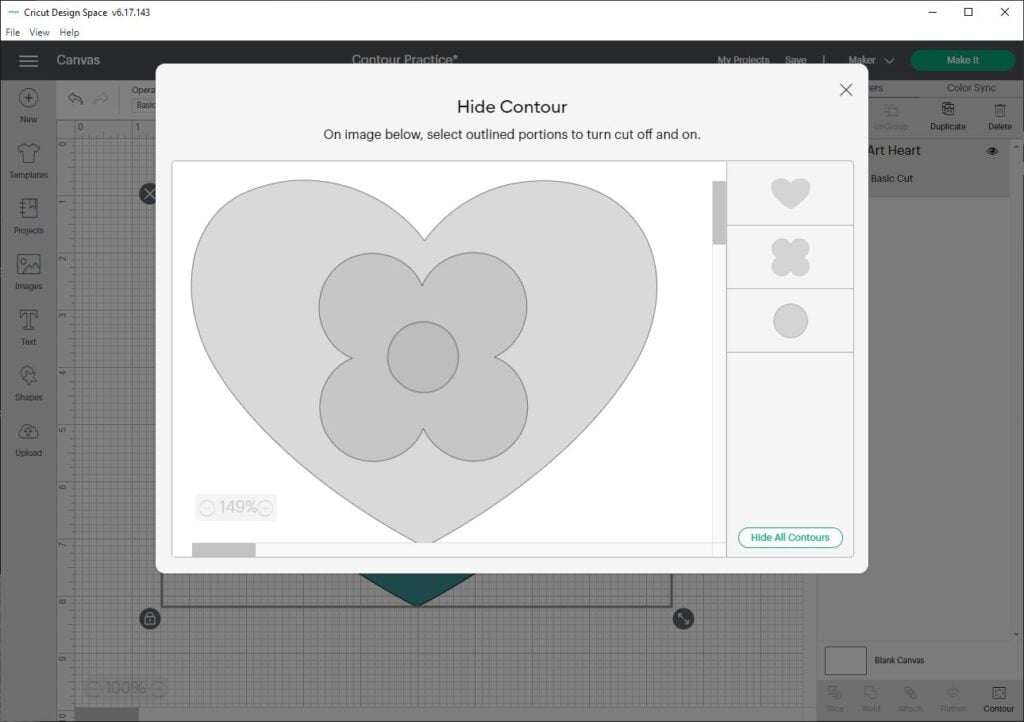
When you click on on the Contour button, Design Space will open up a Disguise Contour window. Inside this pop-up window, you’ll see all of the particular person decrease traces that make up a single image layer. You’ll click on on on any of these decrease traces to cowl them (or flip them off.) When you disguise a decrease line, it will not current up on the Canvas show display screen – and most importantly, it obtained’t be decrease by your Circut.
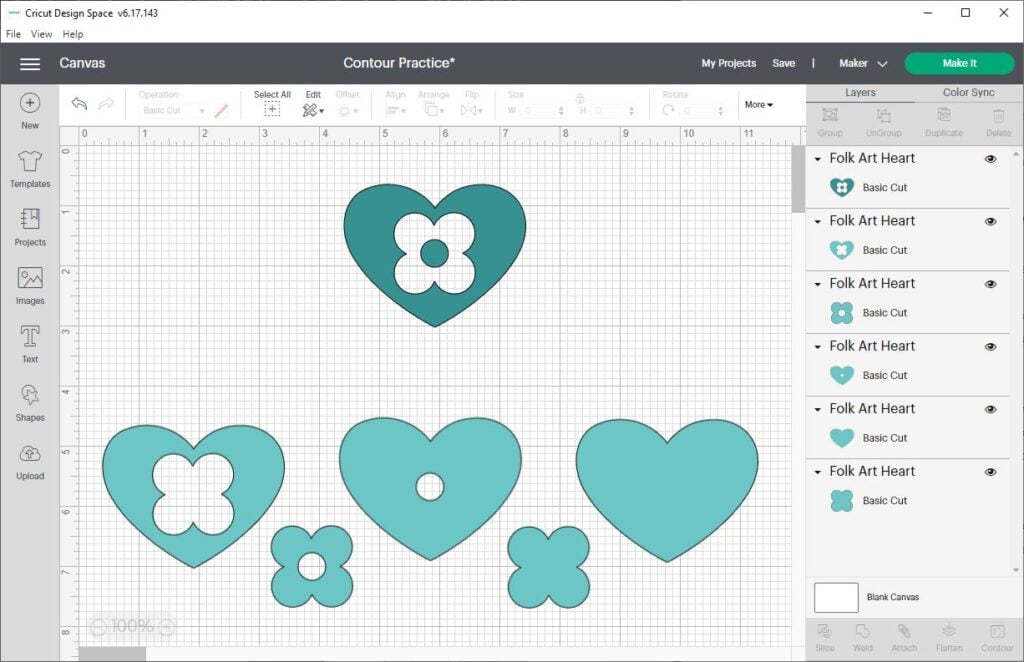
On this image, you probably can see how I’ve turned completely totally different components of the distinctive flower image “on” and “off” to create 5 new designs – solely using the Contour instrument.
The place to hunt out the Contour button?
You’ll uncover the Contour instrument inside the Cricut Design Space desktop program or mobile app.
On Desktop:
You’ll uncover the Contour instrument on the bottom of the Layers panel on the right-hand side of the Design Space Canvas show display screen. The Contour button may be subsequent to the alternative layer devices: Slice, Weld, Join, and Flatten. The Contour icon appears to be like a dashed-line circle.
On Mobile:
You’ll uncover the Contour instrument inside the Actions sub-menu inside the toolbar on the bottom of the show display screen, the ultimate button on the perfect.
The way in which to Use the Contour Software program
Adjust to these major steps to utilize the Contour carry out in Design Space. After this transient overview, we’ll stroll by way of 3 additional examples in higher aspect, with step-by-step screenshots.
- Open Design Space and add an image to the Canvas. If the image has Grouped layers, you want to Ungroup them sooner than using the Contour instrument.
- Select one layer to utilize with the Contour instrument. Click on on the Contour button inside the Layers panel. This will likely open the Disguise Contour window.
- Inside the Disguise Contour window, click on on on the contour traces (aka components of the image) that you just must Disguise. Any contour traces that you just disguise will not be confirmed on the Canvas show display screen, nor decrease everytime you ship the design to the mat.
The way in which to Use the Disguise Contour Window
Inside the Disguise Contour window, you’ll see a gray-scale mannequin of your image on the left side of the window. On the perfect side of the window, you’ll see a panel with a list of all of the particular person decrease traces that make up the image. Inside the bottom correct nook of the window, you’ll see a button that claims “Disguise All Contours.”
You’ll disguise contour traces by clicking on the gray-scale image preview OR on the particular person elements on the perfect panel. Let’s stroll by way of each risk.
Image Preview on the left
The traces on this image signify the particular person decrease traces that make up the image.
Click on on on the decrease traces that you just must disguise (or flip off). The hidden contour traces will change to a lighter shade of gray, indicating that they will not be confirmed or decrease.
For those who want to current a hidden contour, click on on on the hidden decrease traces to revive them. The Contour will reappear on the Canvas, and may be decrease.
Contour Strains Panel on the perfect
The shapes on this panel signify all the actual particular person decrease traces that make up the image. If the Contour has a white background, it is “on” and may be decrease. If the Contour has a gray background, is “hidden” or “off,” and obtained’t be decrease.
You’ll click on on on any of the design elements to cowl them (flip off) or current them (activate).
Disguise/Current All Contours button
You’ll click on on this button to cowl or current all contour traces in an image. (Although it says “Disguise All Contours,” it will depart one contour line exhibiting by default.)
Using Contour on the iOS/Android App
Using the Contour instrument on the mobile app is just like using Contour inside the desktop mannequin of Design Space, nonetheless the show display screen will look a bit completely totally different.
On the mobile app, faucet the Contour button inside the Actions menu to hold up the Disguise Contour window.
Inside the Disguise Contour window, the contour traces may be darkish gray, with a white background as a substitute of a gray fill. When you faucet on a decrease line, it will change to a lightweight gray shade to level that it’s been hidden.
Concepts for using the Contour Software program
Sooner than we get into the examples, listed below are just some major solutions and strategies to recollect when working with the Contour instrument.
- Contour works on images with a few decrease line. In numerous phrases, you probably can solely use Contour on “superior” shapes which may be made up of a few decreasing line. For example, Contour will not work on a simple circle, on account of a circle solely has one decrease line. Nonetheless, Contour will work on a doughnut type, on account of it’s constructed from two decrease traces (the outer circle and the inner circle.)
- Contour works with one layer at a time. The Contour instrument may be unavailable when you haven’t any seen layers chosen, or a few layer chosen.
- You cannot use Contour on a Group of layers or Linked layers. You’ll, however, use Contour on a single layer inside a Group – nonetheless solely one after the opposite.
- Contour works on Decrease or Draw layers, not Print layers. You’ll’t use Contour on Print Then Decrease images or Flattened layers. For those who want to use Contour on Flattened layers, you’ll ought to Unflatten them and alter them once more to Decrease or Draw layers first.
- Contour would not work on textual content material layers. For those who want to use Contour on textual content material, you want to Weld the textual content material first.
- Contour is reversible. Any time you want to edit your design, you probably can open up the Disguise Contour window as soon as extra, and click on on to cowl/current decrease traces. You have to use Contour even after you’ve saved your design.
- There needs to be a minimum of one seen decrease line inside the layer. You’ll’t use the Contour instrument to cowl all of the decrease traces inside a layer. Instead, if you happen to want to disguise each factor in a layer, you probably can toggle the Visibile/Hidden button inside the Layer panel.
3 Strategies to Use the Contour Software program
Open up Design Space, vitality in your Cricut machine, and let’s endure some examples.
Use Contour to determine on which components of the image to cut.
On this occasion, I’ll current you strategies to make use of the Contour instrument to “flip off” components of an image, so that you probably can decrease solely the weather you want. You have to use this system to separate components of your image into completely totally different layers, to have the ability to decrease them out on separate mats.
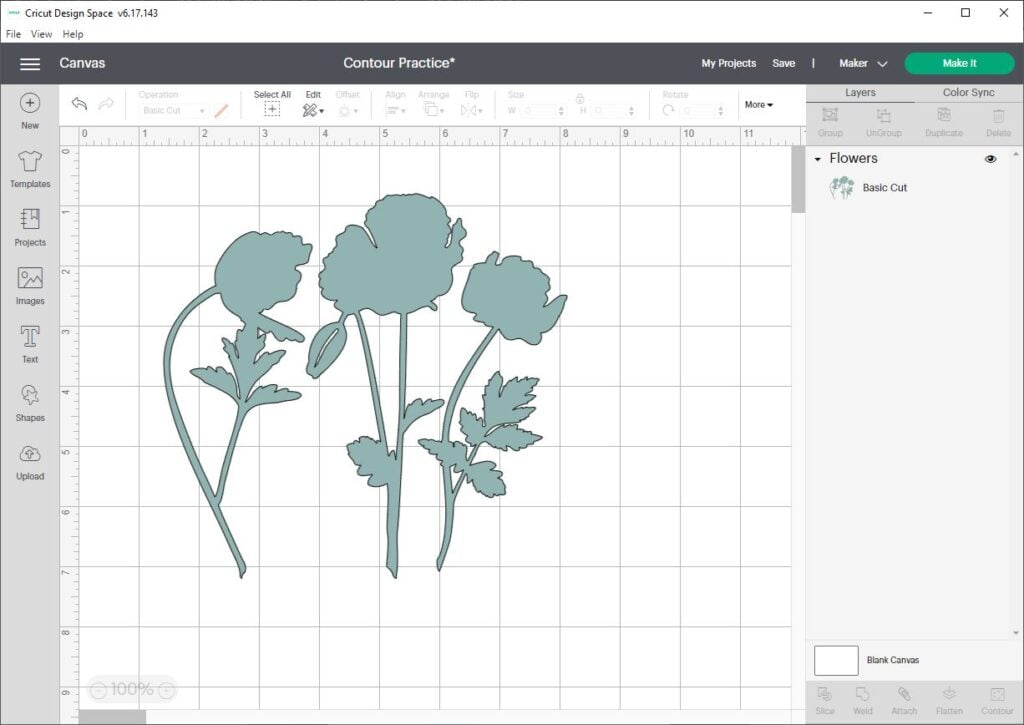
First, add an image to your Design Space Canvas. I chosen this image of three flowers from the Cricut Entry library. Although these flowers aren’t overlapping, they’re nonetheless on the an identical layer.
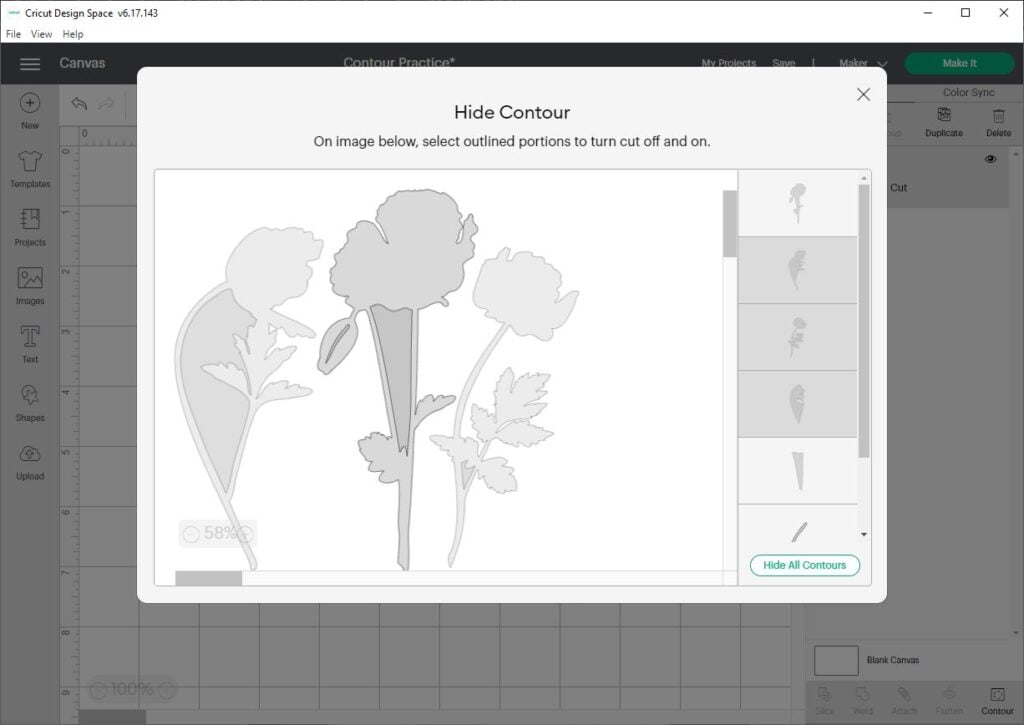
Then, select the Layer, and click on on Contour. This pulls up the Disguise Contour window. Now, click on on on the completely totally different components of the image that you just must disguise. Inside the screenshot beneath, you’ll see that I’ve hidden the left and correct flowers, and saved the center flower exhibiting.
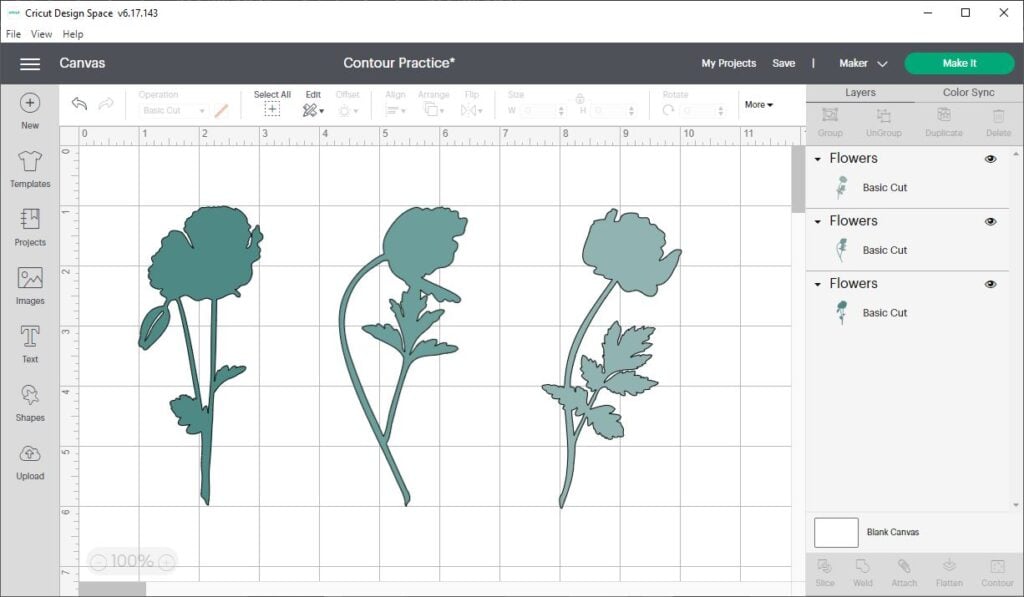
Subsequent, duplicate this layer, and repeat the strategy. On the second layer, disguise all the weather of the design moreover the left flower. And on the third layer, disguise all components of the design moreover the perfect flower.
When you take a look on the Layers panel, you’ll see I’ve all three flowers on their very personal layers. Now, I can edit them individually and decrease them out on completely totally different mats.
Use Contour to remove particulars from a flowery image
On this occasion, I’ll current you strategies to simplify an intricate design by way of the usage of the Contour instrument to “flip off” among the many smaller particulars. On this occasion, we’re using the Contour instrument just about like an eraser instrument to remove undesirable decrease traces from the image.
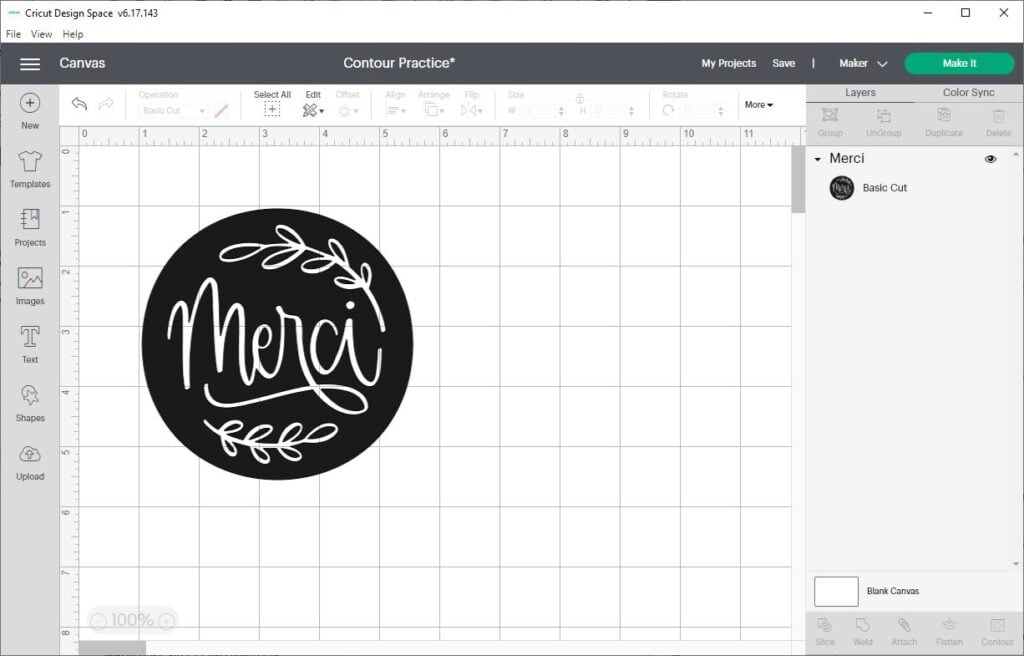
Start by together with an image to the Design Space Canvas. For this occasion, I’m using a circle image with the phrase “Merci,” surrounded by a number of floral motifs.
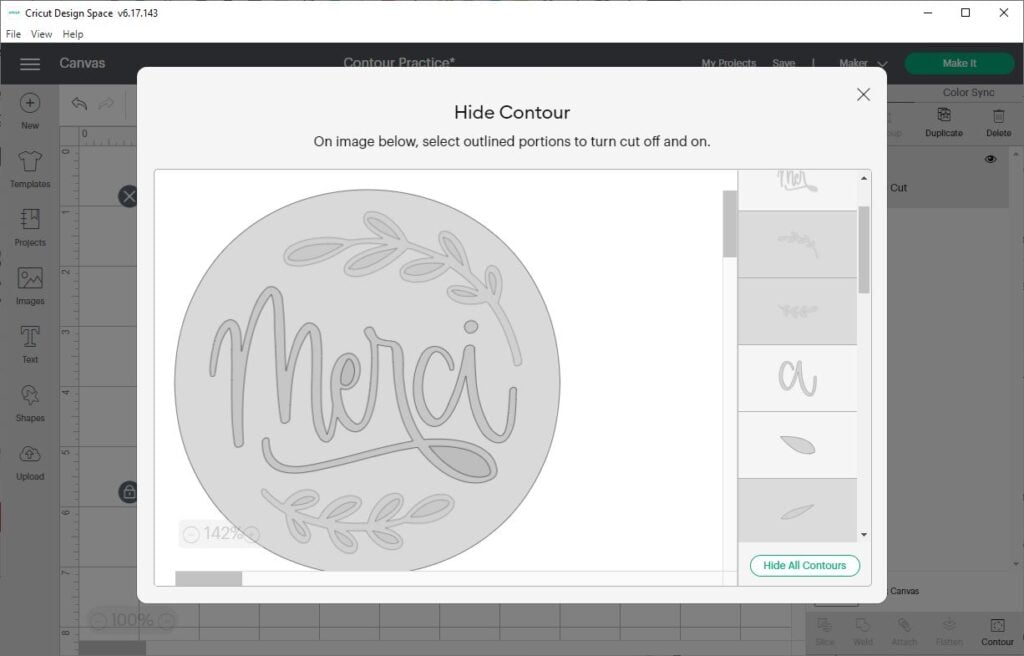
Let’s say that you just wanted to “flip off” the floral designs nonetheless depart the phrase “Merci”. To try this, select the layer, and click on on Contour. This will likely open up the Disguise Contour window. Using each the preview image on the left or the panel on the perfect, click on on on all of the decrease traces you want to disguise. On this image, you’ll wish to cowl the botanical motif shapes, along with all of the little dots that make up the interiors of the leaves.
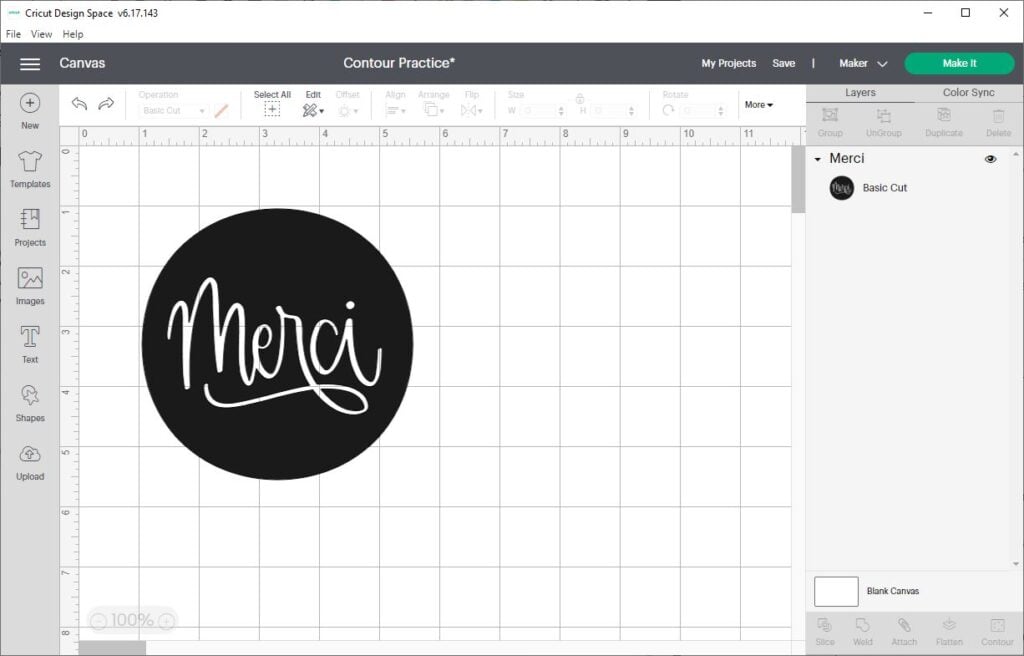
When you click on on once more to the Canvas show display screen, you see that the botanical motifs are hidden, and in addition you’re left with the circle and the phrase “merci”.
Use Contour to indicate a single-color image proper right into a multi-color image.
On this occasion, I’ll current you strategies to make use of the Duplicate and Contour devices to make completely totally different components of the an identical image in a number of colors.

Start by together with an image to the Design Space Canvas. On this occasion, I’m using the phrase “Quilters Gonna Quilt”. Let’s say we would have liked to make each phrase a novel shade.
Click on on on the layer, and duplicate it twice. You may now have three copies of the image – one for each shade. Select all three layers and use the Align instrument to coronary heart them horizontally and vertically. Now, all three copies may be stacked on excessive of each other.
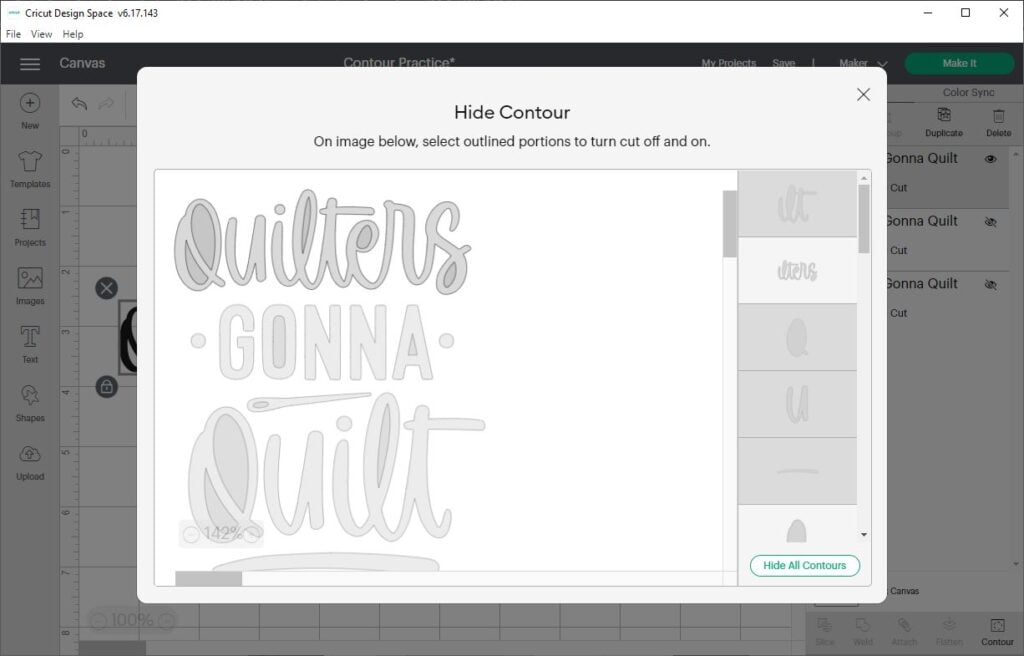
Subsequent, select one layer, and click on on Contour. Inside the Disguise Contour window, click on on to cowl all of the decrease traces, other than the decrease traces inside the phrase “Quilters”. (For superior images like this one, I uncover the best approach to pick the part of the design I want is to click on on “Disguise All Contours” first, after which return and click on on on the decrease traces I must current.) Click on on once more to the first Canvas show display screen, and alter the color of this layer to light blue.
Then, select the second layer, and click on on Contour. Inside the Disguise Contour window, click on on to cowl all of the decrease traces, other than the decrease traces inside the phrase “Gonna”. Click on on once more to the first Canvas show display screen, and alter the color of this layer to medium blue.
Subsequent, select the third layer, and click on on Contour. Inside the Disguise Contour window, click on on to cowl all of the decrease traces, other than the decrease traces inside the phrase “Quilt”. Click on on once more to the first Canvas show display screen, and alter the color of this layer to darkish blue.

Now that you’ve a multi-color image, you probably can decrease it out of varied provides. Or, you probably can take a further step to Flatten these layers together with a background layer, and decrease this mission out as a Print Then Decrease mission. For about using the Flatten instrument to create printable images, click on on proper right here: The way in which to Use Flatten in Cricut Design Space
Troubleshooting Widespread Points
Listed below are some FAQs and customary factors it is doable you will run into when using the Contour instrument.
Why is the Contour button “grayed out” or not clickable?
There are only a few the reason why it is doable you will not be succesful to make use of the Contour button.
First, you probably can solely use Contour on superior shapes fabricated from two or additional decrease traces. So you want to use Contour on a major circle, nonetheless you want to use Contour on a doughnut.
Second, you probably can solely use Contour on one layer at a time. So if you happen to occur to don’t have any seen layers chosen – otherwise you’ve a few seen layer chosen – the Contour button obtained’t be clickable. To restore it, guarantee you’ve gotten only one seen layer chosen.
Third, the Contour button solely works on Decrease or Draw layers. So that you probably can’t use the Contour button on Print Then Decrease layers or JPGs that you just’ve uploaded as Print Then Decrease images.
Fourth, the Contour button would not work on editable textual content material layers. For those who want to use Contour on textual content material, it is worthwhile to Weld it first.
The place is the Contour button?
Inside the Desktop mannequin of Cricut Design Space, you’ll uncover the Contour instrument on the bottom of the Layers Panel on the right-hand side of the Canvas show display screen in Cricut Design Space.
Inside the mobile app, you’ll uncover the Contour instrument inside the Actions sub-menu inside the toolbar on the bottom of the show display screen, the ultimate button on the perfect.
Why is the Contour instrument so gradual, or clicking the flawed spot?
Usually the Contour instrument seems gradual, significantly if you happen to occur to’re engaged on an enormous image with quite a few aspect. Top-of-the-line issue to do is go gradual and wait a bit bit between clicks to let Design Space catch up.
Ought to you possibly can’t seem to click on on the correct type inside the Disguise Contour preview window, attempt using the Zoom instrument to zoom in in your design. Then, if the Contour instrument nonetheless isn’t deciding on the perfect type, use the itemizing of explicit particular person decrease traces inside the right-hand menu.
Research Further About Cricut Design Space
Isn’t Contour a terrific instrument? I hope this tutorial helped you understand strategies to make use of the Contour carry out in Cricut Design Space.
Now that you just’re a grasp of the Contour attribute, listed below are just some additional Design Space tutorials in an effort to attempt:
Have questions? Be a part of the Fb Group!
We hope this textual content was useful for you! In case you’ve gotten any additional questions, be at liberty to hitch my Fb Group. We created this group in an effort to share images, ask questions, and help each other out.

I hope this textual content was useful for you! In case you’ve gotten any additional questions, be at liberty to hitch my Fb Group for Cricut Crafts.
Be a part of the group to share images, ask questions, and help each other out.
What’s Subsequent?
Pin this submit: Save this tutorial to your Pinterest boards to have the ability to come once more to it later.
Depart a comment: We like to hearken to your solutions. Inform me inside the suggestions beneath!
Share on Instagram or Fb: When you make this mission, share it on social media and tag me @sarahmaker_. We wish to see what you make!
Instructions
- Open Design Space and add an image to the Canvas. If the image has Grouped layers, you want to Ungroup them sooner than using the Contour instrument.
- Select one layer to utilize with the Contour instrument. Click on on the Contour button inside the Layers panel. This will likely open the Disguise Contour window.
- Inside the Disguise Contour window, click on on on the contour traces (aka components of the image) that you just must Disguise. Any contour traces that you just disguise will not be confirmed on the Canvas show display screen, nor decrease everytime you ship the design to the mat.