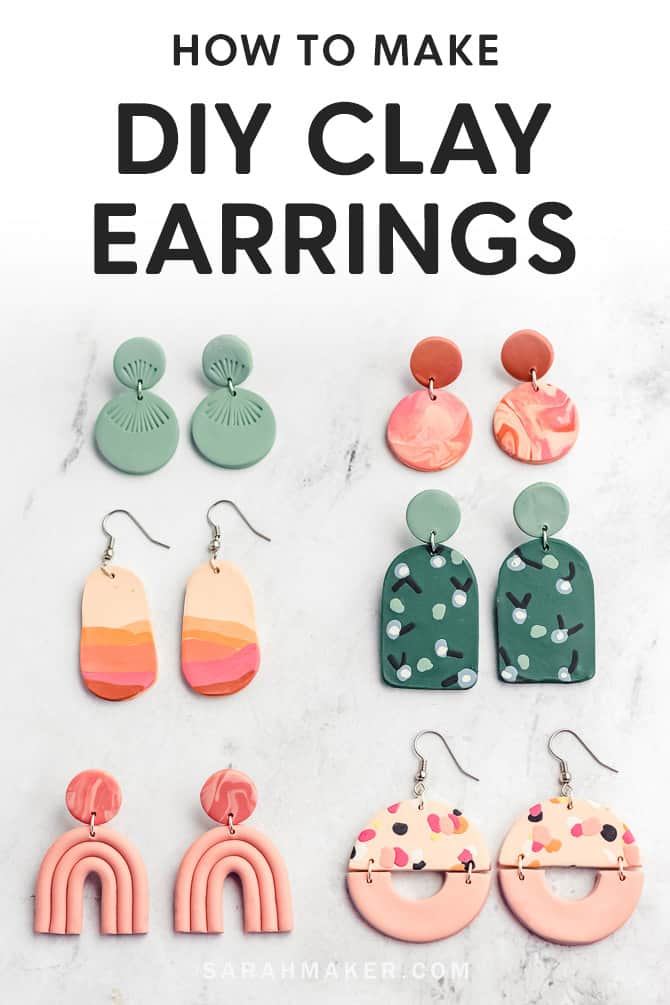
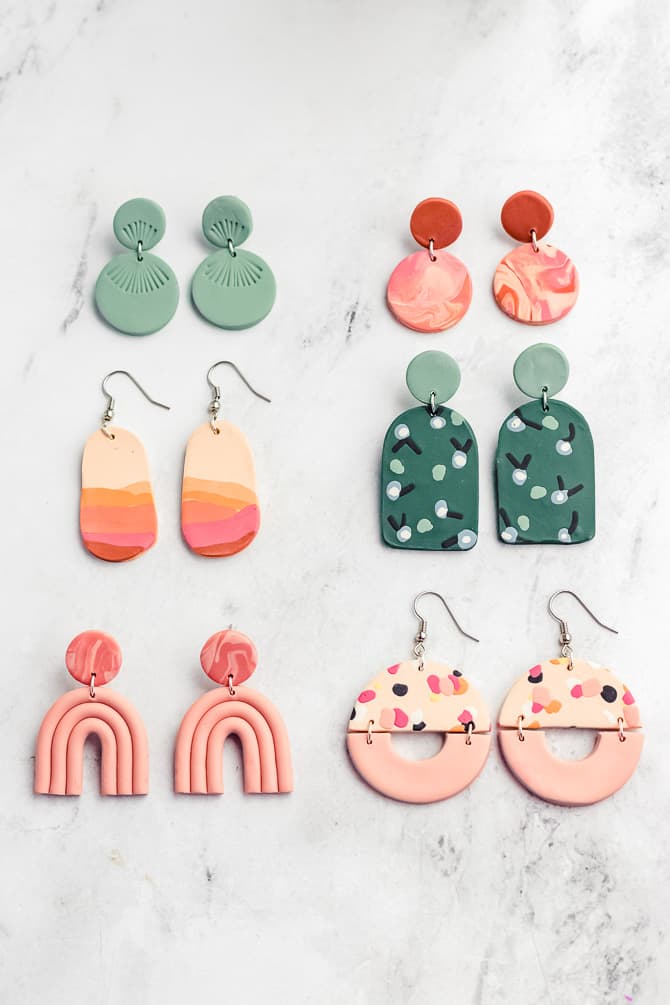
Polymer clay earrings are gratifying, simple, and fast to make. Make your self a pair of these well-liked and stylish designs. Create personalized colors and designs like stylish marble, floral and botanical patterns, abstract landscapes, and arch shapes.

What’s Polymer Clay?
Polymer clay is a form of modeling clay constituted of vinyl. It’s good for crafting on account of it stays mushy until it’s baked in an on a regular basis residence oven. It would not dry out, so that you presumably can retailer additional clay to reuse it one different day.
You presumably can combine it to create personalized colors, sculpt it, or impress it with numerous textures. After baking, you presumably can sand it, polish it, or paint it.
It’s a extremely versatile medium. You presumably can sculpt it into miniatures, make ring dishes, roll it into beads, and naturally, make earrings and jewelry.
Choosing the Correct Mannequin
You’ll want to choose a high-quality mannequin of polymer clay that is acceptable for jewelry making. The clay have to be mushy enough to work collectively together with your arms, nevertheless company enough to hold the small print of your earring designs.
Plus, you’ll want to use a sturdy and versatile clay that gained’t break with on daily basis placed on.
Listed under are among the many producers of polymer clay I prefer to advocate for jewelry-making:
- Premo Sculpey. It’s a extremely regarded mannequin to utilize for polymer clay jewelry. It has a pleasing company texture that holds particulars properly. It’s sturdy and versatile, so it actually works properly for earrings. The colors are vibrant and easy to mix.
- Sculpey Soufflé. This lightweight polymer clay is mushy and is simple to work collectively together with your arms. When baked, it has a pleasing mushy, matte finish that hides fingerprints properly. It’s out there in a pleasing range of colors, too.
- Producers to avoid. It is doable you will uncover Sculpey III or Sculpey Bake Retailer clay on the retailer. You might also see low-cost 50-packs of unbranded clay on-line. I don’t recommend them for this mission. I uncover these clays too mushy to work with, and the baked objects break too merely.
For a breakdown of top-of-the-line and worst producers of polymer clay for earrings and jewelry making, check out this submit: Most interesting Polymer Clay for Earrings and Jewelry
Prepping Your Workspace
Polymer clay is usually very safe, nevertheless it could nicely stain or hurt some surfaces. So, it’s biggest to protect your desk by engaged on excessive of a sheet of parchment or wax paper, a metal baking sheet, or a piece of glass.
In case you occur to don’t have any of those, you’ll even tape down a piece of printer paper, and work on excessive of that.
Sooner than you start, wipe down your desk and devices so that you just don’t get any mud or lint in your clay.
Acquire Your Offers
You don’t need quite a bit to get started making polymer clay earrings. I’ve listed the important provides and devices underneath.
In case you occur to don’t have the actual devices I’ve listed underneath, don’t worry. You presumably can merely substitute comparable devices you’ll uncover in your kitchen or toolbox.
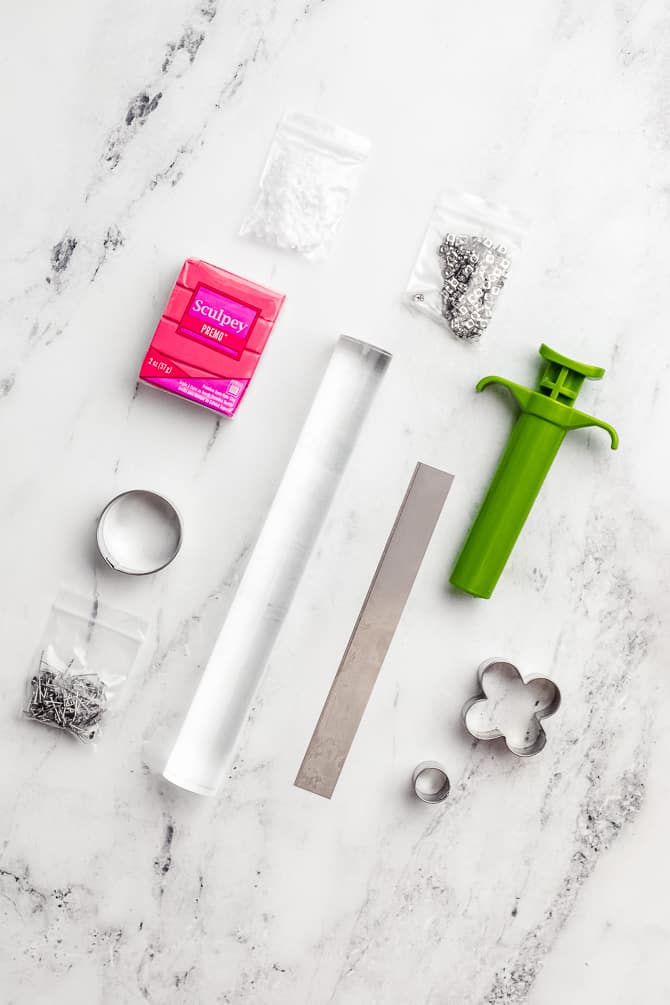
Provides
- polymer clay in quite a few colors
- earring backs (each posts, hooks, or hoops)
- bounce rings
- versatile superglue harking back to Loctite Gel or Gorilla Glue Gel Superglue
- parchment paper or foil
Devices
- acrylic rolling pin (Don’t use the equivalent picket rolling pin that you just simply use with meals.)
- X-Acto, craft knife, or clay slicer
- clay cutters or cookie cutters
- toothpick or an enormous needle
- flat baking sheet
- jewelry pliers
In case you occur to don’t have these explicit devices, you presumably can substitute a straight ingesting glass for the rolling pin and a straightened paper clip for the needle machine.
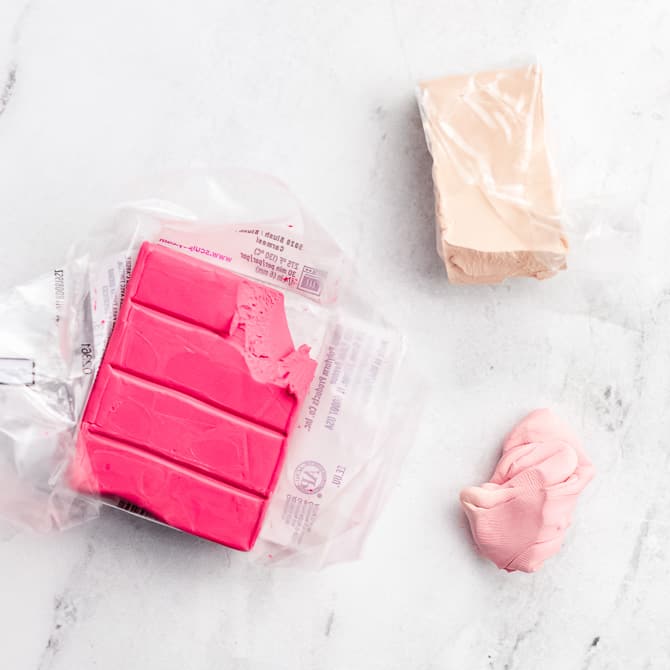
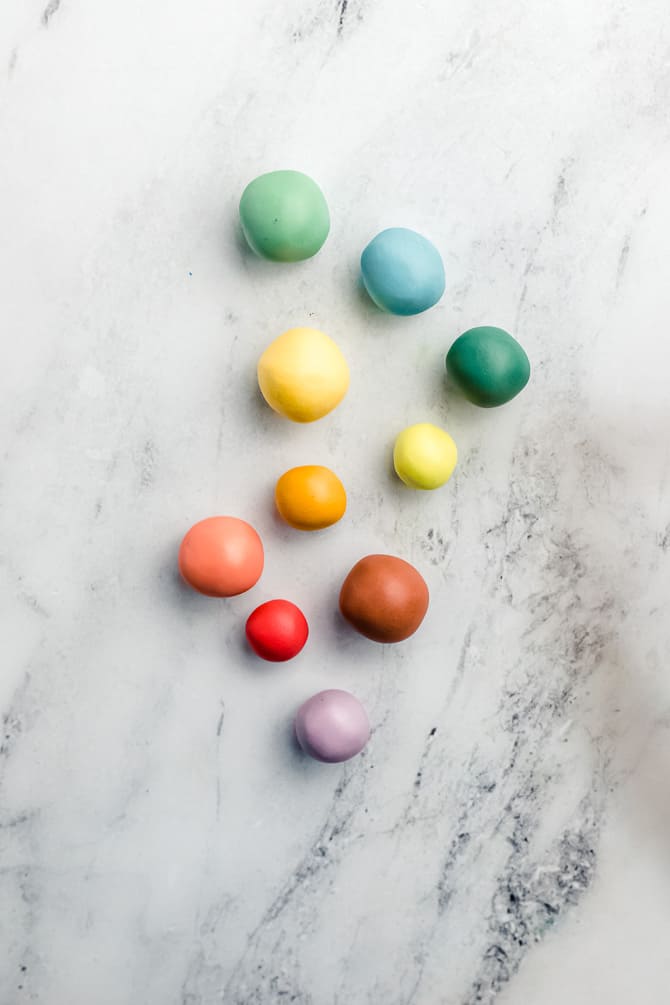
Softening Clay and Mixing Colors
Sooner than you start making earrings, you’ll should scenario the polymer clay.
What’s conditioning? It’s the strategy of kneading the clay to make it softer, further versatile, and less complicated to type.
You presumably can scenario the clay by rolling and kneading it in your arms. Or, you presumably can run it by the use of a pasta machine just a few dozen events. You’ll know the clay is well-conditioned while you presumably can merely roll out an prolonged coil and bend it with out cracks or robust edges.
Wash your arms (wipe them with little one wipes) in between colors to avoid shade mixing.
Take care to not lure air bubbles in your clay if you find yourself kneading and folding it. In case you occur to do happen to make air bubbles, merely pop them with a needle or craft knife.
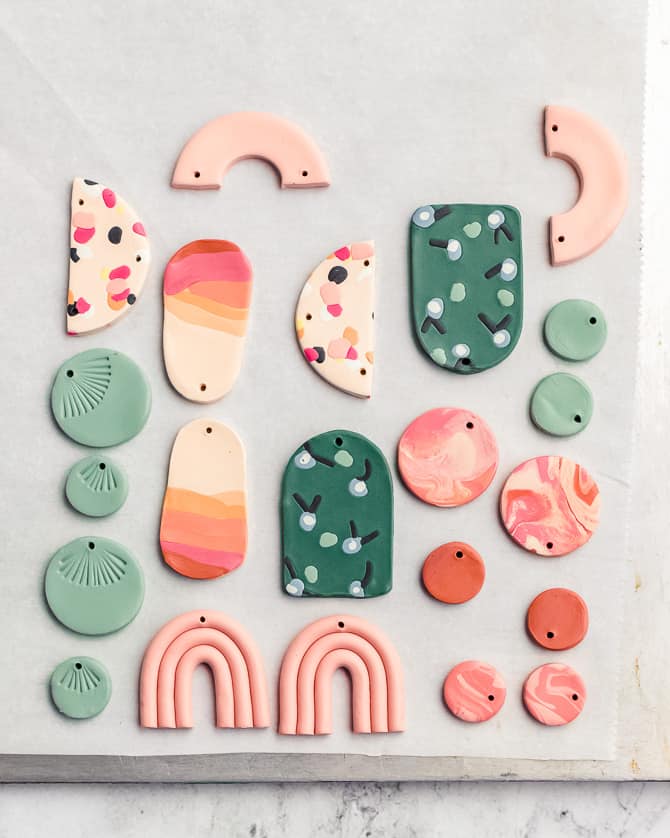
Polymer Clay Earring Ideas
Listed under are some strategies and ideas for making shade designs in your polymer clay slabs.


Rainbow Arch Shaped Earrings
First, using your fingertips and delicate pressure, roll 3 skinny ropes of clay. Try and make them as while doable. Or, use a clay extruder to get utterly even coils.
Then, use your fingertips to bend the first coil proper right into a slender arch type. Then, bend the middle arch. Then, add the outer arch.
Using very gentle pressure, press the coils collectively, and guarantee they’re linked to at least one one other. Don’t push too arduous otherwise you would flatten the coils.
Repeat this course of for the second rainbow. Then, line up every of the rainbows and trim the bottoms even with one another.


Floral Patterned Slab Earrings
For this design, you’ll create a pattern on a flat slab of background clay. You presumably can create an abstract design, a floral or botanical design, or a geometrical pattern.
Knead an enormous ball of clay for the background shade. Using an acrylic rolling pin, roll the clay out flat.
How thick must polymer clay earrings be? I want to roll out to a thickness of 1/8″, or solely a bit thicker.
Then, using cutters or a craft knife, reduce small objects out of various colors of clay. Put together them on the background slab to make a design. Gently pat the objects collectively together with your fingertips to attach them to the slab. Then, use a rolling pin to flatten all the slab.
After the slab is full, use cutters or a craft knife to cut out your earring shapes.


Terrazzo Pattern Earrings
This method is much like the floral patterned slab, moreover even less complicated.
First, scenario an enormous ball of clay for the background shade. Using an acrylic rolling pin, roll the clay out flat to a thickness of 1/8″, or just bit thicker.
Then, using a craft knife, reduce small objects out of various colors of clay. Put together them randomly on the background slab to make a terrazzo design. Gently pat the objects collectively together with your fingertips to attach them to the slab. Then, use a rolling pin to flatten all the slab.
After the slab is full, use cutters or a craft knife to cut out your earring shapes.
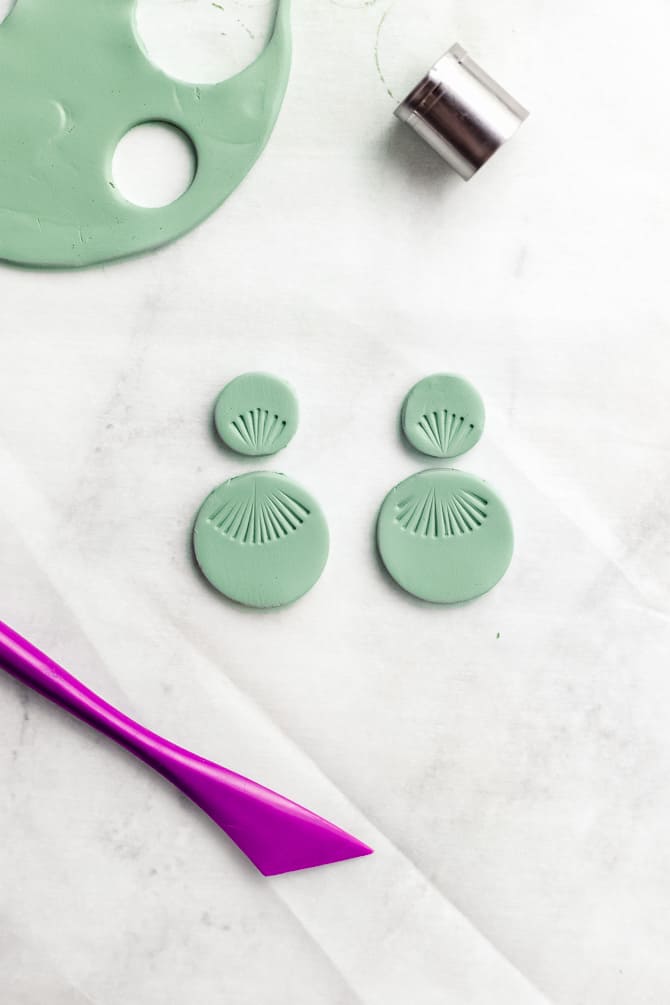
Easy Textured Earrings
Proper right here’s a simple monochrome design, with a contact of texture.
Roll our a slab of polymer clay. Cut back out your earring objects with a cutter or craft knife.
Then, using a texture machine, frivolously press radiating traces into the ground of the clay. Don’t press too deep, in any other case you might create weak spots that may crack as quickly because the clay is baked.


Abstract Panorama Earrings
Proper right here’s a cool abstract design that resembles a panorama scene or a sunset. It’s possible you’ll make these earrings with solely a small amount of quite a few completely completely different colors.
First, scenario only a few small balls of clay in an expansion of coordinating colors. Type the balls into skinny coils. Put together the coils inside the order you want, and frivolously press them collectively.
Then, use a roller to flatten the coils proper right into a slab. Use clay cutters or a craft knife to cut earring shapes out of the slab.


Marbled Clay Earrings
That’s the correct design to make together with your complete scrap clay.
It’s possible you’ll make marbled polymer clay earrings by mixing numerous colors. Determine a combination with enough distinction so the marble pattern will current up. In case you occur to get caught deciding on a shade combo, you may additionally associate with one shade plus the standard white and black.
Scenario each shade and make coils. Twist the entire coils collectively. Preserve twisting and folding the clay until you see a pattern you need. Be careful to not overmix!
Roll the ball flat proper right into a slab to reveal the marble pattern. Cut back shapes collectively together with your cutters or knife.
Shaping and Slicing
After you’ve created the design in clay, use explicit clay cutters, mini cookie cutters, or a craft knife to cut out your earring shapes.
Usually, plastic cutters go away jagged edges throughout the bottom fringe of the shape. You try to wash this edge sooner than baking the clay, otherwise you presumably can sand it off after baking.
In case you occur to don’t want to purchase cutters, you presumably can trace spherical type templates with a sharp craft knife. In my experience, a craft knife leavers a neater, cleaner edge.
I’ve created a sheet of well-liked earring shapes that you just’re free to acquire.
Don’t overlook: You’ll moreover should poke small holes inside the clay shapes to attach your metal jewelry components after baking. I prefer to make use of a blunt tapestry needle for this step. Nevertheless you presumably can merely as merely use a sharp toothpick or a paperclip.
Consider to make the opening large enough in diameter to insert your bounce rings and completely different jewelry components inside the subsequent step. You’ll want to maintain the holes close to the sting of the piece, too.
Baking Polymer Clay
You presumably can bake polymer clay in your widespread residence oven. It is also doable to make use of a toaster oven if it holds a relentless temperature (with no scorching spots!) Under no circumstances try and bake polymer clay in a microwave.
Sooner than you bake:
It’s quite a bit less complicated to clean up little errors whereas the clay stays to be moist. Double-check your objects for bits of lint and fuzz.
To wash the clay sooner than baking, you must use a cotton swab dipped in rubbing alcohol to brush away bits of mud and leftover fingerprints.
Preheat your oven.
Following the instructions on the bundle, preheat the oven to the indicated temperature. Use an oven thermometer to verify your oven’s accuracy. It’s common for residence ovens to run scorching or chilly. Regulate the temperature as wished to compensate.
What temperature?
Look at the once more of the bundle for instructions. Producers like Souffle and Premo bake at 275°.
How prolonged?
As quickly because the oven is accomplished preheating, put your tray of earring objects into the oven. Cowl with a tent of aluminum foil to protect them in the direction of browning or discoloration.
Bake for half-hour for each ¼” of thickness. For a lot of earring components, half-hour will possible be enough time. You may wish to set a timer so that you just don’t overlook about them!
For further data and far more component, ensure you be taught this complete tutorial for the best method to bake polymer clay for good outcomes.
Sanding and Smoothing
If the sides of the earrings are a bit sharp after baking, you must use fine-grit sandpaper to wash them. If you must sand quite a few earrings, you must use a Dremel machine to rush up the strategy.
If you must clear the ground of the polymer clay after baking, you must use a cotton swab dipped in acetone nail polish remover to brush away stray fingerprints.
Do you must seal the clay with a clear coat?
Polymer clay is a sturdy plastic supplies, and you do not wish to seal it to protect it.
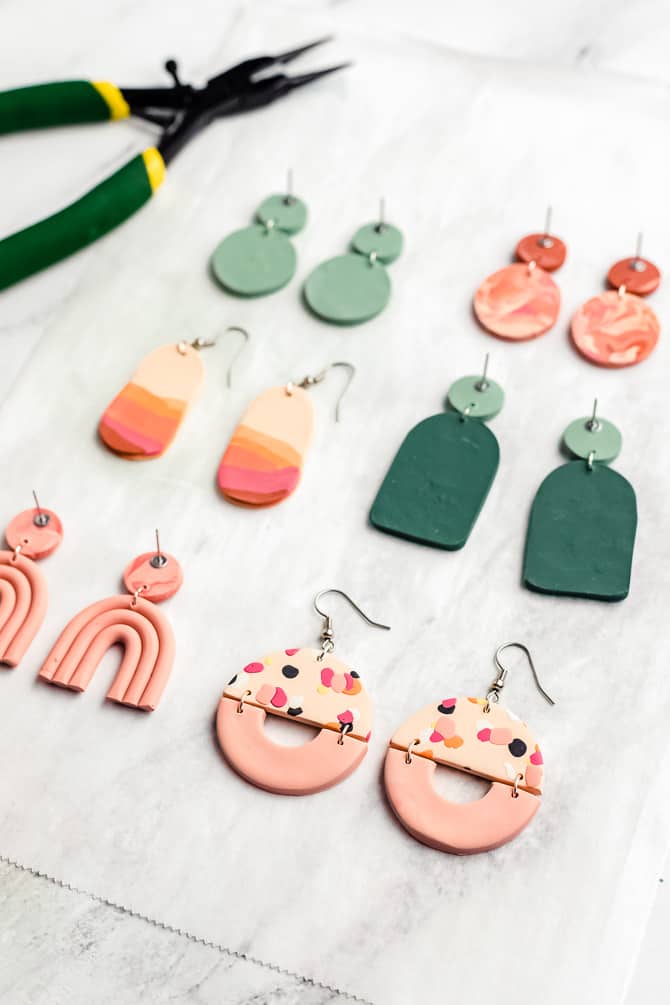
Together with Soar Rings and Earring Backs
The final word step is in order so as to add the metal jewelry components to indicate your clay shapes into earrings.
Studs: To make stud earrings, all you need are posts and backs. Use a dab of versatile gel superglue to attach the undergo the once more of the clay type. Or, bury the pad of the earring submit into the clay itself, and bake them collectively inside the oven. (Uncover further data on glue inside the subsequent half.)
Dangling: It’s possible you’ll make dangling earrings with an ear hook and a bounce ring.
Tiered Earrings: You presumably can join clay shapes to at least one one other with metal bounce rings. To open a bounce ring, grasp it on all sides of the lower up with pliers. Twist it facet to facet, don’t pull it apart. Then, insert your clay objects, and twist the ring shut as soon as extra.
Numerous Approach for Attaching Earring Backs
The strongest approach to attach polymer clay to metal is to create a mechanical attachment between the two objects. What do I suggest by that? You’ll want to encase the pad of the earring submit into the raw clay itself.
To do this, place the earring submit on the once more o the polymer clay piece. Then, add a thin layer of clay on excessive of the submit. Then, bake the clay piece and metal earring once more collectively inside the oven. As quickly because the clay is cured, it ought to harden, and the metal once more will probably be unable to pull out of the clay.
Troubleshooting and FAQ
Listed under are some widespread factors and questions you should have about working with polymer clay.
What’s top-of-the-line glue for polymer clay?
That’s such a typical question, and the reply is: it depends upon. Completely completely different glues are good for numerous sorts of attachments. As an illustration, Sculpey Oven Bake Clay Adhesive or completely different liquid polymer clay is the strongest “glue” for bonding polymer clay to polymer clay. Versatile gel superglues can work properly for attaching clay to metal.
That acknowledged, top-of-the-line and strongest approach to attach polymer clay to metal jewelry findings is to create a mechanical attachment. Lay the earring submit pad or pendant bail onto the once more of the clay piece, and use a small slice of matching polymer clay to embody or bury the metal. As quickly because the clay is cured and hardened, it ought to bodily preserve the submit or bail in place.
My earrings look burned.
In case your clay seems discolored or burnt, the temperature of your oven is perhaps too extreme. It is also doable to try masking your clay objects with a foil tent whereas baking to protect them from browning.
There are fingerprints and fuzz on my clay.
Polymer clay seems to behave like a magnet, selecting up mud, lint, and fingerprints.
To unravel this downside, first, simply ensure you’re not using low-cost producers of unbranded clay (like the type you’ll uncover on-line in 50-packs). These mushy clays entice mud like no completely different.
Secondly, make it doable in your arms and your workspace are large clear sooner than you start working. Wipe down your devices and your desk with a baby wipe. It’s good to clean your arms between colors, too.
And third, double-check your earring objects for mud and fingernail marks sooner than baking. It’s quite a bit less complicated to restore errors sooner than baking whereas your clay stays to be mushy and malleable.
My earrings are brittle and maintain breaking.
In case your polymer clay earrings break merely, there is perhaps just a few points occurring.
First, simply ensure you aren’t using a brittle mannequin of clay, harking back to Sculpey III or Bakeshop.
If that’s not the problem, then it’s seemingly a case of underbaking. Underbaked polymer clay is brittle and liable to snap or chip with heavy use. Completely baked polymer clay will possible be stronger and further sturdy.
Additional Polymer Clay Ideas
For far more polymer clay ideas, ensure you be taught this file of 21 Polymer Clay Ideas and Duties.
Then, check out these related posts:
What’s Subsequent?
Pin this submit: Save this tutorial to your Pinterest boards as a method to come once more to it later.
Depart a comment: We like to take heed to your recommendations. Inform me inside the suggestions underneath!
Share on Instagram or Fb: Whilst you make this mission, share it on social media and tag me @sarahmaker_. We prefer to see what you make!
Provides
- polymer clay in quite a few colors
- earring backs (each posts, hooks, or hoops)
- bounce rings
- versatile superglue harking back to Loctite Gel or Gorilla Glue Gel Superglue
- parchment paper or foil
Devices
- acrylic rolling pin (Don’t use the equivalent picket rolling pin that you just simply use with meals.)
- X-Acto, craft knife, or clay slicer
- clay cutters or cookie cutters
- toothpick or an enormous needle
- flat baking sheet
- jewelry pliers
Instructions
- Scenario the clay by rolling and kneading it in your arms. Take care to not lure air bubbles in your clay.
- For slab designs, roll the clay out to a thickness of 1/8″, or solely a bit thicker. Create a design or pattern in your slab with smaller objects of clay. Roll flat.
- Use cutters or a craft knife to cut out your earring shapes. Use a needle or toothpick to makes holes for bounce rings.
- Place on a parchment-lined baking sheet, and bake consistent with bundle directions.
- Add jewelry components with versatile gel superglue.
Notes
You may wish to be taught the FAQ sections for loads of troubleshooting recommendations.