")
Study to make your very private DIY hair scrunchie with this straightforward step-by-step tutorial. I’ll current you the best way to stitch a seamless, professional-looking scrunchie with a sewing machine or by hand. Plus, I’ll give you three easy selections in order so as to add bows or tails to your custom-made scrunchies.
")
DIY Hair Scrunchies
Scrunchies are everybody’s favorite 90’s hair gear. They normally’re coming once more in an unlimited method! Keep learning to study to make scrunchies your self.
Whenever you’re up for a bit stitching enterprise, it’s easy to make your very private custom-made scrunchies at home! Personalized hair scrunchies are a superb handmade current thought for household and buddies.
Scrunchies are a superb enterprise for beginning sewists or anyone in search of to watch their stitching experience. With this straightforward pattern, you could make a seamless, professional-looking scrunchie in practically no time the least bit.
A Good Problem for Inexperienced individuals
Making a hair scrunchie is a quick and easy stitching enterprise that’s wonderful for beginning sewists.
Scrunchies are low cost to make, too! One scrunchie takes merely quarter-hour and $1 value of fabric and provides.
You too can make scrunchies with or and never utilizing a sewing machine. I need to sew this pattern on a sewing machine because of it makes the tactic a bit sooner. Nevertheless, you’ll utterly sew this scrunchie pattern by hand.
Make a Expert Attempting Scrunchie
On this tutorial, I’ll prepare you the best way to stitch a primary scrunchie. I’ll moreover current you the best way so as to add 3 completely totally different bow variations to your scrunchies.
This pattern doesn’t take shortcuts – so I can’t promise that it’s the quickest one available on the market on the internet. Nevertheless I can promise it would give you a scrunchie with a professional-level finish and no seen seams!
Almost all steps might be achieved with a sewing machine — there could also be solely the tiniest little little bit of hand stitching required. That acknowledged, when you occur to don’t have a sewing machine, you’ll merely hand-sew all the steps. (I’ll current you the best way to change this pattern proper right into a no-sew enterprise, too.)
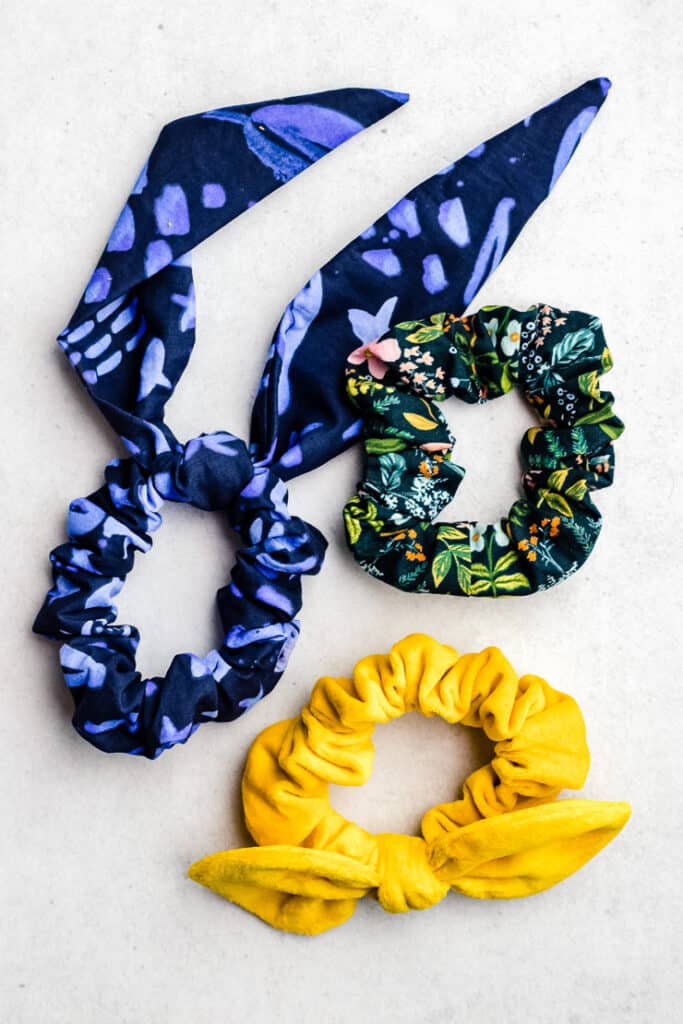
Scrunchies with Knots, Bows, or Tails
Whenever you’d like in order so as to add a bow to your scrunchie, listed beneath are 3 commonplace bow varieties you could make:
- Scrunchie with a Knot Bow
- Scrunchie with a Fundamental Bow
- Scarf Scrunchie with Tails
You can discover the patterns for these scrunchie bows after the pattern for the scrunchie itself.
Most interesting Material for Scrunchies
Hair scrunchies might be made in all types of supplies to match your sort and your wardrobe. Each form of material will give the finished scrunchie a barely completely totally different look.
You need to use practically any form of material you need, from quilting cotton to crushed velvet. Listed below are some points to consider:
- Lightweight supplies like quilting cotton, chambray, jersey, and rayon will acquire merely and may give your scrunchie a full, ruffled look.
- Heavier supplies like velvet look expensive and sophisticated. Nevertheless they might be a bit harder to sew because of the pile makes them slip spherical beneath the stitching machine’s presser foot.
- Simple and shiny supplies like silk, satin, or polyester blends might be pretty slippery. So they could not preserve your ponytail as tightly as totally different supplies.
Whenever you’re a beginner, I wish to suggest starting with cotton, as a result of it’s considered one of many less complicated provides to sew.
You don’t need quite a few materials to get started, each. Scrunchies are a superb enterprise for using small gadgets of fabric out of your stash. For instance, you’ll get about 5 scrunchies from 1 fat quarter-size piece of fabric.

Provides Itemizing
- Safety Pins
- 3/8″ in depth elastic, 8″ prolonged
- Material, 3.5″ by 22″
- Matching thread
- Stitching machine
- Stitching needle
- Turning software program, elective
Chopping Instructions
Listed below are the instructions for chopping out your materials and elastic. Plus, I’ve given you some suggestion on customizing the size of your scrunchie to fit your sort.
Material
Scale back a rectangle of fabric measuring 3.5″ by 22″.
When you want additional ruffles, you’ll enhance the dimensions to 24″.
When you want a thinner scrunchie, you’ll decrease the height of the fabric rectangle to 3″.
When you want a wider scrunchie, you’ll enhance the height of the fabric rectangle to 4.5″
Elastic
I wish to make use of 3/8″ in depth elastic because of it’s skinny like a regular ponytail holder, nonetheless has ample energy to hold my thick hair. It’s possible you’ll merely substitute 1/4″ and even 1/2″ elastic.
Scale back a measurement of elastic measuring 8″. Or, reduce 9″ in case you will have thick hair, in any other case you’re using thick materials like velvet.
After you’ve made a couple of scrunchies, you could want to modify the dimensions of the elastic longer or shorter to get a higher match.
To placed on the scrunchie as a bracelet: You would possibly want to modify the dimensions of the elastic to swimsuit comfortably spherical your wrist. Use a measuring tape to measure your wrist, and add 1/2″ to the consequence.
Discover ways to Sew a Scrunchie
Listed below are the important steps to make a scrunchie:
- Scale back the fabric and elastic to measurement.
- Fold the fabric in half lengthwise and sew the prolonged edge.
- Flip the tube correct facet out, halfway, and sew the temporary ends.
- Flip the scrunchie correct facet out.
- Insert elastic and stitch the ends collectively.
- Sew the small opening closed.
Let’s endure the steps in extra aspect with images.

Step 1. Scale back the fabric and elastic.
Scale back the fabric proper right into a 3.5″ by 22″ rectangle. Scale back an 8″ measurement of elastic.
Step 2. Fold and sew the prolonged edges.
Fold the fabric in half lengthwise with the right sides collectively. Use pins to secure the layers.
You may start your seam from 1 1/2 inches down from the best edge and end your seam 1 1/2 inches up from the underside edge. I wish to make use of pins as a visual reminder of the place to start out out and stop my seam.
With a scant 3/8 seam allowance, sew a straight line alongside the prolonged edge.
Tip: Don’t overlook to backstitch to start with and end of your seam to secure the stitches in place. These temporary backstitches protect the seam from coming undone everytime you flip the scrunchie correct facet out.
When you’ve accomplished, take away the pins.
Step 3. Match and sew the temporary ends.
Flip the tube correct facet out – nonetheless solely halfway! To do this, pin a safety pin by the use of considered one of many materials layers at one end of the tube. Put the safety pin into the opening of the tube, pushing it by the use of to the choice end.
Have persistence, proper right here. It may take a bit work to get the fabric to point out right-side out.
If in case you will have a tube-turner, that’s the time to utilize it!
Whenever you’ve gotten the temporary end to meet each other, match up the edges with the right sides collectively. Use pins to secure the layers. Sew with a 3/8″ seam allowance.

Step 4. Flip correct facet out.
You’ll nonetheless have a small opening inside the tube, correct subsequent to the temporary seam you’ve merely achieved. Attain into this opening and swap the tube of fabric correct facet out. It ought to come back by the use of pretty merely.
After this step, you’ll have an enormous tube of fabric, correct facet out, that seems like a stretched-out scrunchie.

Step 5. Insert the elastic and stitch the ends collectively.
The next step is to feed the strip of elastic by the use of the middle of the tube.
I wish to make use of a safety pin to pin one end elastic to the floor of the tube. This helps me not lose the elastic contained within the tube whereas I work.
Then, pin the second safety pin to the other end of the elastic. Use the safety pin to feed the strip of elastic by the use of the tube. When you’ve accomplished, it is advisable to have every ends accessible by the use of the opening on the facet of the tube.
Sooner than you sew the ends collectively, double-check that the elastic hasn’t twisted contained within the tube. Then, overlap the ends of the elastic by about 1/2″. Sew the ends of the elastic collectively. (I wish to make use of a zig-zag sew for this step.) It doesn’t have to be pretty, it merely should be strong and secure.

Step 6. Sew the remaining opening.
Now that the elastic is contained within the tube, it’s time to sew the remaining opening closed. For a really seamless finish, you’ll sew this opening by hand. Using a blind sew, or an invisible ladder sew, sew the remaining opening closed.
Whenever you don’t want to sew the opening by hand, you’ll sew the opening closed using a sewing machine. To do this, fold the opening closed, and secure it with pins. Using a straight sew, sew very close to the sting of the fabric. There is usually a small seam, nonetheless I don’t assume you’ll uncover it lots while you’re carrying the scrunchie.
Alternatively, you probably may even glue the opening closed with a bit dab of quick-drying materials glue! Don’t let the priority of hand stitching protect you from making these scrunchies!
Keep learning for the three bow variations and patterns!

Discover ways to Sew a Scrunchie by Hand
You too can make this scrunchie and never utilizing a sewing machine by substituting hand stitching with a needle and thread in each step that requires machine stitching.
Choose an all-purpose stitching thread in a color that matches your materials. Use a hand-sewing needle to sew alongside the seams with a small working sew.
Discover ways to Make a No-Sew Scrunchie
You possibly can even make a scrunchie with out stitching by substituting glue for the stitching. I wish to suggest using a sturdy, fast-drying materials glue. Nevertheless, a scorching glue gun would do in a pinch.
When you want to make a DIY scrunchie with out stitching, you need to use the no-sew directions below:
- Observe the chopping instructions for the fabric. Scale back a 9″ piece of elastic (instead of the standard 8″)
- In step 2, use materials glue to seam the prolonged edges.
- In step 3, use glue to seam the temporary edges collectively.
- In step 5, tie the two ends of the elastic collectively in a knot.
- In step 6, use glue to close the remaining opening.
3 Bow Decisions for Scrunchies
When you want to add a bit extra aptitude to your hair scrunchies, listed beneath are three bows you’ll add.
First, make the underside scrunchie as described inside the pattern above. After which, add the bow gadgets in accordance with the patterns that observe.

Discover ways to Make a Knot Bow Scrunchie
This is a quick and easy bow to tie on a accomplished scrunchie. This pattern will give you a “knot bow” that strikes a chord in my memory of bunny ears.
First, get hold of and print the PDF template for the knot bow piece. Then, observe the stitching instructions below:
Step 1: Scale back 2 gadgets from the bow pattern. Place the gadgets’ correct sides collectively, and pin them in place.
Discover: In case you might be using a velvet materials like I am, you could want to use additional pins than common to forestall the fabric from shifting beneath your presser foot.
Step 2. Using a 3/8″ seam allowance, sew alongside the edges of the bow gadgets. Depart a 2″ gap on one facet so you’ll flip the gadgets correct facet out afterward. Deliberate to backstitch to secure your stitching.
Step 3: Using scissors, clip the curves. (This creates a straightforward periphery everytime you flip the fabric correct facet out.) Flip the bow correct facet out by the use of the remaining gap. Press if desired.
Step 4: Using hand stitching, machine stitching, or materials glue, shut the remaining gap.
Then, if you’ve accomplished making the bow piece, tie it onto the scrunchie. And, when you’re apprehensive regarding the knot untying, you’ll secure it with only a few hand stitches or a dab of fabric glue.

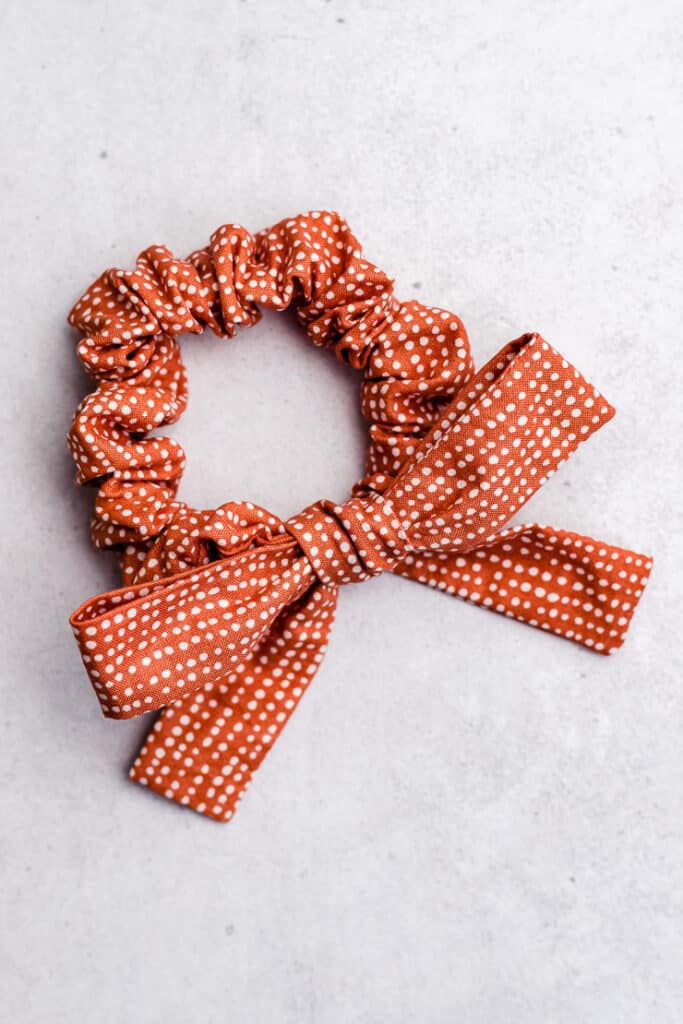
Discover ways to Make a Scarf Bow Scrunchie
Subsequent, now we now have a sophisticated scarf bow that provides your scrunchie the look of handkerchief or scarf “tails”. It’s quite simple to make, too.
This pattern makes a scarf with two tails which may be roughly 8 inches prolonged. I uncover that this is usually a good dimension measurement for regularly placed on. That acknowledged, you’ll positively lengthen the pattern template, following the established curves, to get the dimensions you’re trying to find.
First, get hold of and print the PDF template for the headscarf bow piece. Then, observe the stitching instructions below:
Step 1: Scale back 1 piece from the headscarf pattern. Take care to rearrange the pattern piece on a twice-folded piece of fabric, as described inside the template PDF. (It is best to have 2 folds, and thus 4 layers of fabric. The unfolded piece looks as if a protracted, skinny oval.)
Step 2. Fold the pattern piece in half lengthwise with the right sides collectively. Pin in place.
Step 2. Using a 3/8″ seam allowance, sew alongside the sting of the headscarf piece. Depart a 2″ gap on one facet so you’ll flip the piece correct facet out after stitching. Deliberate to backstitch to secure your stitching.
Step 3: Clip the corners. Flip the headscarf correct facet out by the use of the remaining gap. Press if desired.
Step 4: Using hand stitching, machine stitching, or materials glue, shut the remaining gap.
Then, if you’ve made the headscarf piece, tie it onto the scrunchie. It’s possible you’ll secure the bow with only a few hand stitches or a dab of fabric glue to keep up it from untying.
Discover ways to Make a Fundamental Bow Scrunchie
Lastly, here is a pattern to create a scrunchie with a primary bow.
This pattern makes a bow with shorter tails. When you want a bow with prolonged tails, you’ll reduce an prolonged rectangle of fabric.
Step 1: Scale back a rectangle of fabric that measures 22″ prolonged by 3″ in depth. Fold the fabric piece in half lengthwise with the right sides collectively. Pin in place.
Step 2. Using a 3/8″ seam allowance, sew alongside one temporary edge and the prolonged fringe of the fabric piece. Depart one temporary edge open so you’ll flip the piece correct facet out after stitching. Deliberate to backstitch to secure your stitching.
Step 3: Clip the corners. Flip the fabric tube correct facet out by the use of the remaining open end. Press if desired.
Step 4: Tuck the raw edges contained within the tube, about 3/8″ down. Using hand stitching, machine stitching, or materials glue, shut the remaining gap.
Then, if you’ve made the bow piece, tie it onto the scrunchie. I extraordinarily advocate securing the bow with only a few hand stitches or a dab of fabric glue.
And there you go! Three bow variations in order so as to add to your handmade scrunchies!
Have questions? Be part of the Fb Group!
We hope this textual content was useful for you! If in case you will have any additional questions, be glad to hitch my Fb Group. We created this group so as to share images, ask questions, and help each other out.


What’s Subsequent?
Pin this put up: Save this tutorial to your Pinterest boards so to come back once more to it later.
Depart a comment: We like to hearken to your strategies. Inform me inside the suggestions below!
Share on Instagram or Fb: When you make this enterprise, share it on social media and tag me @sarahmaker_. We wish to see what you make!
Provides
- materials, reduce 3.5″ by 22″
- 3/8″ in depth elastic, reduce 8″ prolonged
Devices
- safety pins
- matching thread
- stitching machine
- stitching needle
- turning software program, elective
Instructions
- Scale back the fabric and elastic to measurement.
- Fold the fabric in half lengthwise with correct sides collectively. Pin in place. With a 3/8″ seam allowance, sew alongside the prolonged edge. Start the seam 1 1/2 inches from the best, and end the seam 1 1/2 inches from the underside
- Flip the tube correct facet out, halfway, and match the temporary ends with correct sides collectively. Pin in place. With a 3/8″ seam allowance, sew the temporary ends.
- Flip the scrunchie correct facet out.
- Use a safety pin to insert the elastic by the use of the fabric tube. Overlap the ends of the elastic by 1/2″, and stitch them collectively. and stitch the ends collectively.
- Hand sew the remaining opening closed. Alternatively, shut the opening with machine stitching or materials glue.
Notes
See the put up above for bow instructions and patterns.
Need these pattern recordsdata? Merely let me know the place to ship them using this kind, below.