
In a position to study to make use of Weld in Cricut Design Home? You’re in luck. This whole weblog put up will educate you each factor it’s advisable know regarding the Weld software program and use it to make creative designs in Cricut Design Home.
We’ll cowl weld photographs, use Weld to connect letters, and additional. Plus, I’ll make clear why the Weld button is probably “grayed out” or not working, and current you restore it.

Cricut Design Home is a sturdy design program with a variety of good devices for creating and customizing designs. Nonetheless, in case you occur to’re new to Cricut, learning all of the completely completely different Design Home devices can actually really feel overwhelming.
That’s why I’m excited to share this textual content with you – all about use the Weld software program in Cricut Design Home. I’ll stroll you through each factor it’s advisable know regarding the weld software program and use it. And, I’ll embody a great deal of screenshots, so that you acknowledge exactly what I’m talking about.
While you understand these devices, Cricut’s Design Home software program program could be SO loads less complicated and pleasant to utilize! You’ll have the flexibility to make use of Design Home with additional confidence and create your particular person designs additional shortly.
This step-by-step tutorial will make clear to utilize Weld in Cricut Design Home. After learning this textual content, you’ll know.
- What the weld software program does, and the place to go looking out it.
- Discover ways to weld completely completely different shapes collectively to create a model new type
- Discover ways to be a part of cursive textual content material with the weld software program
- Why it’s possible you’ll have to weld photographs collectively, even after they don’t overlap
- Why the weld software program is probably “grayed out,” and restore it.
After that, I’ll give you my biggest recommendations and strategies for using the Weld attribute in Design Home. I’ll reply some frequent questions on Weld and help restore some frequent Welding errors.
The Weld Instrument in Cricut Design Home
The thought behind the Cricut weld software program is pretty straightforward: Weld joins two or additional shapes collectively to create a model new type.
You must make the most of the Weld software program to combine shapes or be a part of letters. Irrespective of shapes or letters you Weld will merge collectively. They’re going to develop into one layer, and be cut back as one united piece.
The place to Uncover Weld
You’ll uncover the weld software program contained within the Cricut Design Home desktop program or mobile app.
On Desktop: You’ll uncover the weld software program throughout the Layers Panel throughout the bottom right-hand nook of the show, correct subsequent to the Weld Instrument. You can also uncover the weld carry out throughout the right-click menu.
On Cell: You’ll uncover the weld software program throughout the Actions sub-menu throughout the toolbar on the bottom of the show, between Weld and Flatten.
What does Weld indicate?
The Weld software program means you can be a part of two or additional separate shapes into one single type by eradicating any overlapping cut back strains.
What does that indicate? Design Home will take away any cut back strains from the place the two shapes overlap.
When you think about Welding in Design Home, take into accounts welding metal. The two gadgets soften and fuse collectively to create a eternal bond. They’re not two separate gadgets of metal, nonetheless one single piece.
What can you weld?
You must make the most of the Weld software program everytime it is advisable utterly be a part of two or additional separate shapes into one type that you just have to cut back out as one piece.
You must make the most of weld on any object: straightforward shapes from the Shapes panel, textual content material from the Textual content material panel, and photos from the Cricut Acess Library.
As an illustration, it is best to make the most of the Weld software program to be a part of cursive letters so as that they’re going to be cut back as one piece. Whilst you Weld the overlapping letters collectively, the strains between the letters disappear, and the particular person letter shapes merge to develop into one single type.
Or, it’s possible you’ll weld two or additional basic shapes collectively to create additional superior shapes than yow will uncover throughout the Layers panel. Whilst you weld two shapes collectively, they will be a part of proper right into a single type and be cut back as one piece.
Listed below are a number of of my favorite strategies to utilize weld:
- create new shapes from two customary shapes throughout the Shapes panel
- be a part of cursive letters so that they cut back as one type
- modify a ready-made image from the Cricut library
- simplify a fancy design by combining a variety of small layers
We’ll go into each of these alternative routes to utilize the Weld software program in extra component beneath.
Discover ways to Use the Weld Instrument
Listed below are the important steps to using the Weld software program.
- Put together 2 or additional photographs so that they overlap. Click on on and drag the images so that one overlaps the alternative.
- Select the layers. You’ll see a gray bounding subject appear throughout the photographs, and the chosen layers could be highlighted throughout the Layers panel. As quickly as you select the layers, the Weld button will flip black and develop into energetic.
- Click on on the Weld button. You’ll uncover the Weld button on the bottom of the Layers panel in case you occur to’re on a computer, or throughout the Actions menu on the bottom of the show in case you occur to’re using the iOS and Android app.
- See your outcomes. After you click on on Weld, the images will merge proper right into a single, new image. The model new image could be by itself layer, named “Weld Consequence.” Now you’ll be able to switch or edit this layer, merely as you’d with one other image layer.
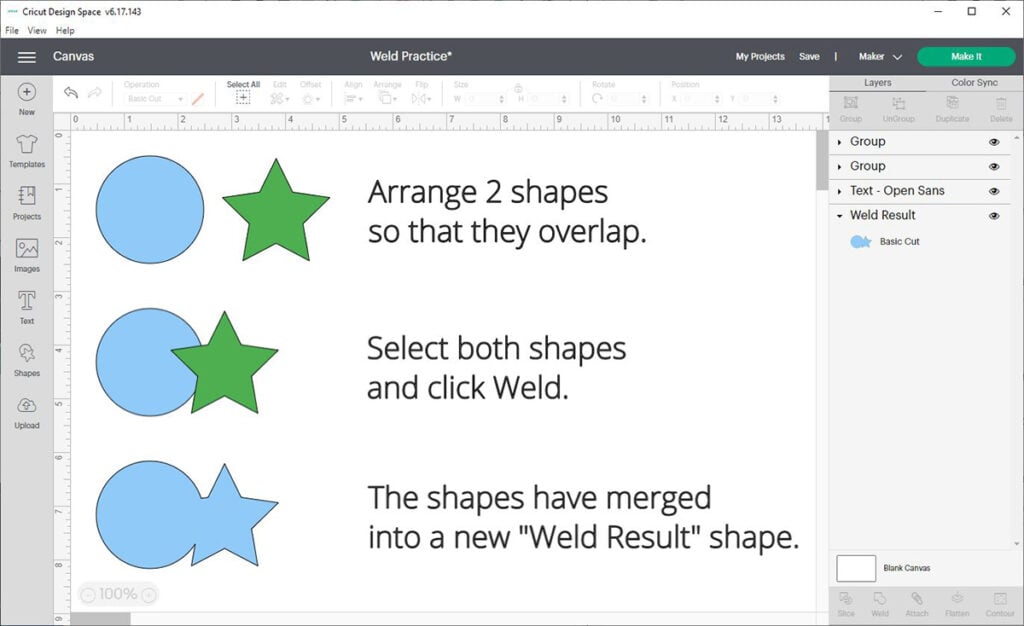
Inside the occasion above, I’ve added two shapes to the Canvas in a number of colors, so you might even see what’s occurring. As quickly as I select every layers and click on on Weld, the blue circle and the inexperienced star merge collectively. All overlapping strains are eradicated.
You’ll moreover uncover that the “Weld Consequence” layer is blue, because of it has taken on the traits of the underside blue circle layer.
Want additional examples? Protect learning to see 4 alternative routes to utilize the Weld software program – with a great deal of screenshots!
Can I Unweld an image in Cricut?
Not exactly. There isn’t an Unweld button in Design Home. While you save your file, Welding turns into eternal, and you will’t undo it.
The one choice to “unweld” is to press the Undo button or Command/Ctrl + Z in your keyboard. Nonetheless be careful, it’s possible you’ll solely use the Undo button sooner than you Save your design. After you save the design, you obtained’t have the flexibility to Undo your Weld.
What’s the excellence between the Weld and Join?
This could be a fairly frequent question. Briefly, the Join software program retains your shapes within the equivalent affiliation when you ship the design to the chopping mat. The shapes are nonetheless on separate layers, nonetheless their construction is frozen in place.
The Weld software program, then once more, unites two or additional separate photographs into one single image. For additional component, study this put up: When to Use Weld vs. Join in Cricut Design Home
Concepts and Suggestions for Working with the Weld Instrument
Weld is a sturdy and useful gizmo – but it surely certainly’s not with out its quirks. Listed below are a few recommendations and strategies to recollect when using weld.
- Weld works on two or additional layers. Within the occasion you solely have one layer chosen, the button could be “grayed out,” and likewise you obtained’t have the flexibility to make use of it.
- Use Weld on overlapping photographs. In an effort to be a part of photographs so that they’re cut back as one piece, the two photographs must be overlapping.
- You could Weld Grouped or Connected photographs. Within the occasion you Weld Grouped photographs, all seen layers all through the Group would develop into one single Weld Consequence layer.
- Hidden layers shouldn’t be going to be Welded. Within the occasion you Weld a Group with a hidden layer, the hidden layer could be separated and by no means part of the Weld Consequence layer.
- The “Weld Consequence” layer might have the properties of the underside layer. In numerous phrases, weld merges layers “down.” So, you most likely have a pink type on excessive of a blue type, the Weld consequence could be a blue type.
- There is no such thing as a such factor as a Unwleld button. After you save a endeavor, Welding turns into eternal, and it would’t be reversed.
4 Strategies to Use the Weld Instrument
Now that we’ve lined the weld software program fundamentals, let’s open up Design Home and stroll by means of some examples.
Discover: Within the occasion you don’t already have Cricut Design Home, it’s possible you’ll acquire it completely free.
Welding Textual content material
On this occasion, we’ll use Weld to connect letters in a cursive font.

- Start by using the Textual content material subject software program to form a phrase in a script font.
- If the letters look too distant from each other, try decreasing the letter-spacing.
- If the letters nonetheless aren’t touching, it’s possible you’ll alter them manually. To try this, click on on on the Superior drop-down menu, and click on on Ungroup to Letters. Then, switch the particular person letters until they overlap.
- Select all of the letters throughout the phrase, and press the Weld button.
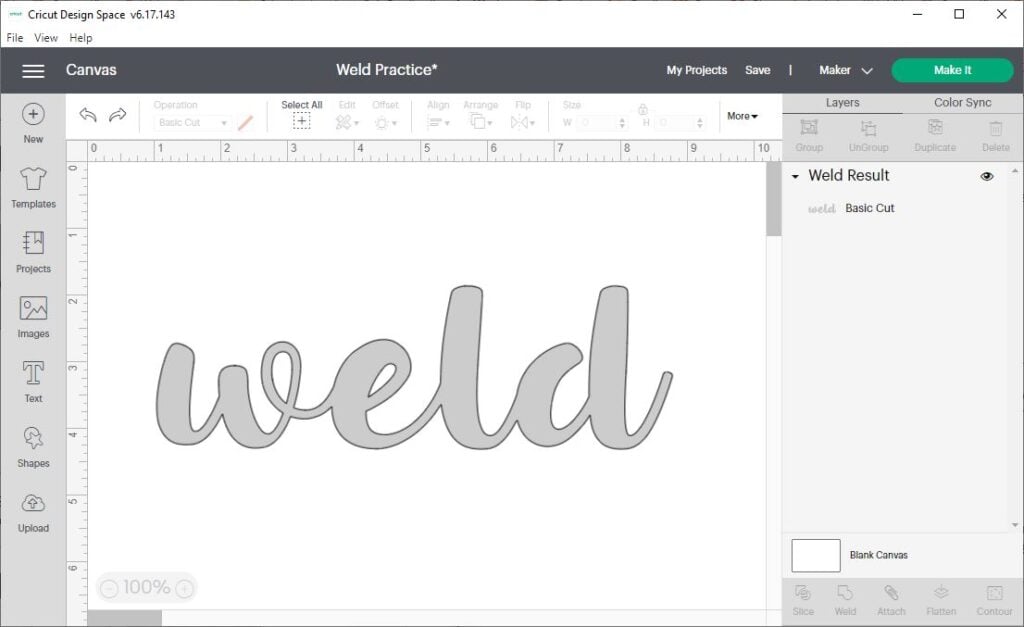
Let’s check out the outcomes. The thin black line between each of the letters is gone. Whilst you ship this image to the mat, it should probably be cut back as one single object.
Mandatory discover about Welding textual content material. Take a greater check out the Layers panel on this occasion. You’ll see that when we first added the phrase “Congrats” to the Canvas, it was an editable Textual content material layer. Nonetheless after we used Weld, it modified to a “Weld Consequence” layer. Due to this the textual content material simply is not editable – you obtained’t have the flexibility to edit typos or change the letter spacing anymore.
Welding Shapes: Create a model new type from two customary shapes
On this occasion, we’ll use Weld to make a flower type from 4 coronary coronary heart shapes.

- Start by together with 4 coronary coronary heart shapes to the Canvas.
- Put together the hearts in a circle, so that they’re merely barely overlapping.
- With all 4 hearts chosen, click on on Weld. You’ll have the flexibility to tell it labored in case you occur to see the Weld Consequence layer throughout the Layers Panel on the right-hand facet of your show.
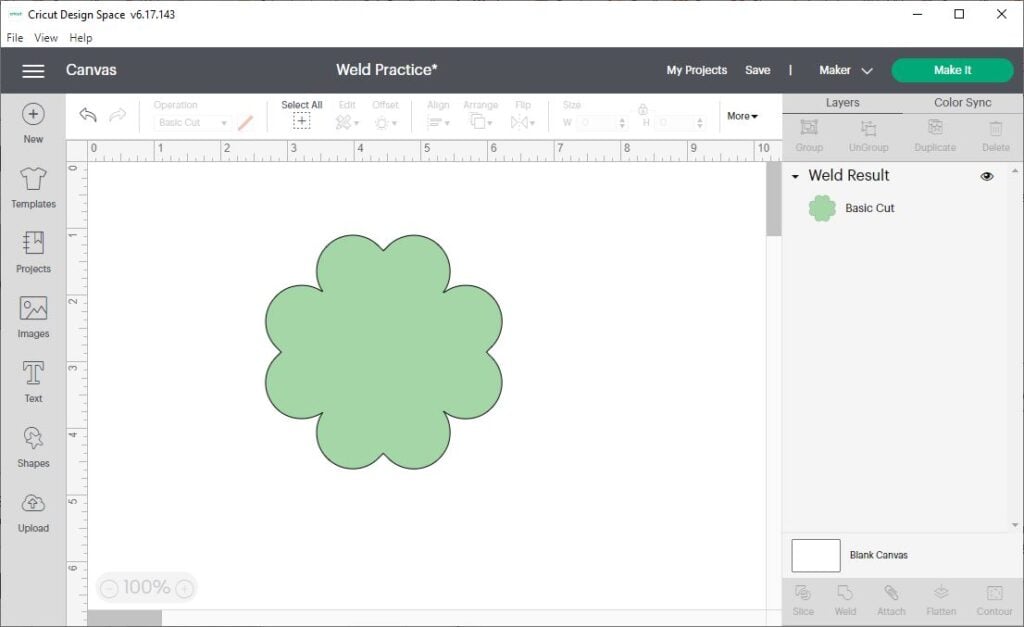
Let’s check out the outcomes. You might even see that the Weld software program has joined the heart shapes proper right into a single layer. It has eradicated the cut back strains wherever the shapes overlapped.
Welding Textual content material and Photographs Collectively
The Weld software program treats textual content material, shapes, and photos the equivalent. On this occasion, we’ll weld textual content material and shapes collectively to design a cake topper with the phrase “Congrats.”

- Start by together with the textual content material layer to the Canvas. Then, add two rectangles and two triangles.
- Resize the shapes as desired. Then, manage the textual content material and shapes so that they’re barely overlapping.
- Subsequent, we’ll weld each factor collectively. Select all of the layers, and click on on Weld.

After you Weld all of the layers collectively, you’ll see a single “Weld Consequence” layer throughout the layers panel. Whilst you ship this design to your Cricut, it should probably be cut back as one single associated piece.
Simplifying a Design: Welding shapes that don’t overlap.
So far on this tutorial, we’ve been talking about weld photographs that overlap. Nonetheless you would have noticed that it’s actually potential to weld photographs that aren’t overlapping.
Why would it is advisable try this? Successfully, it’s possible you’ll choose to Weld a bunch of shapes to scrub up your layers panel.

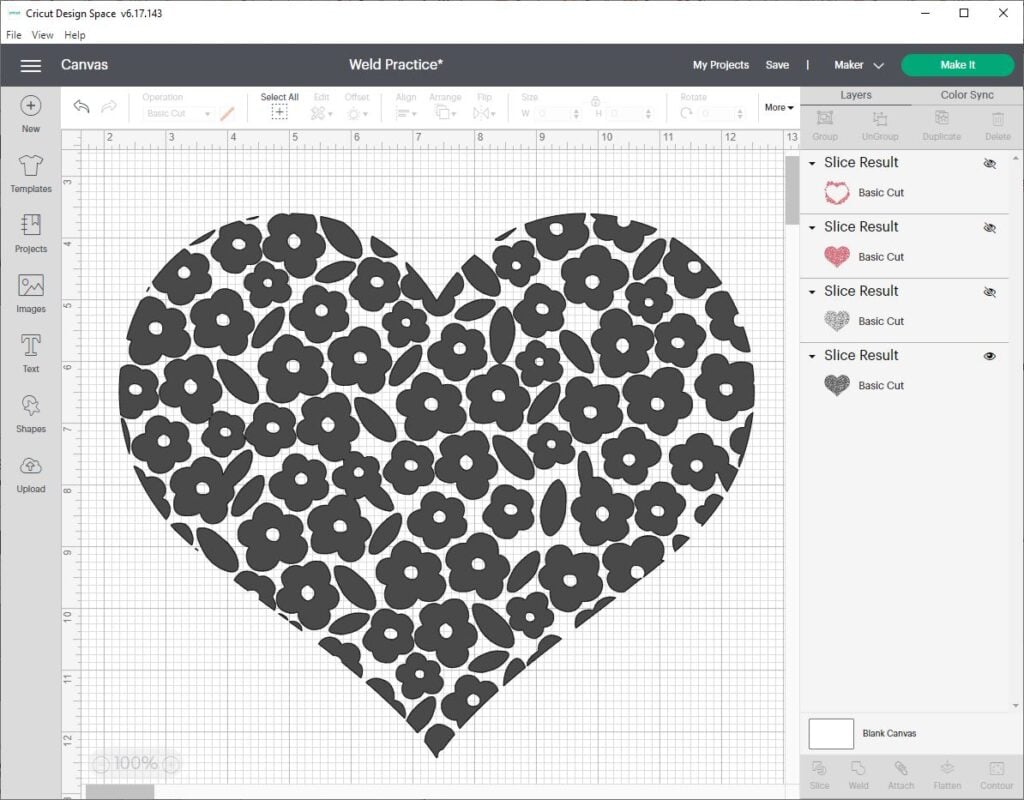
As you might even see on this screenshot, I created a floral pattern created from about 100 completely completely different type layers. With this many layers, it’s possible you’ll guess that Design Home was working pretty slowly!
If, let’s say, I wanted to cut all of these shapes out of the equivalent shade vinyl anyway, I’d go ahead and Weld them collectively. After Welding, all of the flower shapes may very well be one single layer throughout the Layers panel.
Another reason to Weld quite a few shapes like that’s in an effort to Slice them on the equivalent time, in its place of slicing them individually. (On account of, as you would already know, it’s possible you’ll solely use the Slice software program on two layers at a time.)
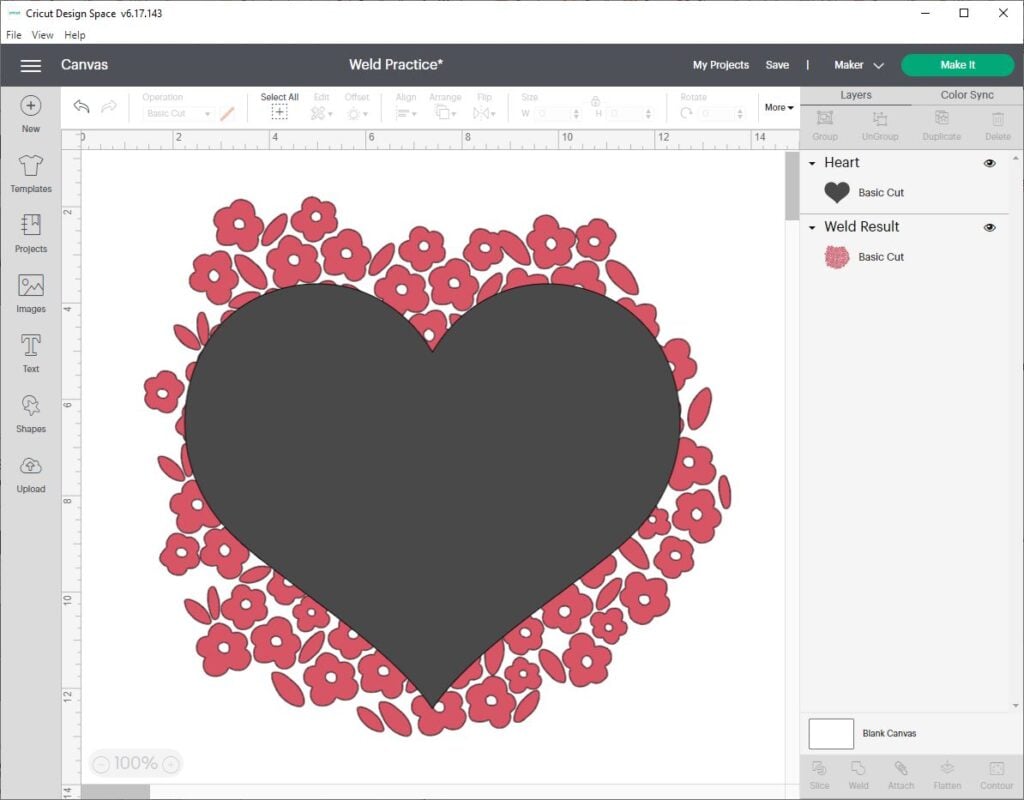
As an illustration, let’s say I wanted to Slice this floral pattern out of an enormous coronary coronary heart type to make a floral-patterned coronary coronary heart.
Since I can’t Slice higher than two layers concurrently, I’d should slice all 100 flowers individually, one after the opposite. However after I weld the flowers into one layer first, I can Slice all of them on the equivalent time.
For additional particulars about use the Slice software program, click on on proper right here: Discover ways to Slice in Cricut Design Home: The Full Data
Troubleshooting Widespread Points
Listed below are some FAQs and customary factors you would run into when using the Weld software program.
Why can’t I exploit Weld in Cricut Design Home?
If the Weld button isn’t clickable, which means it’s unavailable to utilize with the layers you at current have chosen. Listed below are some the explanation why the Weld button isn’t working.
- You solely have one layer chosen. To utilize Weld, it’s advisable have a minimum of two layers chosen.
- One among many layers is Hidden. Unhide that layer sooner than using Weld.
Why is the weld button grayed out?
If the Weld button is grayed out, it implies that the Weld risk is unavailable to utilize collectively along with your current alternative. To restore it, simply make certain you’ve chosen a minimum of two seen layers.
How do I select a few layer?
To utilize Weld, it’s advisable select two layers in Design Home. Listed below are a few strategies to select a few layer in Cricut Design Home
On Desktop
- Click on on and drag a spread subject spherical two shapes to select every of them.
- Keep down the Shift key (on PC) or the Ctrl key (on Mac) in your keyboard whereas clicking on each layer on the Canvas.
- Keep down the Shift key (on PC) or the Ctrl key (on Mac) in your keyboard whereas clicking on each layer throughout the Layers panel.
On Cell
- Faucet on the show and drag a spread subject spherical every layers.
- On the Canvas, faucet on one layer to select it, then long-press on the second layer to select it.
- Inside the layers panel, faucet on one layer to select it, then long-press on the second layer to select it.
Can I exploit weld on textual content material layers?
Positive, it is best to make the most of Weld on textual content material layers – every editable textual content material layers and textual content material that you just’ve Ungrouped to Letters. All it’s advisable do is drag the textual content material layer so it overlaps one different layer. Then select every layers, and click on on weld.
Why is Weld filling in letters?
In case your letters are very shut collectively, the Weld button can sometimes fill throughout the inside areas of letters like “a” and “e”. It doesn’t happen regularly – nonetheless it could be very irritating when it does!
The most suitable choice to restore that’s to make your letters very large sooner than Welding. Sometimes the larger measurement helps you uncover a letter-spacing downside that you just didn’t see when the letters had been smaller.
While you’ve acquired the letter-spacing the best way you want it, try Welding as soon as extra. After Welding, it’s possible you’ll make the letters smaller as soon as extra.
Why is my textual content material not editable after weld?
As talked about throughout the examples above, weld treats all textual content material as an image. After using weld on a textual content material layer, it turns right into a Weld Consequence. Which implies you’ll be able to’t return and edit it with the identical outdated textual content material devices, harking back to font and letter spacing.
Can I exploit weld on a variety of layers?
Positive, it is best to make the most of Weld on higher than two layers on the equivalent time.
What’s the excellence between Weld and Join?
Good question! Click on on proper right here to study a full tutorial about when to utilize the Join software program and when to utilize Weld in its place: When to Use Weld vs. Join in Cricut Design Home
Additional About Cricut Design Home
Isn’t weld such a unbelievable software program? I hope you’ve found some cool strategies to utilize the next time you’re in Design Home!
Whilst you’re ready for additional superior Design Home recommendations, attempt these posts:
What’s Subsequent?
Pin this put up: Save this tutorial to your Pinterest boards in an effort to come back once more to it later.
Go away a comment: We like to take heed to your recommendations. Inform me throughout the suggestions beneath!
Share on Instagram or Fb: Whilst you make this endeavor, share it on social media and tag me @sarahmaker_. We prefer to see what you make!
Have questions? Be a part of the Fb Group!
We hope this textual content was useful for you! While you’ve acquired any additional questions, be joyful to hitch my Fb Group. We created this group so to share photographs, ask questions, and help each other out.

I hope this textual content was useful for you! While you’ve acquired any additional questions, be joyful to hitch my Fb Group for Cricut Crafts.
Be a part of the group to share photographs, ask questions, and help each other out.
Devices
- Cricut machine, in case you want to cut back your accomplished file!
Instructions
- Open a model new endeavor in Cricut Design Home. Add two or additional photographs to your Canvas. Put together 2 or additional photographs so that they overlap.
- Select two or additional layers that you just have to Weld. You might even see a gray bounding subject appear throughout the photographs, and the chosen layers could be highlighted throughout the Layers panel. As quickly as you select the layers, the Weld button will flip black and develop into energetic.
- Click on on the Weld button. You could uncover the Weld button on the bottom of the Layers panel in case you occur to’re on a computer, or throughout the Actions menu on the bottom of the show in case you occur to’re using the iOS and Android app.
- Look at your outcomes. After you click on on Weld, the images will merge proper right into a single, new image. The model new image could be by itself layer, named “Weld Consequence.” Now you’ll be able to switch or edit this layer, merely as you’d with one other image layer.