
In a position to study to make use of Flatten in Cricut Design Space? This whole weblog put up will practice you all of the items you may need to know regarding the Flatten software program in Design Space.
You’ll be taught what the Flatten software program actually does, when you need to use the Flatten software program in your designs, and additional. Plus, I’ll cowl a variety of frequent errors to watch out for, and reply your usually requested questions on using Flatten in Cricut Design Space.

If you happen to’re a Cricut beginner, you’ll come all through many new phrases. And a variety of these phrases – like Weld, Join, Slice, and Flatten – talk to the design devices inside Cricut’s Design Space software program program.
Design Space is a strong design program, nonetheless it’s going to probably actually really feel overwhelming when you’re first starting out.
That may help you be taught further about one of the best ways to make use of Design Space, I’ve put collectively a set of articles concerning the commonest capabilities and enhancing devices.
Mannequin new to Cricut? You may have to study this beginner’s info to Cricut first.
Flatten in Cricut Design Space
In at current’s article, we’ll cowl all of the items you may need to know regarding the Flatten software program in Cricut Design Space. After finding out this textual content, you’ll know:
- What the Flatten software program does, and the place to hunt out it.
- When and why you need to use Flatten
- The excellence between Flatten and Weld
- Straightforward strategies to make use of Flatten to create Print Then Cut back initiatives
- Straightforward strategies to “Unflatten,” in case you modify your ideas.
- Why the Flatten software program will not be working, and one of the best ways to restore it.
Whenever you understand one of the best ways to make use of the Flatten software program, Design Space is perhaps somewhat extra pleasing to utilize. And, you’ll be able to use Flatten to create printable designs quickly and easily.
Flatten Software program Fundamentals
The Flatten software program is probably going one of many 5 necessary design devices for working with layers in Cricut Design Space. (The other layer devices are Slice, Weld, Join, and Contour.) Fortuitously for us, the Flatten software program is probably going one of many less complicated devices to know.
Flatten combines a variety of layers proper right into a single-layer printable image that it is advisable to use to make Print Then Cut back initiatives.
What does Flatten do?
Using Flatten does three points:
- It “flattens down” all the chosen layers into one single layer.
- It moreover removes all internal reduce traces from the chosen layers. It does protect one reduce line throughout the outside outline of the model new merged image.
- Then, it modifications the model new merged image to a Print Then Cut back layer, moderately than a reduce layer.
The place to Uncover the Flatten Software program
You’ll uncover the Flatten software program contained within the Cricut Design Space desktop program or mobile app.
On Desktop: You’ll uncover the Flatten button throughout the Layers Panel throughout the bottom right-hand nook of the show display, correct subsequent to the Join Software program. You can also uncover the Flatten carry out throughout the right-click menu.
On Mobile: You’ll uncover the Flatten software program throughout the Actions sub-menu throughout the toolbar on the bottom of the show display, between Weld and Flatten.
When to Use Flatten
You should use Flatten anytime it is advisable to combine a variety of Cut back layers into one Print layer. You’ll normally use Flatten to rearrange your design for Print Then Cut back initiatives.
You should use the Flatten software program everytime it is advisable to be a part of two or further separate shapes into one kind that you just simply have to print, after which reduce out all as one piece.
- For example, it is advisable to use Flatten to combine textual content material and kind layers to make group labels with printable vinyl.
- Or, combine a variety of image layers to make vibrant, printable stickers that you could be reduce out using Cricut’s Print Then Cut back attribute.
What types of objects can you Flatten?
You should use the Join software program on any object: main shapes from the Shapes panel, textual content material from the Textual content material area, and photos from the Cricut Entry Libary.
Why do you may need to use Flatten for Print layers?
Sooner than you’ll print your image, you’ll need to range it from a Cut back layer to a Print layer.
As chances are high you may know, most images and textual content material inside Cricut Design Space are Cut back layers. Which signifies that Cricut will reduce spherical each of the individual shapes.
If you happen to use Flatten, Design Space combines the chosen layers proper right into a single printable image. Using Flatten tells Design Space that you just simply have to print all the image, and make just one reduce throughout the outside outline of the combined image.
Straightforward strategies to Use the Flatten Software program
Let’s open Cricut Design Space and work with some examples. All you’ll need is the free Design Space software program program and a Cricut machine.
Listed beneath are the basic steps to using the Flatten software program:
- Open Design Space and start a model new problem. Put together 2 or further layers on the Design Space Canvas show display.
- Select the layers that you just simply have to flatten. You’ll see a gray bounding area appear throughout the images, and the chosen layers is perhaps highlighted throughout the Layers panel. The Flatten button will flip black and turn into energetic.
- Click on on the Flatten button. You’ll uncover the Flatten button on the bottom of the Layers panel when you occur to’re on a laptop, or throughout the Actions menu on the bottom of the show display when you occur to’re using the iOS and Android app.
- Strive your outcomes. After clicking Flatten, the images will merge proper right into a single, new layer. The model new layer is perhaps named “Flatten” and have the Operation label of “Print Then Cut back” Now you’ll be able to switch, resize, or edit this layer, merely as you’d with another image layer.
Want further examples? Preserve finding out for an in depth step-by-step tutorial with a great deal of screenshots, so that you understand exactly what I’m talking about.
Proper listed below are some issues to remember when using Flatten:
- The Flatten software program works on a variety of seen layers. For many who solely don’t have any seen layers chosen, the button is perhaps “grayed out,” and in addition you gained’t be able to use it.
- You should use Flatten on a single layer or a variety of layers. Flatten will flip a single Cut back layer proper right into a single Print layer. Or, flatten will combine a variety of Cut back layers proper right into a single Print layer.
- After using Flatten, the individual layers are actually not editable. Which suggests that you could’t change the color, measurement, font, and so forth., of any of the component layers of the Flattened design.
- Flatten will work whether or not or not the layers are overlapping or not. Overlapping images is perhaps reduce out as one piece. Non-overlapping images is perhaps reduce out as separate objects.
Can I Unflatten an image in Cricut Design Space?
Positive, there could also be an Unflatten button in Design Space. The Unflatten button will turn into energetic when you select an already Flattened layer. You should use the Unflatten button at any time to separate beforehand Flattened layers, even after saving your problem.
That said, the Unflatten button isn’t the exact reverse of the Flatten button. The Unflatten button does separate the image into separate layers. So, you’ll be able to edit them individually.
Nonetheless, the layers will nonetheless be Print Then Cut back layers. If you would like the layers to be customary reduce layers as soon as extra, you’ll need to range the Operation of the layers from “Print Then Cut back” once more to “Elementary Cut back.”
What is the distinction between Flatten and Weld?
Flatten and Weld can seem associated at first, nonetheless they’re used for very utterly completely different features.
Weld combines a variety of Cut back layers into one single Cut back layer. If you happen to use Weld, the layers turn into one single color. And the following layer is a Cut back layer – not a “Print Then Cut back” layer. For further regarding the Weld attribute, click on on proper right here: Straightforward strategies to Weld Textual content material and Images in Cricut Design Space
Then once more, Flatten combines a variety of Cut back layers into one single Print layer. If you happen to use Flatten, the layers protect their separate colors. And the following layer is a “Print Then Cut back” layer, not a typical Cut back layer.
3 Strategies to Use the Flatten Software program
Now that we’ve coated the Flatten software program fundamentals, let’s open up Design Space and stroll by the use of some examples.
Discover: For many who don’t already have Cricut Design Space, you’ll get hold of it completely free.
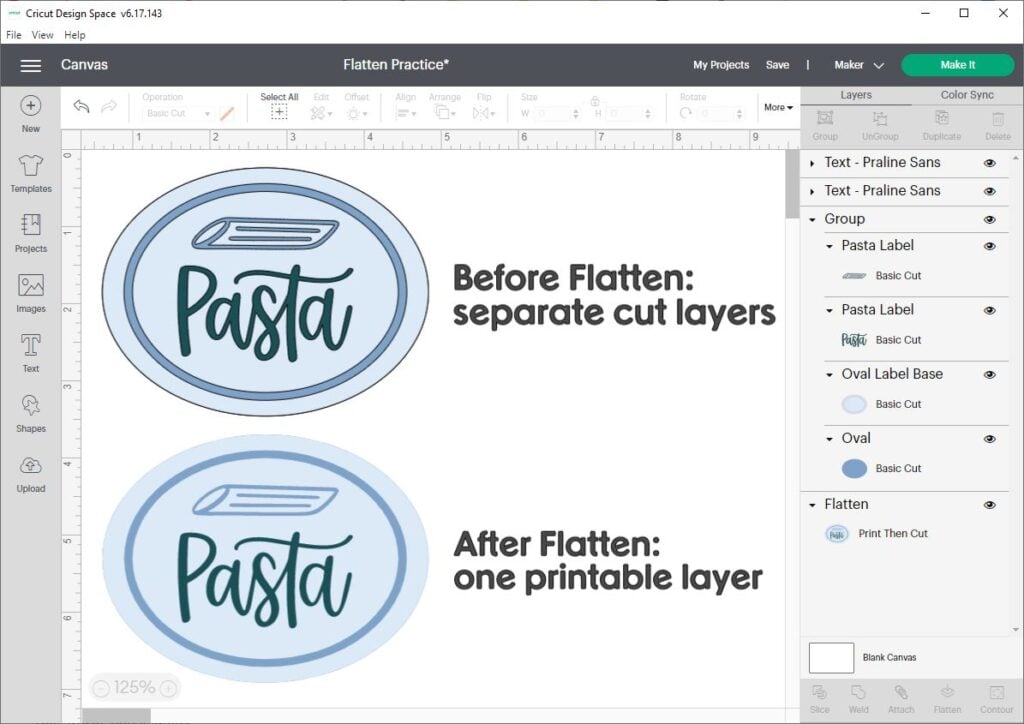
Using Flatten to Create a Print Then Cut back Label
On this occasion, we’ll use the Flatten button to combine textual content material and kind layers proper right into a printable label with Cricut’s Print Then Cut back attribute.
For many who’ve in no way used Print Then Cut back sooner than, let me make clear the basics. Print Then Cut back is an outstanding attribute that tells your Cricut to cut throughout the outside border of an image that you just simply’ve printed by yourself residence printer.
You may be acquainted will importing a JPG image as a Print Then Cut back image. Nonetheless you’ll be able to even use the Flatten software program to point out any design proper right into a Print Then Cut back image.
Let’s stroll by the use of an occasion collectively.
First, open up Design Space and start a model new problem. Add a variety of shapes and textual content material layers to the Canvas. At this degree, each kind and textual content material area is by itself layer, and I can nonetheless edit them individually.
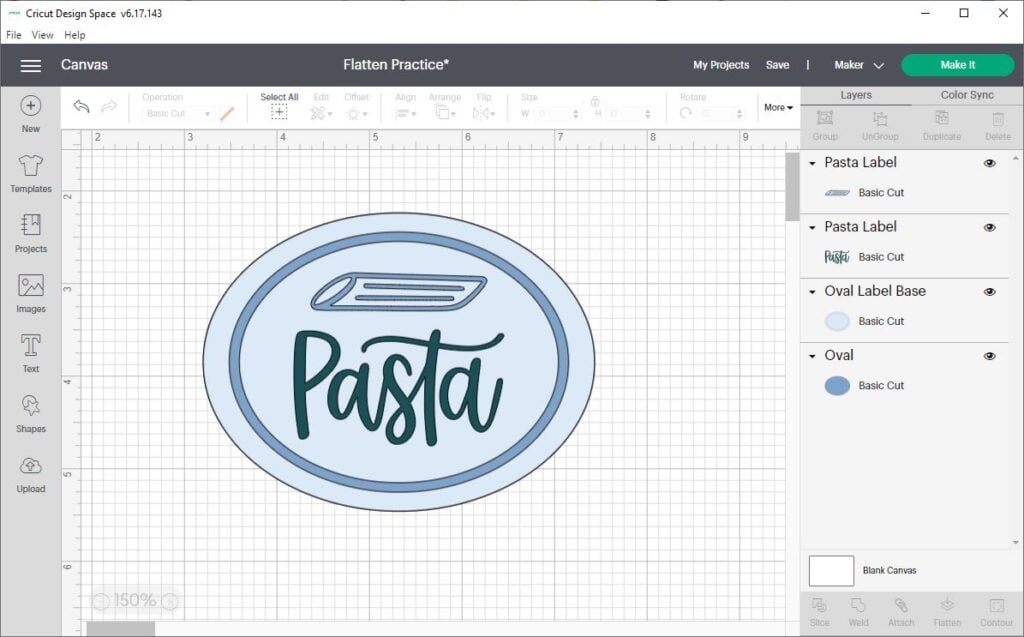
If I had been to click on on “Make it,” each little bit of the design will be reduce out by itself decreasing mat. This isn’t what we want for this problem.
So, cancel the reduce and return to the Canvas show display. Select all the layers and click on on Flatten. Now, all the layers are “flattened down” into one layer.
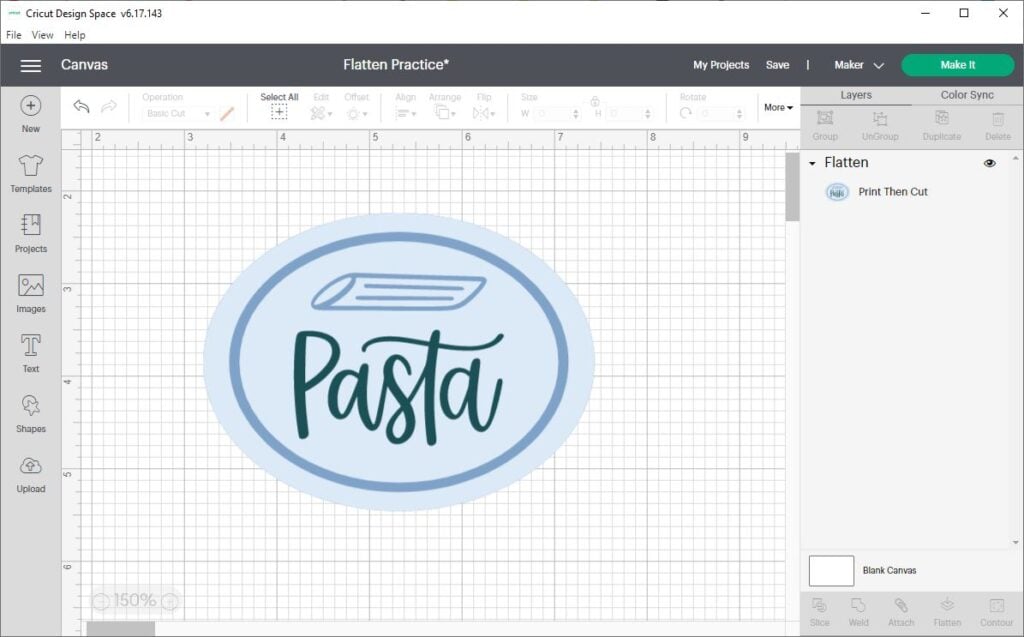
If you happen to first check out it, the final look of the design hasn’t modified. Nonetheless when you look fastidiously on the Layers panel, you’ll discover that heaps has modified.
- First, all the layers have been merged into one new layer, labeled Flatten.
- Second, all internal reduce traces (aka overlapping reduce traces) have been eradicated.
- Third, the model new layer has the “Print then Cut back” operation moderately than the “Elementary Cut back” operation.
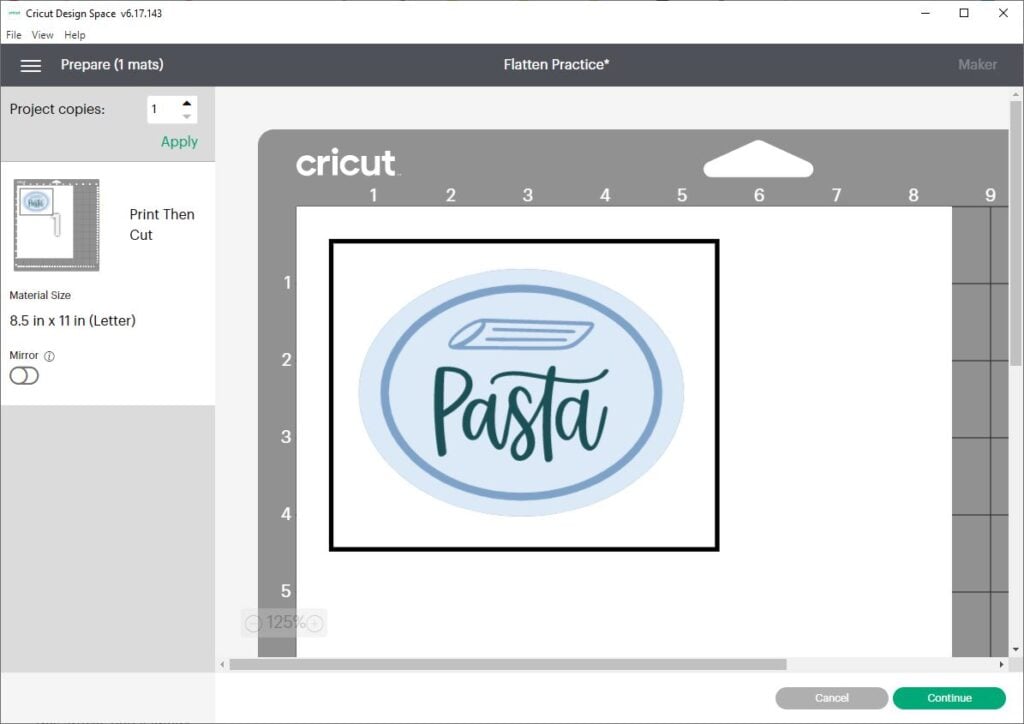
Now when you click on on “Make It” to ship this design to the mat, you’ll see a really utterly completely different decreasing mat preview.
There is perhaps a white rectangle on the Cricut mat representing an 8.5″ by 11″ sheet of printer paper. On that paper, you’ll see a black outline of a rectangle. These black traces are the registration marks that your Cricut will use to align the blade for proper cuts. Contained within the rectangle, you’ll see your Flattened image.
For many who click on on Proceed, Cricut will speedy you to print the design by yourself residence printer. Then, it could speedy you to load the printed design into your decreasing machine so as that it’s going to probably reduce throughout the outside edge.
Using Flatten to Create Printable Stickers
Proper right here’s one different occasion of using the Flatten software program to create a Print Then Cut back problem. Observe along with this occasion to study to make stickers with Cricut.
First, add your required images and textual content material to the Design Space Canvas. On this occasion, I used two traces of textual content material, and a coronary coronary heart kind.

You’ll uncover that the objects of this design don’t overlap, and there is no background kind behind them. We’re capable of flatten them now, and so they’ll merge down into one printable layer.
Proper right here’s the problem: As a result of the letters and coronary coronary heart kind shouldn’t overlapping, Cricut will reduce spherical each of the objects individually. This is not going to work for a sticker.
Proper right here’s the reply: We’re ready so as to add a white background kind behind the phrases and coronary coronary heart. Then, we are going to flatten and blend all the shapes onto the background.
There are a variety of strategies in order so as to add a background to this sticker. Chances are you’ll add a main kind from the Kind panel. Or, my favorite methodology is in order so as to add an Offset throughout the images and Flatten these all collectively.
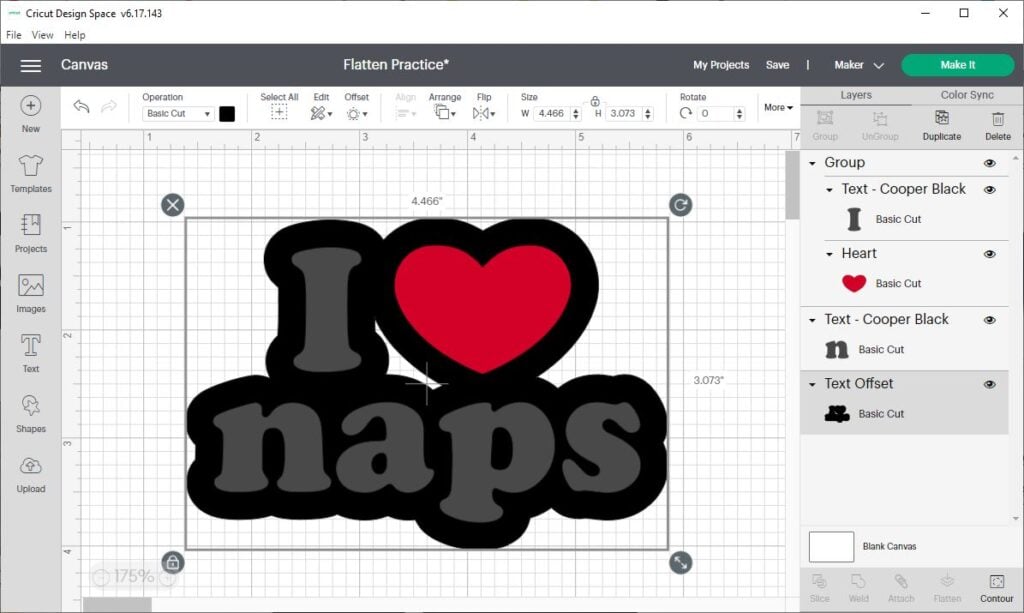
If you end up with a spot throughout the offset, as I did with the sticker above, it is advisable to use the Contour software program to “flip off” that inside kind.

Now that we’ve added the secure background kind, you’ll’t see the Canvas grid traces by the use of the design. This generally is a seen cue that it is advisable to use to tell that the sticker will reduce out all as one piece.
Click on on proper right here to be taught further about Straightforward strategies to Make Stickers with Cricut and printable sticker paper.
Straightforward strategies to make use of Unflatten
On this occasion, I’ll current you one of the best ways to make use of the Unflatten software program to undo the Flatten button.
First, select the Flatten layer that you just simply have to Unflatten. Then, click on on the Unflatten button. Let’s use the sticker image from the sooner occasion

If you happen to check out the image itself, not quite a bit is totally completely different. Nonetheless when you check out the Layers panel, you’ll see that the individual shapes have been separated into utterly completely different layers.
Nonetheless, you’ll moreover see that each of those layers stays to be a “Print Then Cut back” layer. For many who click on on “Make It,” Cricut will try to print after which reduce each layer individually.
So, when you want to flip these “Print Then Cut back” layers once more into “Elementary Cut back” layers, you’ll need to range their Operation. Go as a lot because the Operation drop-down menu throughout the prime toolbar. Then select Elementary reduce from the menu. It’s going to convert the layers once more into customary cuttable layers.

And naturally, one different easy methodology to undo the Flatten button is the press the Undo button in Design Space or Ctrl/Cmd Z on the keyboard.
Troubleshooting Frequent Points
Listed beneath are some FAQs and customary factors chances are high you may run into when using the Flatten software program.
Why is the Flatten button “grayed out” or not working?
If the Flatten button isn’t clickable, which suggests it’s unavailable to utilize. Larger than seemingly, it means don’t have any seen layers chosen. To restore it, guarantee you have got as a minimum one seen layer chosen.
The place is the Unflatten button?
There could also be an Unflatten button in Design Space. To activate it, you’ll first need to decide the Flattened layer. Then, you’ll be able to see the Detach software program on the bottom of the Layers Panel. You can also uncover the Unflatten carry out throughout the right-click menu.
Why is Cricut decreasing the inside of my Print Then Cut back image?
First, double-check that your layer is labeled “Print Then Cut back” and by no means “Elementary Cut back.” Then, confirm that your Print Then Cut back design has a secure background behind it.
If you would like Cricut to cut throughout the outside of all the printed image, you may need to be sure that the image has a secure background sooner than Flattening. For many who see gridlines behind your image on the Canvas show display, which suggests you don’t have a background behind your image. And if the weather of your image are associated, Cricut will reduce them out individually. Please talk to the second occasion for further particulars.
Be taught Further About Cricut Design Space
I hope this tutorial helped you understand one of the best ways to make use of the Flatten software program in Cricut Design Space. It truly is probably going some of the important devices, notably for designing Print Then Cut back initiatives.
Now that you just simply’re a grasp of the Flatten attribute, listed below are a variety of further Design Space tutorials so as to check out:
Have questions? Be a part of the Fb Group!
We hope this textual content was useful for you! You most likely have any additional questions, be comfortable to affix my Fb Group. We created this group so as to share footage, ask questions, and help each other out.

I hope this textual content was useful for you! You most likely have any additional questions, be comfortable to affix my Fb Group for Cricut Crafts.
Be a part of the group to share footage, ask questions, and help each other out.
What’s Subsequent?
Pin this put up: Save this tutorial to your Pinterest boards so to return once more to it later.
Go away a comment: We like to hearken to your options. Inform me throughout the suggestions underneath!
Share on Instagram or Fb: If you happen to make this problem, share it on social media and tag me @sarahmaker_. We wish to see what you make!
Instructions
- Open Design Space and start a model new problem. Put together 2 or further layers on the Design Space Canvas show display.
- Select the layers that you just simply have to flatten. You will notice a gray bounding area appear throughout the images, and the chosen layers is perhaps highlighted throughout the Layers panel. The Flatten button will flip black and turn into energetic.
- Click on on the Flatten button. You’ll uncover the Flatten button on the bottom of the Layers panel when you occur to’re on a laptop, or throughout the Actions menu on the bottom of the show display when you occur to’re using the iOS and Android app.
- Strive your outcomes. After clicking Flatten, the images will merge proper right into a single, new layer. The model new layer is perhaps named “Flatten” and have the Operation label of “Print Then Cut back” Now you’ll be able to switch, resize, or edit this layer, merely as you’d with another image layer.