
Are you aware that you could be add your particular person images into Cricut Design Home? It’s true! A number of the extremely efficient choices of Cricut Design Home is its capability to take your uploaded images and convert them into cuttable shapes.
Whether or not or not you’ll want to use your particular person designs, drawings, family photos, finding out how one can add your particular person images to Design Home allows you to make crafts which is likely to be uniquely yours.

Cricut freshmen often ask me: “Can I add my very personal images with Cricut?” And I always reply them with an enthusiastic, “Certain!” One in every of many greatest points about Cricut and Design Home is that you just add any image you want – freed from cost!
In a position to examine additional about how one can add images to Cricut Design Home? If that is the case, then this weblog submit is just for you. We’ll converse slightly bit bit regarding the sorts of recordsdata it’s best to use, the place to go looking out top-of-the-line SVGSs, and how one can add them to Design Home. We’ll even talk about some frequent points you would possibly run into when importing recordsdata.
Tips about tips on how to Add Photos to Cricut Design Home
On this step-by-step tutorial, I’ll current you merely how easy it is so as to add your particular person images into Design Home. All it takes is 4 straightforward steps (or solely 3 steps once you’re using SVGs!)
- Open the Cricut Design Home app and start a model new enterprise.
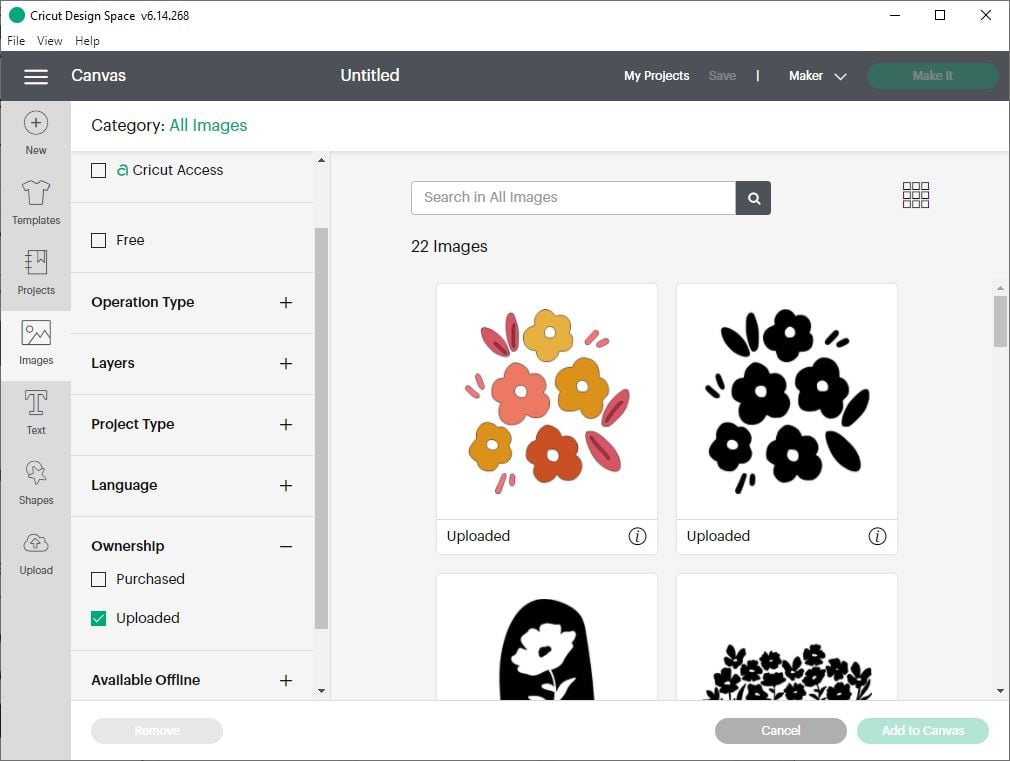
- Click on on the Add button, and select the image file you’ll want to add.
- Select the image type and take away the background with the various eraser devices. (For raster images solely.)
- Title the image, add tags, and click on on Add to complete.
You want to use these steps when importing images from the Cricut Design Home app in your desktop, laptop computer pc, or cell machine (like an iPhone or iPad).
Mannequin new to Cricut? Start with this handy info.
Now, let’s stroll by the strategy in further component.
The Two Most vital Types of Photos
There are two most vital lessons of image recordsdata that you could be add to Cricut Design Home: raster images and vector images.
It’s important that you just understand the important variations between the two file types, nonetheless I promise we obtained’t get too technical or tough.
Raster Photos
Raster images are major images made up of tiny dots of color, often called pixels. Digital images, drawings, and scanned work are all sorts of raster images. Quite a few free clip art work images are moreover raster images.
Raster images end in file extensions like .png, .jpg, .jpeg, .gif, and .bmp. These sort of images are created in packages like Photoshop, Procreate, or Paint.
Raster images may be uploaded to Design Home as a single layer. It might probably prevent them as a Print Then Decrease image or a powerful cuttable type to utilize in several sorts of Cricut duties.
Vector Photos
Vector images are graphic images designed with strains and elements. When people talk about SVGs, they’re talking about vector images.
Vector image recordsdata end in file extensions like .svg. .eps, or .dxf. These sort of images are created in packages like Adobe Illustrator or Inkscape.
SVG images are the most common form of cut back file to utilize with Cricut Design Home. SVG stands for “scalable vector graphic”. Which means you could make the SVG image as big or small as you want, with out it attempting pixelated or blurry.
Why I would like vector images for Cricut duties
Vector file type images are explicit because of they are much additional versatile, versatile, and easy to utilize with Cricut Design Home. Because of they’re designed with paths and elements, vector images can create a so much cleaner cut back than jpg or png images.
What’s additional, SVG recordsdata can comprise superior designs comprised of quite a lot of shapes. Cricut Design Home will be taught and course of those shapes for you, individually the image into fully totally different layers as compulsory.
The place to go looking out new SVGs so as to add
You may discover free clip art work images on internet sites like rawpixel.com, or premium SVG recordsdata on internet sites like Etsy.
Do you have to buy SVG images from Etsy or totally different design web sites, you’ll have to add them to Design Home sooner than using them in your Cricut duties.
- First, acquire the cut back file.
- Whether it is accessible in a zipper file, you’ll have to unzip it.
- Then, you could add the unzipped file to Design Home.
Observe: Not all clip art work you uncover on-line is free for the taking. Be taught and respect the psychological property rights of various designers and solely add images you private and are permitted to utilize.
Tips about tips on how to add an image to Design Home
Step 1. Open the Cricut Design Home software program program and start a model new enterprise. Select the Add button on the bottom of the left design panel. Select Add Image so as to add an image to utilize in a design. You could choose an image with definitely one among these applicable recordsdata types: .jpg, .gif, .png, .bmp, .svg, or .dxf.
(Observe: You are not presently able to utilize .dxf recordsdata throughout the iOS or Android variations of Design Home.)

Step 2. Select the Browse button to search out the image you’ll want to use out of your computer. Or, you in all probability have the image recordsdata ready, you could drag and drop the file into the add window.
Do you have to add a raster image (a major image that ends in .jpg, .gif, .png, or .bmp), you’ll observe the Elementary Image Add show subsequent.
Do you have to add a vector image (a scalable image that ends in .svg or .dxf), you’ll observe the Vector Image Add show subsequent.

Risk 1: Importing Elementary Photos (Raster Photos)
After getting chosen the image, you’ll observe the Elementary Image Add Show. You’ll discover a preview of your uploaded image on the left.
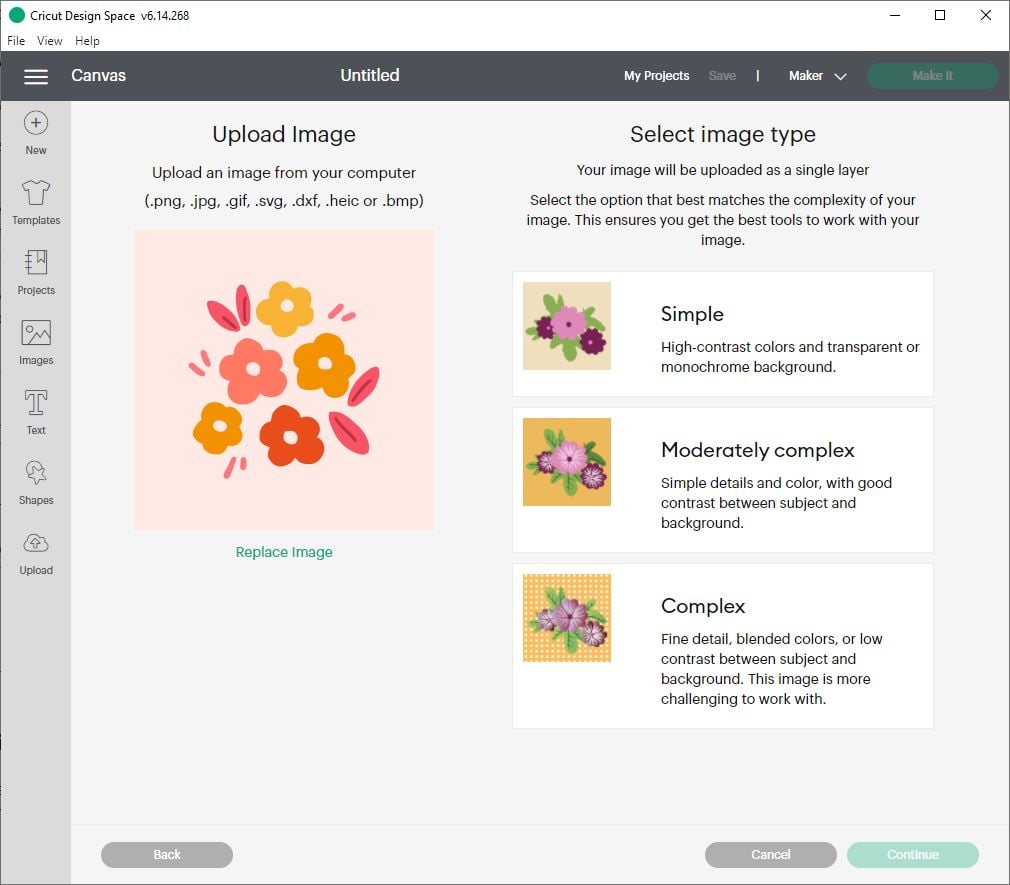
Step 3: Clear up the image.
Design Home will fast you to choose your image type on the becoming. Select the image alternative that most interesting matches the complexity of your image. In case your design is straightforward with clear edges and simple strains, choose Simple. In case your design is additional tough with quite a lot of colors, textures, or patterns, choose Superior. (When uncertain, I tend to resolve on Superior.)
Background Remover Devices
On the next show, Design Home supplies you with quite a lot of selections to remove any undesirable background colors or totally different areas out of your image.
In case you’re a Cricut Entry member, it’s best to use the Background Remover instrument to remove the background routinely.
In case you aren’t a Cricut Entry member, you could nonetheless use the Handbook instrument selections: Select, Erase, and Crop.
Choose each the Select and Erase, Erase, and/or Crop devices to remove parts of the image that you just don’t want to make use of.
- Select and Erase: Select an area or color differ in your image, then erase it. Use the Superior Selections button to change the tolerance (or sensitivity) of the instrument.
- Erase: Click on on and keep to erase sections of your image. You could change the size of your erase instrument by transferring the slider.
- Crop: Use the crop instrument to erase rectangular sections of your image.
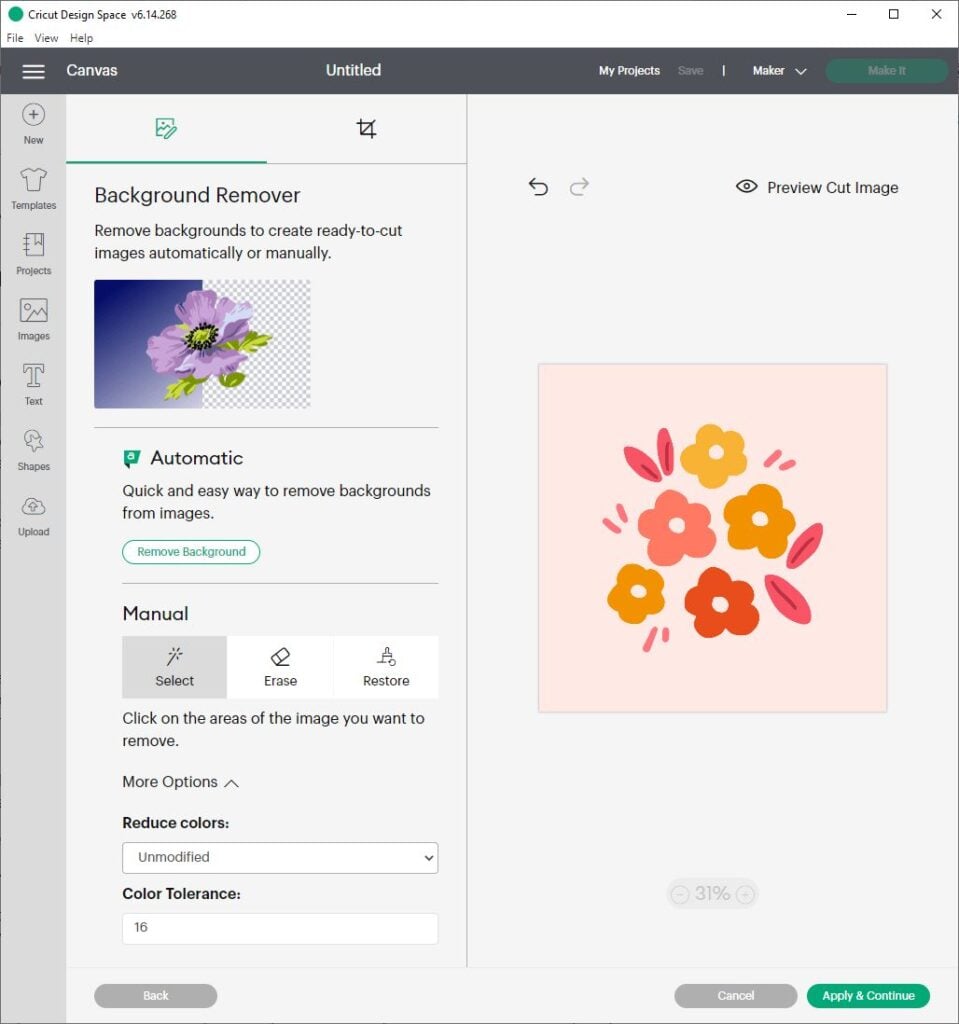
On this occasion, I want Design Home to take care of the flower and leaf shapes, nonetheless not the background. So, I used the Select and Erase instrument to click on on on the sunshine pink background area to remove it from the image.
You want to use the buttons throughout the top-right nook to zoom in or out as wished to see all parts of your image. (I made sure to zoom in and erase the sunshine pink background color in each of the flower amenities.)
Step 4: Title and Save the Image
Select Preview to see what the final word Decrease Image will look like. The sturdy gray area represents the contours of the image that you’ll observe in your Design Home canvas. The gray checkerboard background signifies areas on the image which have been eradicated – these areas are literally clear and will not be cut back. Do you have to see any areas you might need missed, click on on Disguise Preview to return to the Select and Erase Show. If you find yourself happy with the image, select Proceed.
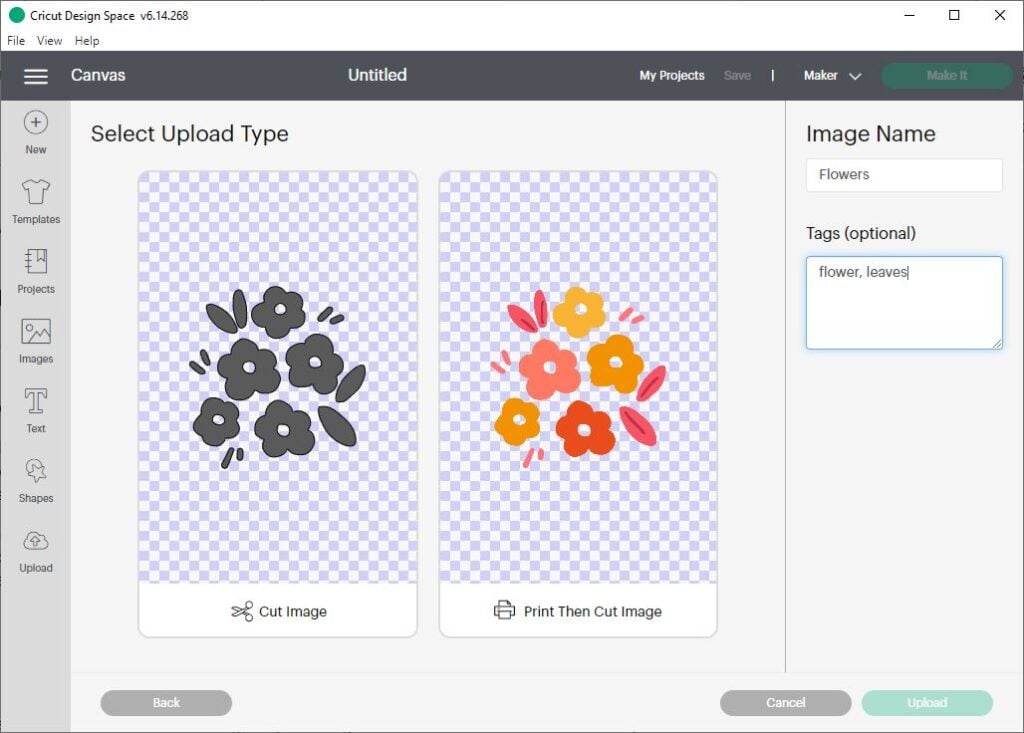
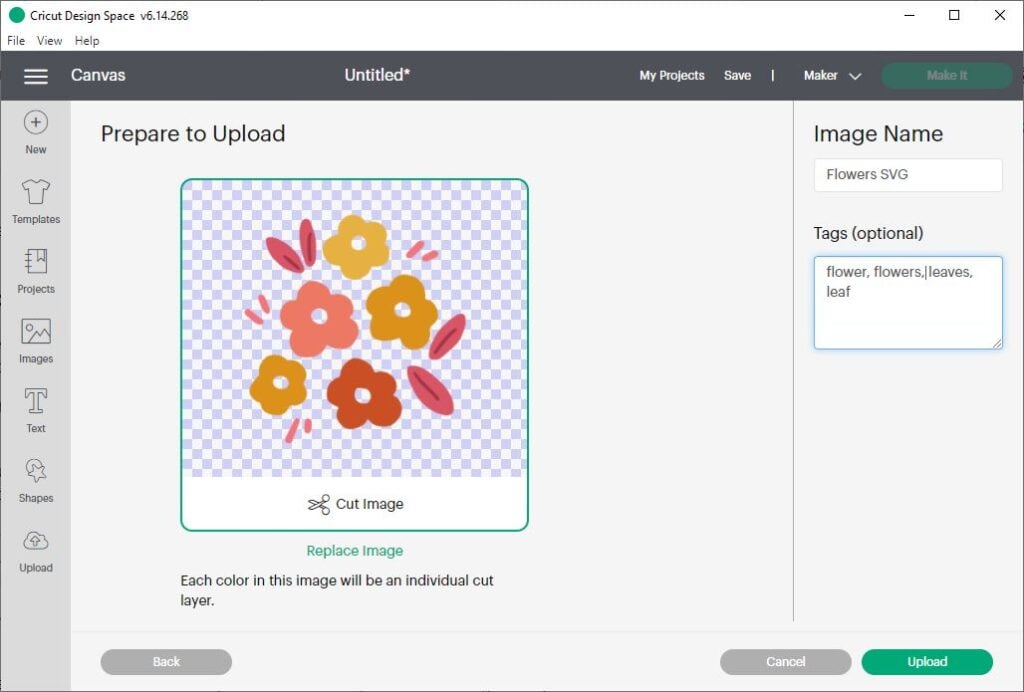
On the next show, choose whether or not or to not save a lot of your image as a Decrease Image or a Print Then Decrease Image. Ought to you choose Decrease Image, the image may be saved as a powerful type solely – all colors and patterns may be eradicated. Ought to you choose Print Then Decrease Image, the image will save with the colors and patterns intact. (Choose this choice for Print Then Decrease duties, like stickers or printable vinyl duties.)
Lastly, establish your image and supplies it a few tags (key phrases) in order to hunt for it later. Select Add. You may now see your image throughout the Present Uploads image library on the bottom of the show.
In order so as to add the image to your design, click on on on the image to choose it. Then click on on Insert Photos in order so as to add it to your Canvas design show.

On this occasion, since I saved the flower image as a Decrease image, the image is added to the Canvas show as a single layer. I can now cut back this kind out of paper, vinyl, or another supplies I want.
Risk 2: Importing Vector Photos
Good news – importing vector images to Cricut Design Home is even easier than importing raster images.
Select the vector image (ends in .svg or .dxf) that you just want so as to add. You could select it in your file folder, or drag and drop the folder to the Design Home image add window.
Step 3: Title and Save the Image
On the next show, you’ll observe a preview of your chosen file. Give your file a fame and a few descriptive tags (key phrases), so yow will uncover it later. Then select Add.
You may return to the Add show, the place you’ll observe the image throughout the Present Uploads image library on the bottom of the show. In order so as to add the image to your enterprise, click on on on the image to choose it, then select Insert Image in order so as to add it to your Canvas.

Observe: If the vector image you’ve chosen was designed with quite a lot of layers, the layers may be grouped collectively on the Canvas. It’s attainable so that you can to see the particular person layers throughout the Layers Panel on the right-hand side of the Canvas show. In case you want to switch or resize the layers individually, you’ll need to first ungroup them.
The place to go looking out images you’ve already uploaded
Proper right here’s how one can uncover all the pictures that you just’ve uploaded to Design Home.
First, click on on on the Photos button to see the Cricut images Library. From proper right here, you could look for an image by its establish or tag. You might also select Uploaded from the Possession filter on the left-hand menu drop-down to see solely these images that you just’ve uploaded your self.
Troubleshooting Image Uploads
Listed beneath are a few ceaselessly requested questions on importing images to Cricut Design Home.
Why is my image sturdy gray?
Raster (pixel-based) images like .jpg and .png will add as a single type layer. Ought to you choose to save lots of a lot of the image as a Decrease Image, Cricut Design Home will convert it to a powerful, cuttable type.
In case you want to maintain the whole inside particulars – akin to quite a lot of colors, patterns, and so forth. – make sure to save lots of a lot of the image as a Print Then Decrease image. You could then use the image in Print Then Decrease duties, like stickers or printable vinyl duties.
How do I add images on the iPhone app (iOS app)?
Importing images to the Cricut Design app in your phone is much like the steps I’ve outlined above. The one distinction, really, could be the format of the show.
- Open the app and create a model new Canvas.
- Click on on the Add button throughout the bottom menu bar.
- Take {a photograph}, select {a photograph} out of your {Photograph} Libary, or select {a photograph} out of your Recordsdata.
- Use the Take away, Erase, and Crop devices to clean up your image. Use the preview image throughout the excessive correct nook to see what your cut back file will look like.
- Refine the cut back paths using the Despeckle and Clear devices.
- Select the Add type – each a Decrease image or Print Then Decrease image. Then, establish your image and press Save.
Help, I can’t take away the background.
It could be laborious to utilize the Select and Erase instrument to isolate the first subject of {{a photograph}} if the background is just too superior, or if there’s low distinction between the subject and the background. On this case, your most interesting wager is to utilize the Eraser instrument to manually erase the weather of the image that you just don’t want to cut back.
My cut back image appears to be blurry or pixelated.
When choosing a raster image (.jpg or .png) to utilize as a cut back file, seek for a straightforward image with clear strains and robust colors. This will likely help your Cricut create the cleanest cut back file doable. (Take into account that once you enlarge a low-resolution .jpg image, it’s going to look blurry or pixelated.)
Additional Cricut Design Home Tutorials
Do you have to love Cricut and want to review additional about Design Home, listed below are some posts you is likely to be interested by.
Have questions? Be a part of the Fb Group!
We hope this textual content was useful for you! You in all probability have any additional questions, be blissful to affix my Fb Group. We created this group to be able to share images, ask questions, and help each other out.

What’s Subsequent?
Pin this submit: Save this tutorial to your Pinterest boards in order to return once more to it later.
Depart a comment: We like to take heed to your recommendations. Inform me throughout the suggestions beneath!
Share on Instagram or Fb: Everytime you make this enterprise, share it on social media and tag me @sarahmaker_. We prefer to see what you make!
Instructions
Raster Photos
- Open the Cricut Design Home software program program and start a model new enterprise. Select Add.
- Select the Browse button to search out the image you’ll want to use out of your computer. Or, you in all probability have the image recordsdata ready, you could drag and drop the file into the add window.
- Select the image type that most interesting matches the complexity of your image. Then, use the Select and Erase, Erase, and Crop devices to remove parts of the image that you just don’t want to make use of.
- On the next show, choose whether or not or to not save a lot of your image as a Decrease image or a Print Then Decrease image. Title your image, give it a few tags, and click on on Add.
Vector Photos
- Open the Cricut Design Home software program program and start a model new enterprise. Select Add.
- Select the Browse button to search out the image you’ll want to use out of your computer. Or, you in all probability have the image recordsdata ready, you could drag and drop the file into the add window.
- Title the image and add a few descriptive tags (key phrases), so yow will uncover it later. Then select Add.