
Capable of be taught Slice in Cricut Design Space? Bear in mind this weblog put up your ultimate data to the Slice software program. I’ll make clear use Slice in Cricut Design Space, along with what it does and why it’s very important. You’ll study to make use of the Slice software program to crop images and slice textual content material. I’ll moreover current you why the slice button may be “grayed out” or not working – and restore it.
While you study by this textual content, I consider Slice will develop to be thought-about one in every of your favorite devices in Cricut Design Space!

The Slice attribute is an especially helpful gizmo inside Cricut Design Space that may allow you create distinctive initiatives collectively along with your Cricut machine. I exploit it frequently to crop images, slice textual content material, and create new shapes.
The concept behind the Cricut Slice software program is pretty simple: Slice cuts a type or textual content material from one different type. Regardless that the Slice software program is easy to utilize, it does have various quirks which will frustrate newer Cricut prospects.
If that’s you, don’t concern. This article will prepare you all of the items it is important to know regarding the Slice software program and use it. I’ll moreover current you my 5 favorite strategies to utilize the Slice software program inside Design Space and reply your widespread questions regarding the Slice attribute.
The Slice Instrument in Cricut Design Space
This step-by-step tutorial will make clear to utilize Slice in Cricut Design Space. On this put up, you’ll be taught:
- What the Slice software program actually does, and the place to hunt out it
- One of the best ways to decrease out a type from a much bigger type
- One of the best ways to crop or trim undesirable parts of images
- One of the best ways to create new, custom-made shapes using the Shapes software program
- Why the Slice software program may be “grayed out,” and what it is important to do to restore it.
Plus, I’ll current you my 4 favorite strategies to utilize Slice in Design Space.
What is the Slice Instrument?
Slice is a software program inside Cricut Design Space that allows you to decrease one image out of 1 different image. You’ll uncover it on the bottom of the Layers panel, subsequent to the other Design Space layer devices: Weld, Join, Flatten, and Contour.
Mannequin new to the Cricut world? You possibly can want to study this major: What’s a Cricut Machine, and What Can it Do?
What Slice Actually Does
The Slice software program splits two overlapping images into various objects by “slicing out” one image from the other image. Primarily, the Slice software program creates new decrease paths wherever the edges of the two images overlap.
You’ll contemplate it like a cookie cutter or a flowery hole punch: The Slice software program “punches out” the type of 1 image from the type of the other image.
In consequence, the Slice software program creates totally new shapes from the distinctive shapes. Each of the model new shapes will current up inside the Layers panel as an individual layer.
Why You Must Use Slice
While you start using Slice, you’ll be shocked at how loads it may do. The Slice function is particularly useful for slicing out shapes and textual content material from greater background shapes. You may even use it to crop or trim away undesirable areas of shapes or images.
Listed beneath are a couple of of my favorite strategies to utilize Slice:
- “punch out” shapes and textual content material from a much bigger background type
- create new, custom-made shapes from two customary shapes inside the Shapes panel
- crop, or trim away, undesirable parts of an image
- decrease an image into various objects, and separate this stuff into utterly completely different layers
- modify or rearrange a ready-made image from the Cricut library
We’ll go into each of these different methods to utilize the Slice software program in further ingredient beneath.
One of the best ways to Use the Slice Instrument
You need to use the Slice software program to cut out one type from one different type, decrease overlapping shapes from each other, or decrease textual content material from a type.
Listed beneath are the major steps to using the Slice software program.
- Put together 2 images so that they’re overlapping. Click on on and drag the images so that they overlap. Within the occasion you try and Slice two images that aren’t overlapping, nothing will happen.
- Select every layers. Don’t forget that after you’re using Slice with images, you might solely work with two layers at one time. As quickly as you select the two layers, a gray bounding discipline will appear spherical every images, and the individual layers will seemingly be highlighted inside the Layers panel.
- Click on on the Slice button on the bottom of the Layers panel within the occasion you’re on a laptop or inside the Actions menu on the bottom of the show display within the occasion you’re using the iOS and Android app.
- See your outcomes. Separate the layers to see your new shapes. Now you might edit the layers individually, and delete any layers you don’t need.
While you get the maintain of it, Slice is sort of simple to utilize. It is really that easy!
Options and Strategies for Working with the Slice Instrument
I consider Slice is a extraordinarily helpful gizmo – but it surely absolutely’s not with out its quirks. Listed beneath are various concepts and suggestions to recollect when using Slice.
- Slice works on two layers. When using Slice with images, you might solely work with two layers at one time. For those who select larger than two layers, the button will seemingly be “grayed out,” and in addition you acquired’t be able to use it.
- Slice works on overlapping images. With a view to make use of Slice, the two images needs to be overlapping. Within the occasion you Slice two images that aren’t positioned on excessive of each other, nothing will change.
- Slice can work on Grouped images, nevertheless supplied that the other images contained in the Group are hidden. For those who want to Slice a layer that is part of a multi-layered Group, it’s essential first conceal or ungroup the other layers to activate the Slice software program.
- Slice works with textual content material too. Nonetheless, slicing with textual content material (significantly multi-layered textual content material) has its private quirks that we’ll cowl considerably bit later.
The place to Uncover Slice
You’ll uncover the Slice software program contained within the Cricut Design Space desktop app or mobile app.
On Desktop: You’ll uncover the Slice software program inside the Layers Panel inside the bottom right-hand nook of the show display, correct subsequent to the Weld Instrument. You may even uncover the Slice function inside the right-click menu.
On Cell: You’ll uncover the Slice software program inside the Actions sub-menu inside the toolbar on the bottom of the show display, between Weld and Flatten.
5 Strategies to Use the Slice Instrument
Now that we’ve lined the Slice software program fundamentals, let’s discuss various of my favorite strategies to utilize Slice inside Cricut Design Space.
Decrease shapes and textual content material from a much bigger background type
On this occasion, I’ll be making a gift tag. I’ve started with a protracted rectangle type, and smaller circle, and the phrase “Congrats.”
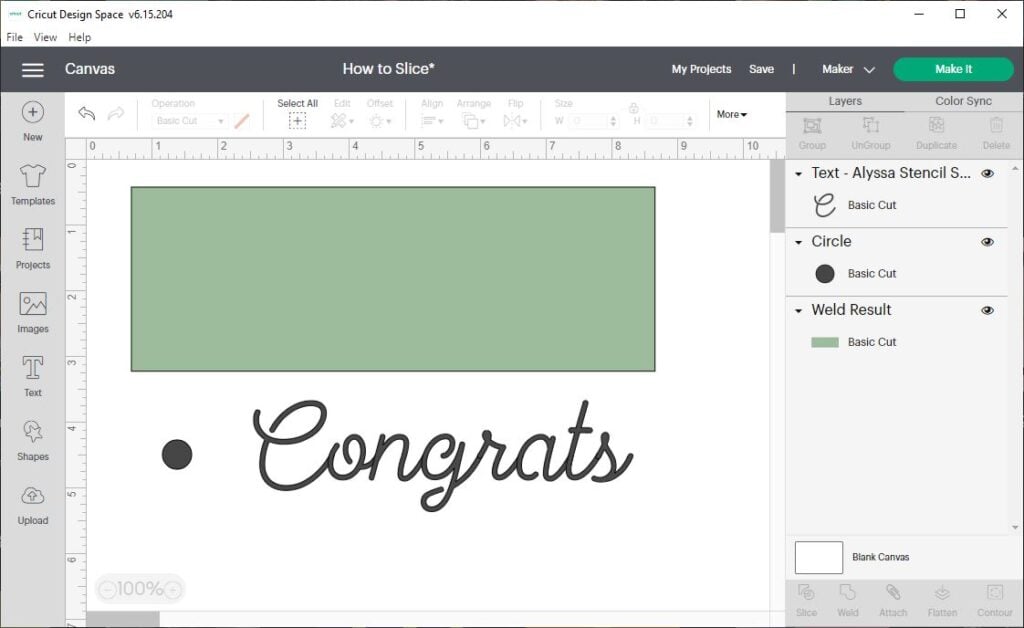
- Create a model new endeavor. Add the shapes and a textual content material discipline to the Canvas.
- We’ll start by using the smaller circle to punch a niche inside the rectangle reward tag, so we have a spot to tie a ribbon. Drag the circle on excessive of the rectangle. Select every layers, and click on on Align > Center Vertically to line them up. Then, with every layers nonetheless chosen, click on on Slice. You’ll see the Slice Consequence inside the Layers Panel on the very best aspect of your show display.
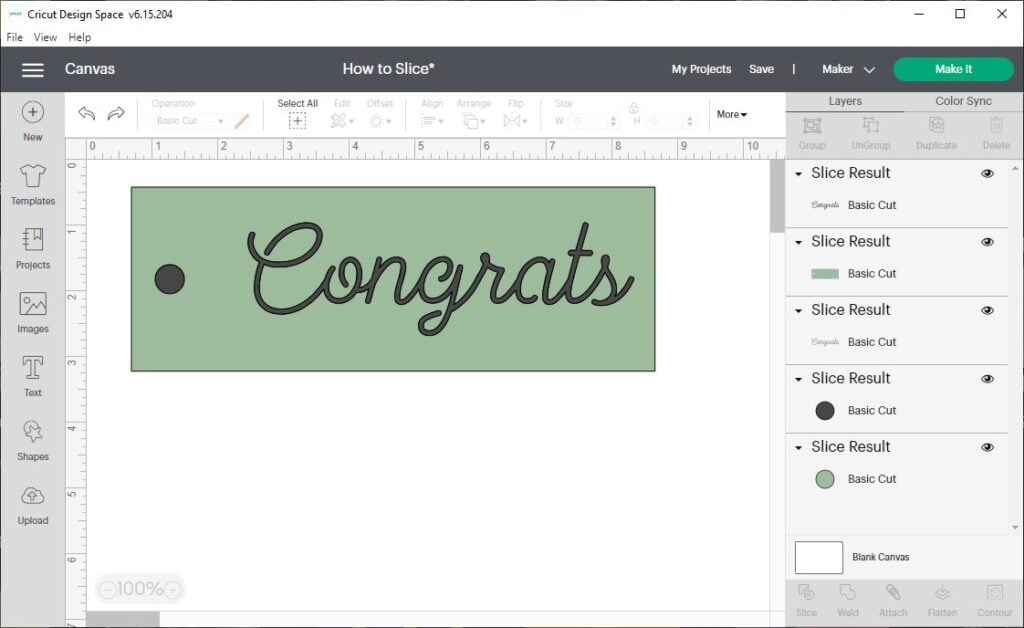
- Subsequent, we’ll repeat the strategy with the phrase “Congrats.” Drag the textual content material on excessive of the rectangle. Select every layers, and click on on Align > Center Vertically. Then, with every layers chosen, click on on Slice. You’ll be able to see the Slice Consequence inside the Layers Panel on the very best aspect of your show display.
Take into accout: We’re in a position to solely slice two layers at a time. So that you just’ll should make this reward tag in two steps: slice the circle first, after which slice the phrase second.
Let’s check out the outcomes.
- First, you’ll see that we nonetheless have the distinctive circle type and the distinctive textual content material layer. (These layers are in black.)
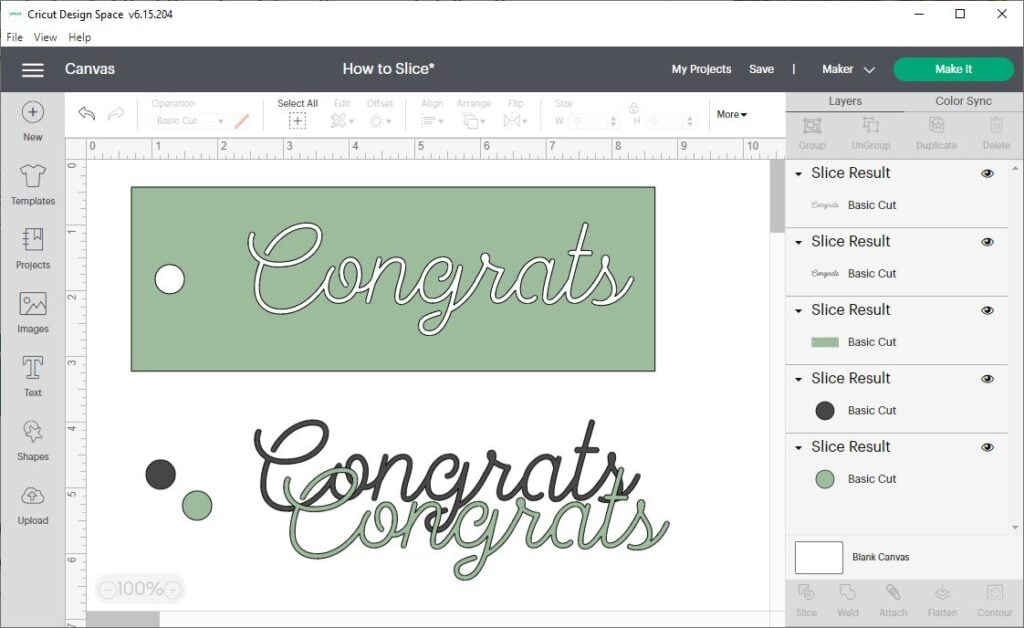
- Second, you’ll see the distinctive rectangle type with the circle hole and the phrase “punched out” of it. (This layer is in inexperienced.)
- And third, you’ll see the “punch-outs” themselves. These layers have been sliced from the rectangle. (These layers are in inexperienced, too.)
There may be further objects on the Canvas than you anticipated, nevertheless that’s okay. Within the occasion you look rigorously, you’ll see that the outcomes are just like using a bodily hole punch on a little bit of cardstock. You’ve got the punch itself, the cardstock type, and the small circle that was punched from the cardboard.
Within the occasion you don’t need the extra phrases and circles, you might merely delete them out of your Canvas.
Important bear in mind about textual content material: Take a extra in-depth check out the textual content material layers on this occasion. You’ll see that after we first added the phrase “Congrats” to the Canvas, it was an editable Textual content material layer. Nevertheless after we used Slice, Design Space modified the “Congrats” layer to a Slice Consequence – this means it’s an image, not an editable textual content material layer.
Create a model new type from two customary shapes
On this occasion, we’ll be making a crescent moon type from two circles.

- Start by together with two circle shapes from the Shapes toolbar to the Canvas. I’ve modified the colors of the circles to help current you exactly what’s occurring – nevertheless you don’t have to do that in your private endeavor.
- Drag one circle on excessive of the other circle, so that they’re overlapping. Click on on Align > Center Vertically so that the circles are all lined up.
- With every circles nonetheless chosen, click on on Slice. You’ll be able to inform it labored within the occasion you see the Slice Consequence layers inside the Layers Panel on the very best aspect of your show display.
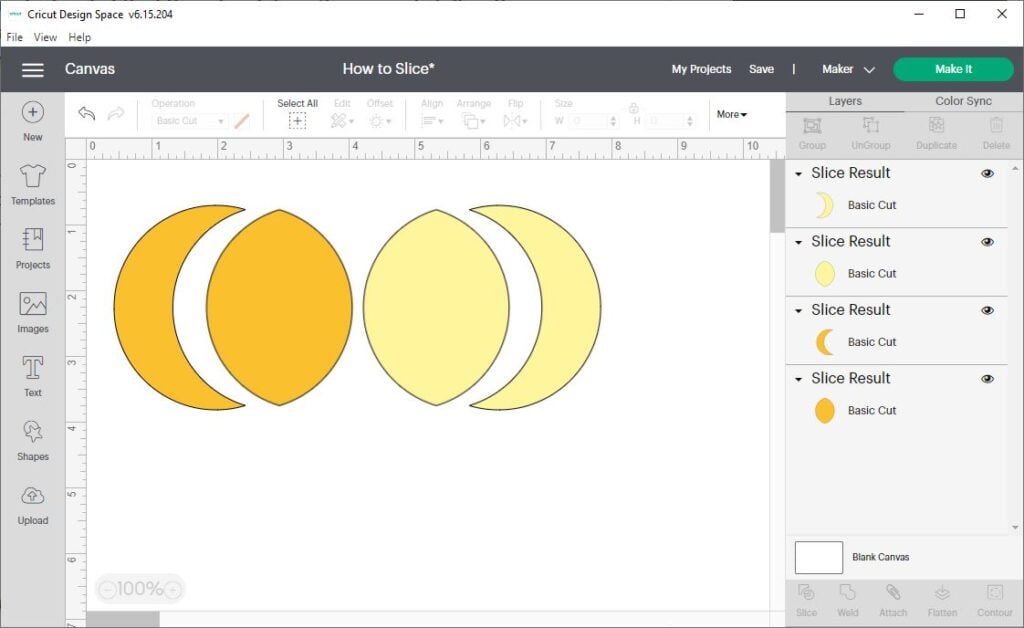
Let’s check out the outcomes. You’ll see that the Slice software program has decrease apart the layers wherever their edges overlapped.
- You’ll have the orange circle decrease into two objects, the place it overlapped by the yellow circle.
- And, you’ll nonetheless have the yellow circle decrease into two objects, exactly the place it overlapped by the orange circle.
You may need ended up with further objects than you anticipated. Nevertheless, you might even see on this occasion how nothing was deleted or added to the Canvas. You proceed to have the yellow and orange circle – they’re merely sliced into two objects each.
As a result of you probably don’t want all of these objects to your endeavor, you might merely delete the layers you don’t need.
Crop an image.
Thought-about one in every of my favorite strategies to utilize the Slice function is to crop a premade design or decrease file. On this occasion, we’ll use Slice to trim away undesirable design components from a Cricut Entry Library image.
Start a model new endeavor and add an image to the Canvas. On this occasion, I’ll be using this Father’s Day Banner.
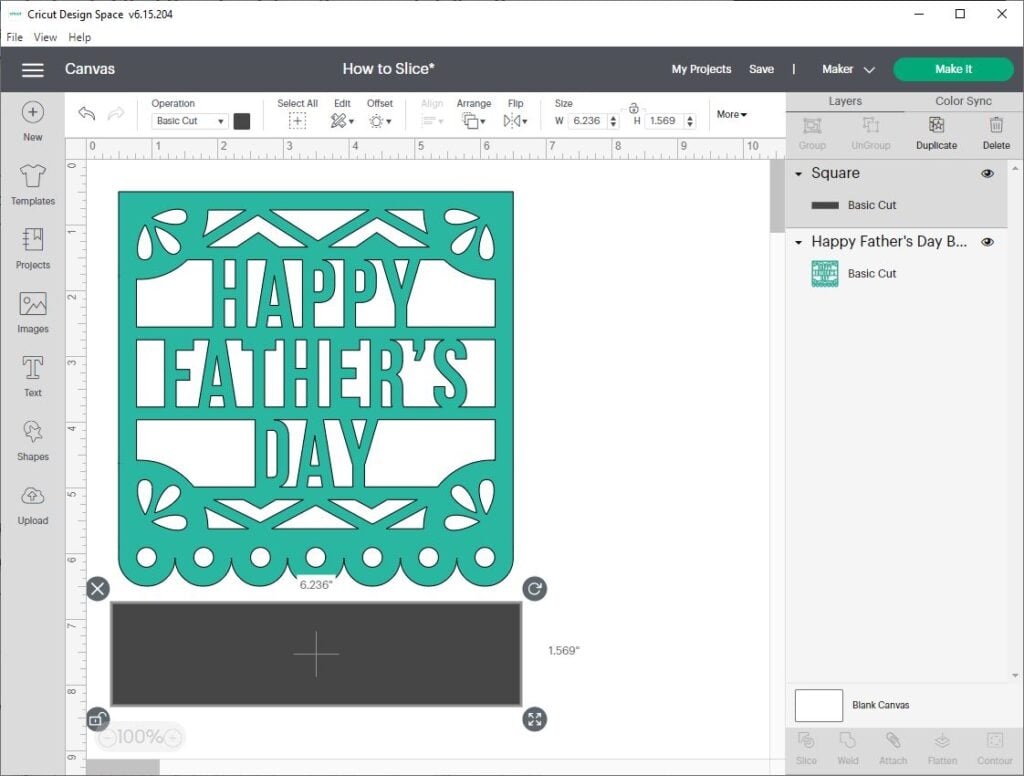
Now, I really like this design – nevertheless let’s faux I wish to chop off the scalloped bottom edge so that I can flip it proper right into a greeting card.
- First, add a sq. type to the Canvas, and resize it to be large enough to cowl the underside fringe of the banner design.
- Drag the shape over the banner layer, and place it to overlap the realm of the banner you want to trim off.
- Select every layers, and click on on Slice. You’ll know it labored within the occasion you see the Slice Consequence layers inside the Layer panel.
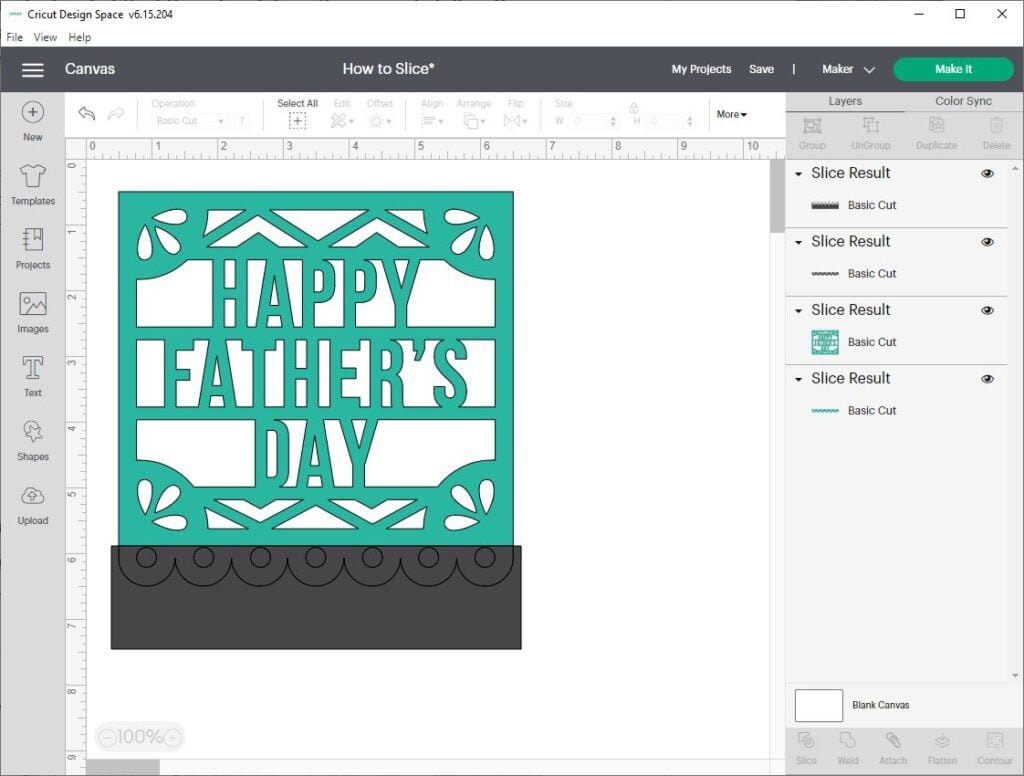
Now, let’s check out the outcomes. You’ll see 4 objects: the distinctive banner, the half we sliced off, the distinctive rectangle, and the part of the rectangle that overlapped the banner.
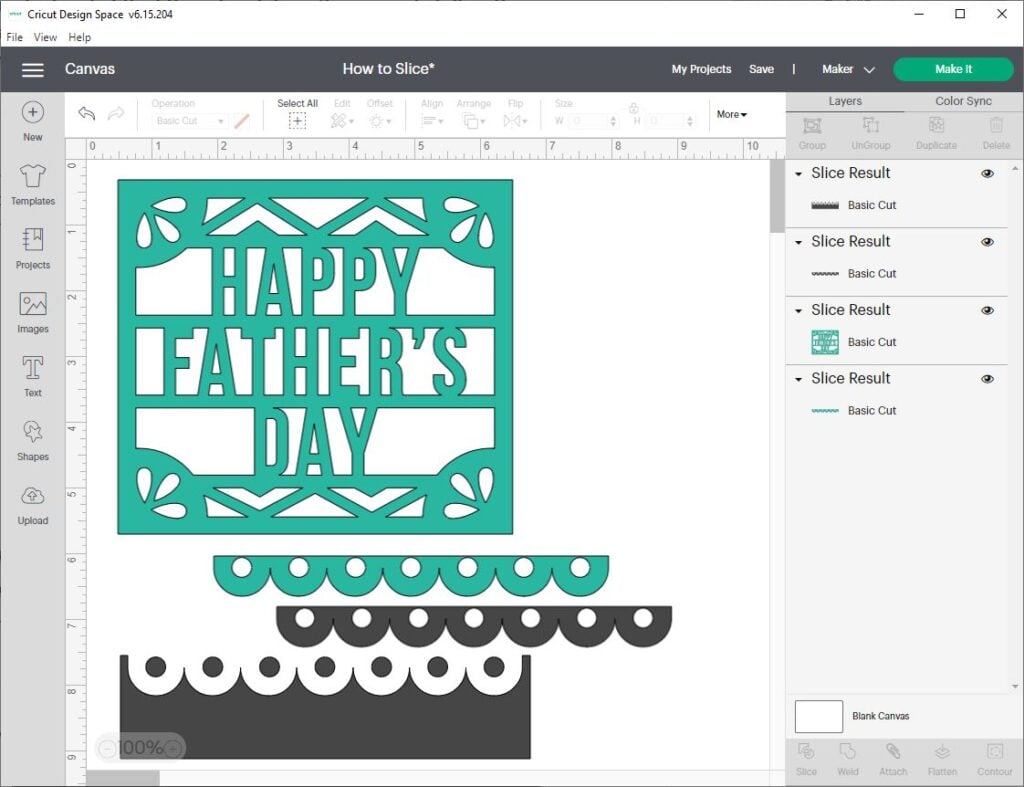
Delete the extra layers, and in addition you’ll be left with a banner design with 4 straight edges.
Decrease an image into various objects and layers.
Proper right here’s an excellent simple methodology to utilize the slice software program to separate an image into various parts.
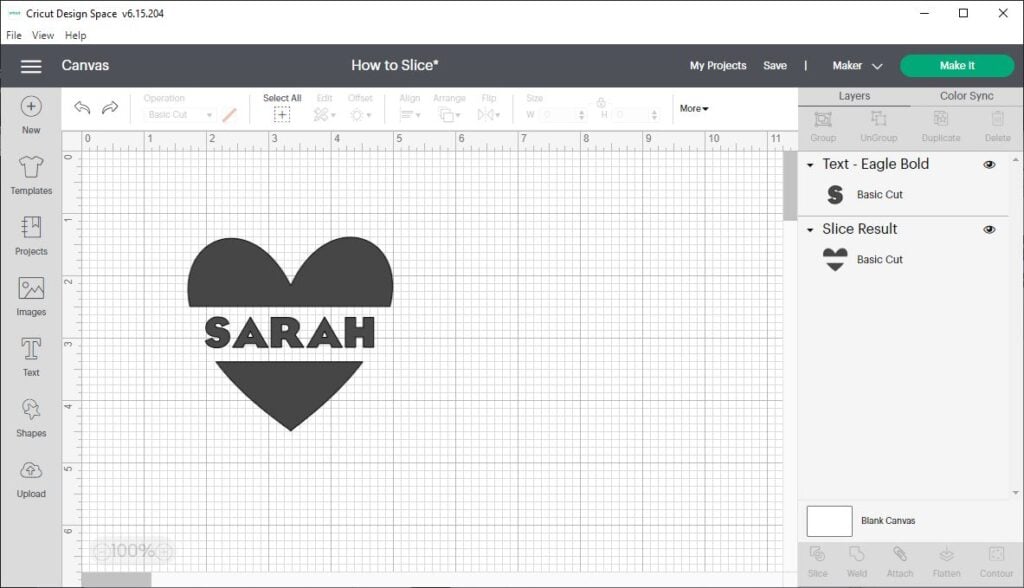
On this occasion, I’ll be using the Slice software program to cut a coronary coronary heart into two halves to create a minimize up monogram.

- Use the Shapes menu inside the left-hand toolbar in order so as to add a coronary coronary heart type to your canvas. Then, within the an identical methodology, add a sq. to the canvas.
- Resize the sq. right into a protracted rectangle, and drag it so that it overlaps the center of the middle. You may even click on on Align > Center vertically so that the two shapes line up utterly.
- Select every shapes and click on on Slice. After you delete the extra layers, you’ll be left with a coronary coronary heart type divided into two separate objects.
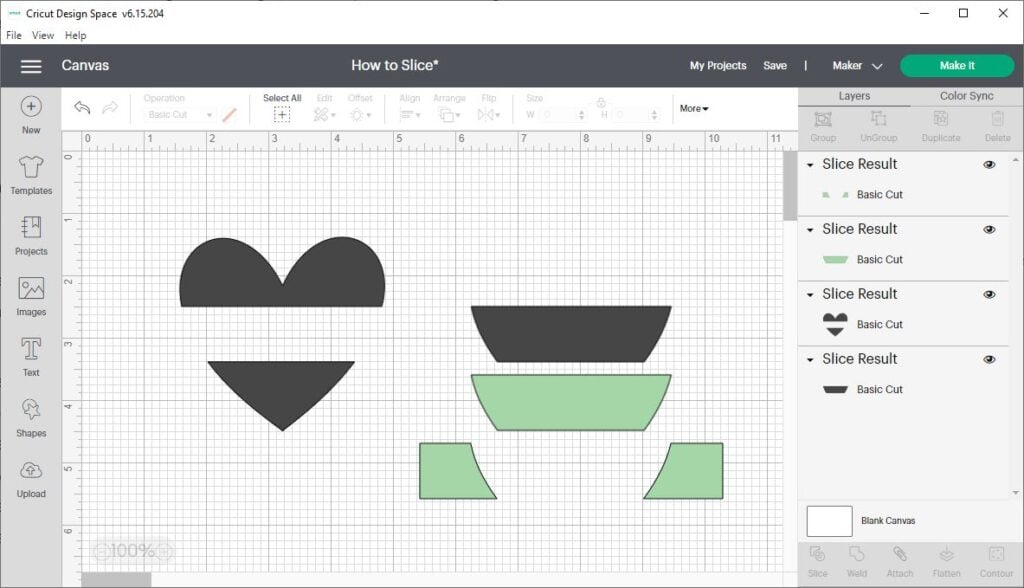
Listed beneath are the outcomes. After you delete the layers you don’t want, you’ll be left with a minimize up coronary coronary heart image. Now, you might add regardless of textual content material you want to create the minimize up monogram.
Bear in mind: Regardless that the middle seems to be like favor it’s minimize up into separate halves, the shape stays to be one Slice Consequence layer. If it’s essential have the power to switch the best and bottom objects of the middle independently, then you’ll have to place them on their very personal layers. To do that, you’ll should slice the image one other time.
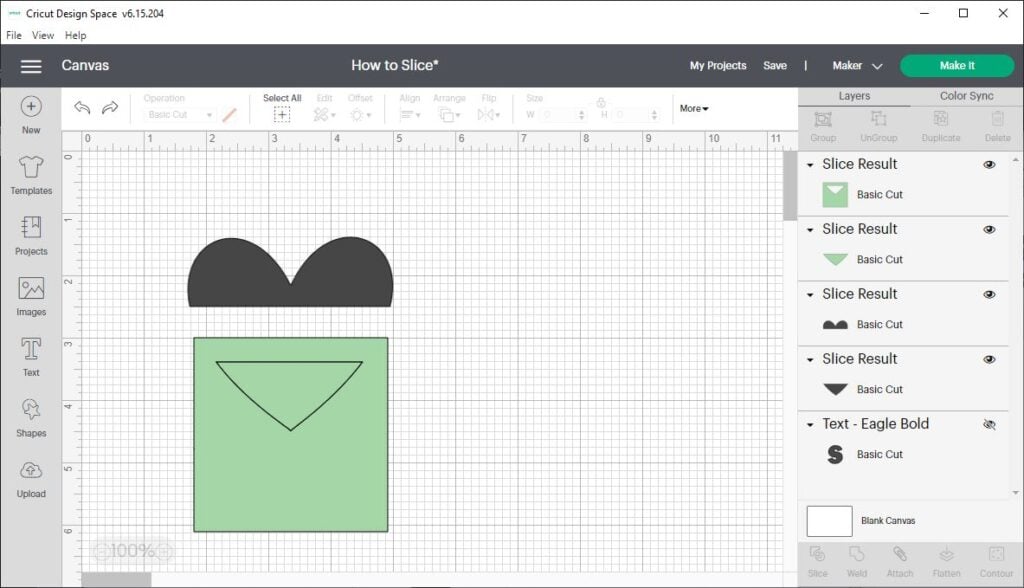
Create a model new rectangle and place it over your total bottom half of the middle. Select the middle and the rectangle and press Slice as soon as extra. It can put each half by itself layer.
Modify or rearrange a ready-made image.
Proper right here is one different methodology to utilize the Slice software program to vary or rearrange a ready-made design.
Let’s say I want to use a ready-made design from the Cricut Image Library, but it surely absolutely’s too prolonged to swimsuit on my endeavor. I can use the Slice software program to cut the image apart and rearrange it, so it matches.
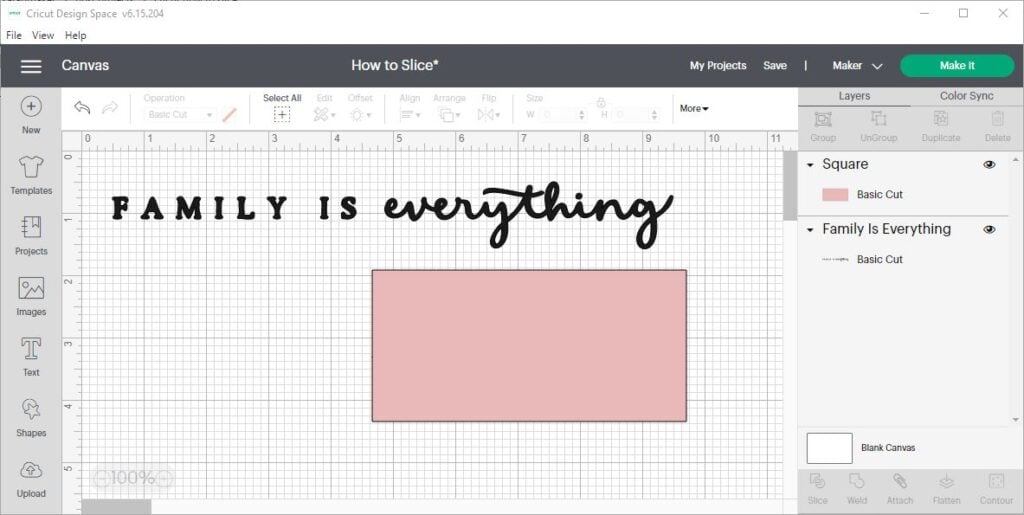
On this occasion, I’m using the quote “family is all of the items”. That could be a image layer from the Photos library, not one factor I’ve typed.
- Start a model new endeavor and add a quote design to the Canvas. Within the occasion you look inside the Layers panel, you’ll see that the “family is all of the items” quote is all one image layer. It’s not one factor I’ve typed myself, so I can’t merely edit it with the Textual content material software program.
- What I can do is decrease it apart with the Slice software program, and rearrange it. To try this, add a rectangle to the Canvas and resize it so it overlaps the phrase “all of the items.”
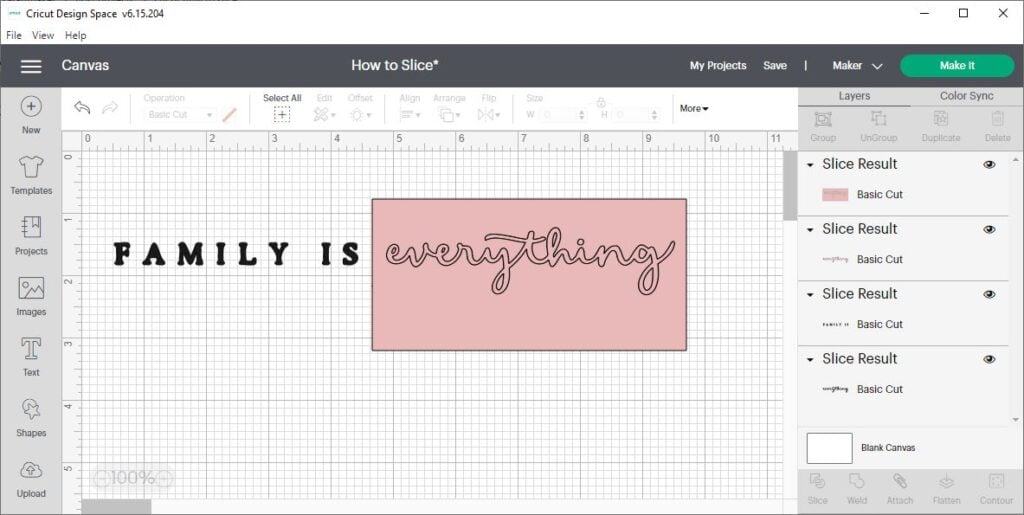
- Select every layers, and Click on on Slice. Now click on on and drag the layers to tug them apart and see your outcomes.
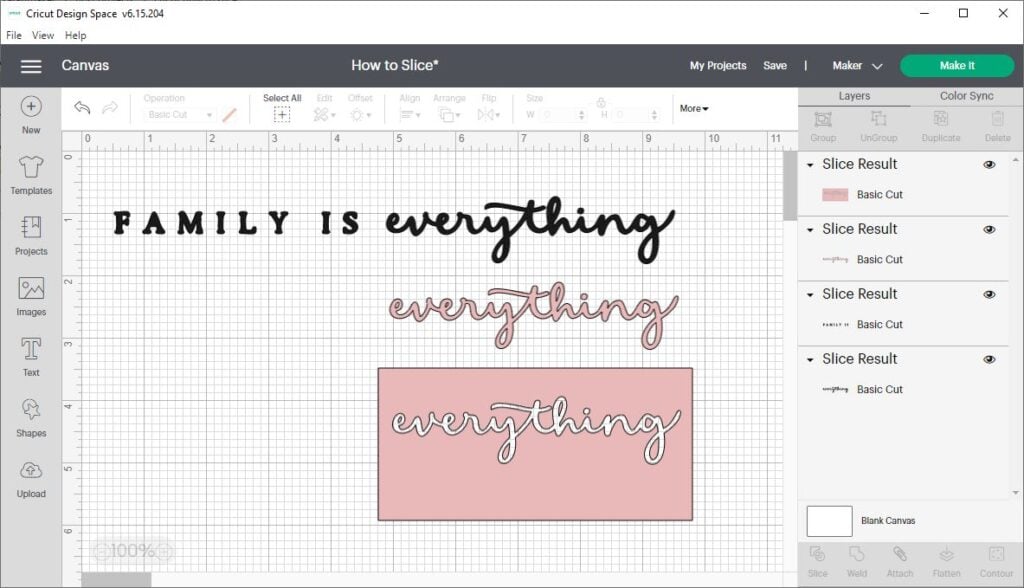
Listed beneath are the outcomes. After you delete the extra layers, so that you just’re left with the two layers you want: the phrases “family is” on one layer and “all of the items” on a second layer. Now, you might click on on and drag the phrase “all of the items” beneath the “family is” layer.

Using Slice with Textual content material
You need to use the Slice software program to cut out textual content material from one different image, too. The Slice software program treats all the actual individual letters as one single layer. So, usually, using Slice with textual content material is analogous as using Slice with images.
- Add a textual content material layer to the Canvas, and edit it with the textual content material devices as typical.
- Drag the textual content material so that it overlaps one different layer.
- Select every layers and click on on Slice.
After you use Slice on a textual content material layer, it’ll develop to be a Slice Consequence layer – aka an image layer. Which implies you may not be able to edit it with the textual content material devices – like font measurement or letter spacing.
Multi-layer Textual content material
The Slice software program treats multi-layered textual content material considerably differently than it treats completely different images. Listed beneath are these variations:
- If the textual content material is multi-layered and one layer is hidden, it’s essential use the Slice software program.
- Nevertheless, when the Slice function is carried out with hidden layers, all hidden layers will seemingly be far from the Canvas and the Layers panel. So, if you happen to want to keep these hidden layers in your endeavor, it’s essential ungroup them sooner than using the Slice software program.
Troubleshooting Frequent Points
Listed beneath are some FAQs and customary factors that you could possibly be run into when using the slice software program.
Why can’t I exploit Slice in Cricut Design Space?
Within the occasion you’ll be able to’t use the Slice button, it’s unavailable to utilize with the layers you in the mean time have chosen. Listed beneath are some the reason why the Slice button isn’t working.
- You solely have one layer chosen. To utilize Slice, it is important to have two layers chosen.
- You’ve got larger than two layers chosen. Slice works with two layers at a time.
- Considered one of many layers is in a Group. To utilize that layer, Ungroup it sooner than using Slice.
- Considered one of many layers is Hidden. Unhide that layer sooner than using Slice.
Why is the Slice button grayed out?
If the Slice button is grayed out, it implies that the Slice risk is unavailable to utilize collectively along with your current selection. To restore it, simply bear in mind to’ve chosen solely two layers, and that each layer is Ungrouped and Seen.
How do I select a few layer?
With a view to make use of Slice, it is important to decide on two layers in Design Space. Listed beneath are various strategies to pick a few layer in Cricut Design Space
On Desktop
- Click on on and drag a range discipline spherical two shapes to pick every of them.
- Keep down the Shift key ( on PC) or the Ctrl key (on Mac) in your keyboard whereas clicking on each layer on the Canvas.
- Keep down the Shift key ( on PC) or the Ctrl key (on Mac) in your keyboard whereas clicking on each layer inside the Layers panel.
On Cell
- Faucet on the show display and drag a range discipline spherical every layers.
- On the Canvas, faucet on one layer to pick it, then long-press on the second layer to pick it.
- Throughout the layers panel, faucet on one layer to pick it, then long-press on the second layer to pick it.
Why are there so many layers after using Slice?
Slice cuts two images into various objects by creating new decrease traces wherever their edges overlap. While you’ve received two overlapping circles, Circle A will seemingly be decrease into various objects wherever it overlaps with Circle B. Circle B will seemingly be decrease into various objects wherever it overlaps with Circle A.
Counting on which shapes you choose and the best way they overlap, you probably can end up with 3, 4, or way more utterly completely different parts.
Even so, within the occasion you pull the layers apart and put them once more collectively like a puzzle, you’ll see that nothing was added to the Canvas. Each half was already there; it’s merely sliced apart into various Layers now.
Can I exploit Slice on textual content material layers?
Positive, it’s essential use Slice on textual content material layers. Drag the textual content material layer so it overlaps one different layer. Select every layers, and click on on Slice.
Why is my textual content material not editable after Slice?
Like we talked about inside the examples above, Slice treats single-layer textual content material as an image. After using Slice on a textual content material layer, it turns right into a Slice Consequence – aka an image layer. Which means you cannot return and edit it with the usual textual content material devices, similar to font and letter spacing.
How can I exploit Slice on various layers?
As I mentioned sooner than, Slice works on two layers at a time. While you’ve received three or further layers you want to Slice, you’ll should Slice them in steps, two at a time.
Additional About Cricut Design Space
Isn’t Slice such a unbelievable software program? I hope you’ve found some cool tricks to make use of the next time you’re in Design Space!
Everytime you’re ready for further superior Design Space concepts, check out these posts:
What’s Subsequent?
Pin this put up: Save this tutorial to your Pinterest boards as a strategy to come once more to it later.
Depart a comment: We like to take heed to your ideas. Inform me inside the suggestions beneath!
Share on Instagram or Fb: Everytime you make this endeavor, share it on social media and tag me @sarahmaker_. We wish to see what you make!
Have questions? Be a part of the Fb Group!
We hope this textual content was useful for you! While you’ve received any additional questions, be comfortable to hitch my Fb Group. We created this group to be able to share footage, ask questions, and help each other out.

Provides
- SVG recordsdata or images inside Design Space
Instructions
- Put together 2 images so that they’re overlapping. Click on on and drag the images so that they overlap. Within the occasion you try and Slice two images that aren’t overlapping, nothing will happen.
- Select every layers. Don’t forget that after you are using Slice with images, you might solely work with two layers at one time. As quickly as you select the two layers, a gray bounding discipline will appear spherical every images, and the individual layers will seemingly be highlighted inside the Layers panel.
- Click on on the Slice button on the bottom of the Layers panel within the occasion you are on a laptop or inside the Actions menu on the bottom of the show display within the occasion you are using the iOS and Android app.
- See your outcomes. Separate the layers to see your new shapes. Now you might edit the layers individually, and delete any layers you do not need.