
In a position to study to make use of your Cricut? This Cricut beginner’s data will practice you all of the items you should know to get started collectively along with your new machine. We’ll cowl the basics of how Cricut machines work and what supplies you should make your first enterprise. After that, we’ll go over some incessantly requested questions and phrases so that you just don’t get aggravated or discouraged!

The way in which to Use a Cricut for Learners
Merely obtained a mannequin new Cricut Machine? Congratulations!
Ponder this put up your remaining data to Cricut for newbies. We’ll go over the way in which it really works, what you should use one, and some of my most interesting recommendations on getting started collectively along with your first initiatives. I hope that after you study it, the Cricut learning curve gained’t be pretty so steep.
Be pleased to utilize the Desk of Contents to leap spherical and go to the sections you most should study.
Getting Started with Cricut
Cricut machines are designed to be straightforward and easy to utilize. That acknowledged, they do take some getting used to – notably in case you’re a Cricut beginner.
After you open the sphere, you’ll in all probability find yourself questioning:
- Now, what do I do?
- What should I make first?
- How do I get started?
I keep in mind I was so excited to get my first Cricut machine and make all the initiatives and handmade presents on my Pinterest board. Nevertheless, to be utterly honest, I was moreover pretty intimidated by my new machine.
- Will I be succesful to work out the design software program program?
- What provides should I try first?
- What further supplies and devices do I would like?
I get it! I keep in mind what it’s choose to be a Cricut newbie.
My first enterprise may not have been Instagram-worthy – nonetheless that didn’t matter. I cherished the strategy (and the short, clear cuts), and I’ve on no account regarded once more. Since then, I’ve made so many pleasing initiatives, along with celebration and residential decor, t-shirts, stickers, and Christmas taking part in playing cards!
Now that I do know additional, I reap the benefits of my Cricut frequently. I’ve found heaps over time, and I hope this weblog put up will help Cricut newbies who desire a bit little little bit of help getting started.
What’s a Cricut?
A Cricut is a lowering machine which will cut back every kind of assorted provides, corresponding to paper, card stock, adhesive vinyl, and heat change vinyl.
It’s best to use a Cricut to cut completely something you’d typically cut back with scissors or a craft knife – nonetheless with way more tempo and precision than you may ever do by hand!
For additional particulars about what a Cricut can do, do this put up: What’s a Cricut Machine, and What Can it Do?
How does a Cricut work?
You’ll take into account a Cricut machine like a printer – nonetheless instead of printing an image onto a little bit of paper, it cuts a kind out of a sheet of paper or vinyl.
When you open up a Cricut machine, you’ll see a small blade that strikes spherical on a carriage to cut the design you’ve chosen. The fine-point blade is type of a miniature X-acto knife which will cut back even in all probability essentially the most delicate and sophisticated shapes.
Which Cricut machine do it’s important to get?
There are presently three sorts of Cricut machines within the market: The Cricut Uncover 3, the Cricut Maker 3, and the Cricut Pleasure.
- The Cricut Uncover 3 is the mid-level alternative and the best-selling machine. It could cut back various provides and make plenty of a number of sorts of initiatives. (This model replaces the sooner Cricut Uncover Air 2 model.)
- The Cricut Maker 3 is a additional extremely efficient model which will cut back a higher number of provides, along with thicker provides like balsa picket. The Maker 3 will also be acceptable with additional sorts of devices, similar to the scoring wheels, rotary blade, engraving tip, and knife blade.
- The Cricut Pleasure is a smaller model that’s transportable, easy to rearrange, and straightforward to utilize.
What’s the right Cricut machine for you? Be taught this put up for an in depth comparability of all current Cricut fashions: Cricut Comparability: Which Cricut Machine is the Best for You?
What sorts of provides can Cricut cut back?
Cricut machines can cut back such a giant variety of provides, it is perhaps arduous to guidelines all of them. The reality is, given that Cricut group is constantly testing new provides, you might depend on this guidelines to develop over time.
Quite a lot of the hottest sorts of lowering provides embrace:
- aluminum foil
- butcher paper
- cardstock
- chalkboard vinyl
- growth paper
- copy paper
- cardboard
- craft foam
- iron-on vinyl
- faux leather-based
- felt
- glitter cardstock
- glitter vinyl
- Infusible Ink sheets
- magnetic sheet
- pure picket veneer
- parchment paper
- eternal vinyl
- printable sticker paper
- removable vinyl
- smart provides
- stencil film
- vellum
- washi tape
- wrapping paper
Each of the three current Cricut fashions can cut back a barely utterly completely different alternative of provides.
- The Cricut Uncover 3 can cut back higher than 100 provides – along with cardstock, vinyl, iron-on vinyl, glitter paper & bonded materials.
- The Cricut Maker 3 cut back higher than 300 sorts of provides, along with paper, vinyl, materials, paper, picket, and leather-based.
- The Cricut Pleasure cut back higher than 50 provides, along with paper, vinyl, iron-on, and some skinny faux leather-based provides.
Do that helpful article for additional particulars about provides, cut back stress settings, and blade form.
A observe on supplies producers: You do not need to buy Cricut mannequin provides to realize success. I’ve used and cherished Cricut vinyl, nonetheless I’ve moreover had success with Oracal and Siser mannequin vinyl.
What completely different supplies and devices would you like?
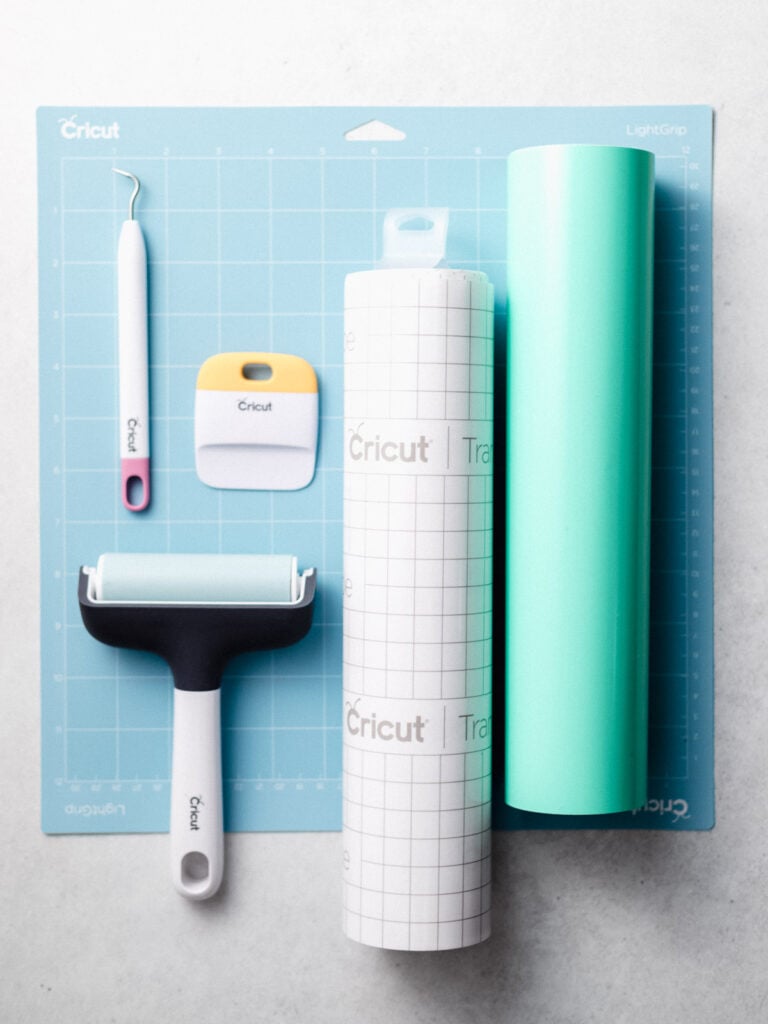
Your new Cricut machine will embody quite a few supplies and devices that you just’ll should get started. Contained within the subject, you’ll uncover a blade, a pen, and supplies samples in your first enterprise. (Quite a lot of the machines embody Cricut lowering mats, some don’t.) You’ll moreover get a charging twine and USB cable, if acceptable.
Provides
After you make that first apply enterprise, you’ll need to buy some additional supplies and provides so you might maintain creating.
- In case you want to make paper initiatives, retailer for scrapbooking paper, cardstock, and vellum.
- In case you favor to make vinyl initiatives, you’ll want some adhesive vinyl, iron-on vinyl, and change tape.
- In case you want to try Cricut Infusible Ink initiatives, you’ll need the Infusible Ink sheets or markers and a acceptable “clear” merchandise.
Mats
In case your machine didn’t embody lowering mats, you might have to buy some further mats. Cricut lowering mats can be found in 4 utterly completely different strengths – each for a number of sorts of provides. You should buy mats which could be 12″ sq. or 12″ by 24″ for larger initiatives. Click on on proper right here for a data to Cricut lowering mats.
Blades
If in case you’ve got a Cricut Maker, you can purchase additional Cricut blades and devices which will may help you make a number of sorts of initiatives. Quite a lot of the obtainable devices embrace the engraving software program, the knife blade, the scoring wheels, and the rotary blade for material. Click on on proper right here for an entire data to Cricut blades.
Pens
Are you aware that you might write collectively along with your Cricut? In case you insert Cricut pens or markers into the dual software program holder, you must use your Cricut to take care of taking part in playing cards and envelopes, or draw intricate designs in your paper initiatives.
Hand Devices
I moreover advocate searching for quite a few low cost hand devices which will make creating collectively along with your Cricut even less complicated. At a minimal, you’ll desire a weeding software program and a scraper software program.
Cricut presents quite a few beginner kits, along with a Main Gadget Set and an Essential Gadget Set. These kits embody in all probability a very powerful handheld devices, along with tweezers, a weeding software program, scissors, a small spatula, scraper, a scoring stylus, and a paper trimmer.
Click on on proper right here for an entire data to Cricut devices and gear.
Heat Press
In order to use iron-on vinyl to your initiatives, you’ll should press it with a heat press, household iron, or Cricut EasyPress. It’s best to use any of these three – nonetheless I would like the EasyPress for a lot of initiatives on account of it heats so evenly and persistently.
The way in which to Make your First Cricut Enterprise
The first step is to take your new machine out of the sphere, and plug it in near your laptop computer. Then, be a part of a free Cricut ID account, receive the Cricut Design Space app, and arrange it in your laptop computer.
After that, you’re in a position to make your first enterprise. Listed beneath are the basic steps to using a Cricut:
- First, choose a design in Cricut Design Space. You’ll select a pre-made image or design your private.
- Then, select your lowering supplies and place it on the sticky lowering mat. The mat will keep the material in place whereas the Cricut cuts the design. Then, press the button to load the mat into the machine.
- Select the precise supplies settings in Design Space, and ship the design to your Cricut lowering machine.
- Press the flashing button in your Cricut machine to start lowering.
- After the machine finishes lowering the design, take away the mat from the machine, and the material from the mat.
Now, you might take your cut back paper gadgets or vinyl designs, and add them to your initiatives.
What types of Cricut initiatives can you make?
It’s best to use a Cricut to make an unlimited variety of utterly completely different craft initiatives. Listed beneath are quite a few of the most interesting Cricut initiatives for newbies:
- iron-on t-shirts and onesies.
- handmade greeting taking part in playing cards
- leather-based earrings and bracelets
- paper banners and celebration decorations
- personalized stickers
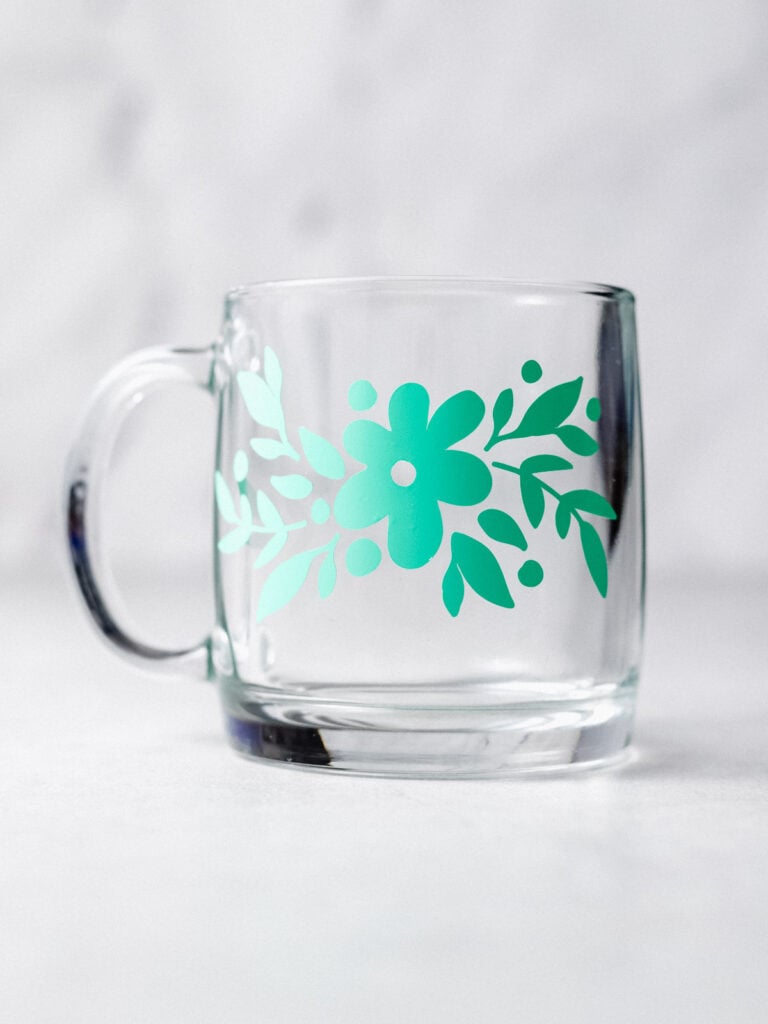
- monograms for a mug, cup, or tumbler
- sort out envelopes and invitations
- stencils for glass etching
- personalized painted picket sign
- vinyl decals for automotive dwelling home windows
- personalized pantry labels
- stencils for a painted doormat
- quilt blocks and applique shapes
The way in which to Set Up Your New Cricut
Sooner than you may start crafting, you’ll should organize your new machine. To set it up, you’ll desire a computer or a mobile gadget and an internet connection.
If in case you’ve got the choice, I wish to suggest organising your Cricut with a desktop laptop computer or laptop computer laptop.
Listed beneath are the steps to rearrange a model new Cricut.
- Plug in and change in your machine.
- Pair the machine to your laptop computer or mobile gadget with the USB twine or Bluetooth
- Go to Cricut.com/setup to acquire Design Space.
- Adjust to the on-screen prompts to complete the setup course of.
It seems straightforward, correct? Do that tutorial, which may stroll you through all of the items in a bit additional ingredient: The way in which to Set Up Your New Cricut
The way in which to Get hold of and Arrange Design Space
As you observed throughout the half above, the first part of the setup course of is downloading and placing within the Design Space software program program.
Cricut Design Space is a design software program program software program that you just’ll use to create the photographs that you just’ll cut back collectively along with your Cricut. You’ll receive it to your desktop, or use the Design Space mobile app in your iPhone, iPad, and Android models.
Design Space is free to acquire and comes with many free pictures and fonts. For an extra value, you must use pictures and fonts from the Cricut Entry library, which you’ll uncover inside Design Space.
Proper right here’s the way in which to acquire and arrange Design Space in your laptop computer:
- Open up an internet browser window, and go to cricut.com/setup.
- Get hold of and arrange the Cricut Design Space app for Desktop.
- Adjust to the on-screen instructions to create and register with a Cricut ID.
- On the next show display screen, select your machine.
- Plug throughout the machine with the ability twine and press the Vitality button to point out it on.
- Use the included USB twine to connect the machine to your laptop computer, or pair it by means of Bluetooth. (Pleasure machines ought to use Bluetooth.)
- At this stage, Design Space may ask you to attend whereas it updates your machine.
- Then, Design Space will rapid your to register your machine.
Be taught this Cricut Setup Info for additional even particulars about downloading Design Space and organising your new Cricut.
The way in which to Use Design Space for Learners
Design Space is the design program you’ll use to create and customise designs and ship them to your Cricut to cut. Like all software program program program, it takes a while to check and completely grasp. Nevertheless you’ll be able to do it!
Let’s start with a brief overview. There are 4 principal screens in Design Space:
- The Dwelling show display screen. That’s the place you’ll uncover your saved pictures, saved initiatives, the featured ready-to-make initiatives, and some Cricut Youtube motion pictures.
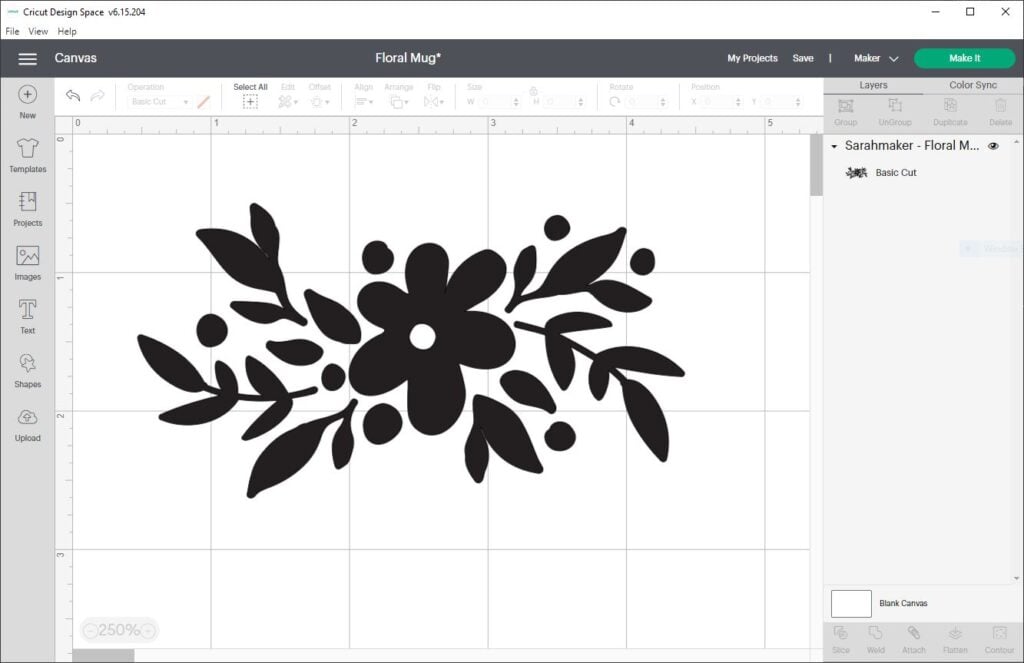
- The Canvas show display screen. That’s the place you’ll do your entire designing and enhancing. You’ll add your private pictures and SVG recordsdata, add textual content material, patterns, and shapes.
- The Put collectively Show. After you click on on “Make it,” you’ll go to the Put collectively Show, the place you’ll see the mat preview. Proper right here you might rearrange objects on the mat, change the number of enterprise copies, or “Mirror” your enterprise.
- The Make Show. On this show display screen, you’ll choose your provides settings, double-check that you have the suitable devices and pens inserted into the dual software program holder, and start the cut back.
Design Space is a gigantic topic that truly deserves its private sequence of tutorials. Listed beneath are some additional Design Space tutorials for newbies:
The way in which to Add Your Private Pictures
Are you aware that you might add your private designs into Cricut Design Space? Cricut Design Space will take your uploaded pictures and convert them into cuttable shapes.
All it takes is 4 straightforward steps (or solely three steps in case you’re using SVG cut back recordsdata!)
- Open the Cricut Design Space app and start a model new enterprise.
- Click on on the Add button, and select the image file you must add.
- Select the image form and take away the background with the numerous eraser devices. (For raster pictures solely – jpg and png pictures.)
- Title the image, add tags, and click on on Add to complete.
It’s best to use these steps when importing photographs from the Cricut Design Space app in your desktop, laptop computer laptop, or mobile gadget (like an iPhone or iPad).
Click on on to study a tutorial which will stroll you through the strategy in further ingredient: The way in which to Add Pictures to Cricut Design Space
The way in which to Add Your Private Fonts
Have you ever ever ever wished to utilize your private fonts to Cricut Design Space? The good news is that importing fonts to Cricut Design Space is a lot simpler than chances are high you will suppose.
Listed beneath are the basic steps to downloading a model new font and accessing it inside Cricut Design Space.
- Get hold of the font that you just want to make use of.
- Unzip the font file folder. Double click on on on the particular person font file. Adjust to the prompts in your laptop computer to place within the font file.
- As quickly because the font is put in, open Cricut Design Space.
- Create a model new enterprise, and add a model new textual content material subject to your Canvas. Then, click on on on the font drop-down menu throughout the prime toolbar to change the font.
For heaps additional information, along with the way in which to arrange on House home windows, Mac, iPhone, iPad, and Android, make certain you study: The way in which to Add Fonts to Cricut Design Space
The way in which to Decrease Paper on a Cricut
Paper lowering is probably going one of many commonest sorts of Cricut initiatives for newbies. It’s an efficient solution to get conscious of your machine with out worrying about messing up expensive provides.
Chopping Paper on a Cricut
- Place the paper or cardstock onto Cricut LightGrip lowering mat.
- Create the design in Design Space, and cargo the material into the machine.
- Select the appropriate supplies settings, and cargo the super stage blade into the machine.
- Press Go to start the cut back.
- When the cut back is full, unload the mat.
Proper right here’s an very important tip about eradicating the paper from the mat. As a substitute of peeling the paper off the mat, flip the mat the flawed manner up and peel the mat away from the paper. This may actually really feel awkward until you get the dangle of it – nonetheless it really is likely one of the greatest methods to forestall the paper from curling.
Click on on proper right here for additional particulars about the way in which to scale back paper and cardstock with Cricut.
The way in which to Decrease Vinyl
After you’ve made a paper enterprise or two, you’re ready to start lowering vinyl.
On the planet of Cricut crafting, there are two principal courses of vinyl: adhesive vinyl and heat change vinyl. (Cricut calls their line of heat change vinyl “Iron-On vinyl” – nonetheless it’s the an identical issue.)
Adhesive vinyl is utilized to initiatives like a sticker. It’s obtainable in a variety of sorts, along with removable and eternal adhesive vinyl.
Adhesive vinyl has two layers: the vinyl itself and a paper backing. After the vinyl design is cut back, peel off the paper backing and apply it to your initiatives with a bit stress (not heat).
Listed beneath are the easy steps to cut back adhesive vinyl collectively along with your Cricut:
- Design your enterprise in Cricut Design Space, or load a pre-made design file.
- Place the vinyl on the lowering mat with the paper backing side down. Load the lowering mat into the Cricut machine.
- Once more in Design Space, choose the appropriate supplies settings. Load the precise blade into the machine. Press the Go button to begin lowering.
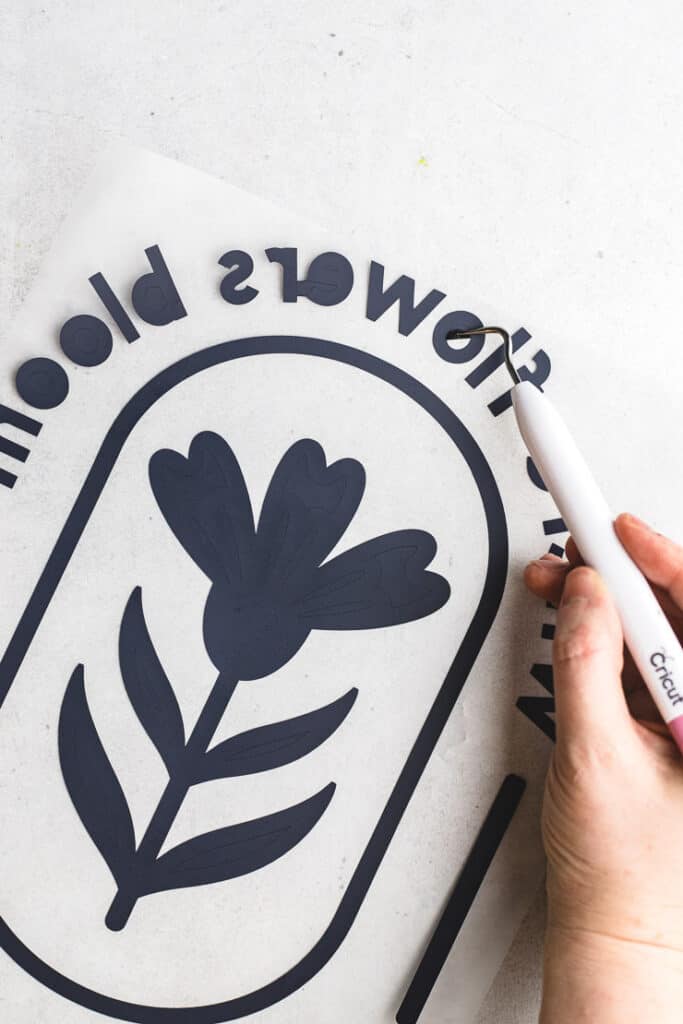
- When the cut back is full, unload the mat. Weed the excess vinyl from the design with a weeding software program.
For additional information, along with software program options and troubleshooting errors, study this tutorial: The way in which to Decrease Vinyl with Cricut
The way in which to Decrease Iron-On Vinyl
After you make a couple of initiatives with adhesive vinyl, try using iron-on (aka heat change vinyl).
Iron-on vinyl is a specific type of craft vinyl with a heat-activated adhesive. One in all these vinyl adheres to materials or completely different surfaces when pressed with a heat provide like a household iron or an EasyPress.
Iron-on vinyl moreover has two layers: the vinyl itself and a plastic supplier sheet. In case you’re taking a greater look, you’ll uncover that iron-on vinyl has a boring side and a shiny side. The shiny side is the side with the plastic liner.
Chopping iron-on vinyl is rather like lowering adhesive vinyl, nonetheless with quite a few very important variations.
- Load the vinyl onto the Cricut lowering mat with the “Shiny side down.”
- Be sure that to click on on the “Mirror” toggle button in Design Space to replicate the design sooner than you chop it.
- After weeding the design, use the plastic supplier sheet to change the design to your enterprise.
Click on on proper right here additional a step-by-step tutorial on the way in which to make use of iron-on vinyl with Cricut.
One easy Cricut enterprise that’s wonderful for newbies is to make an iron-on vinyl t-shirt. Click on on proper right here to study the entire tutorial on the way in which to make Cricut T-shirts.
The way in which to Use Cricut Infusible Ink
One different pleasing supplies to cut with Cricut is the model new line of Infusible Ink.
Infusible Ink is a model new ink change product from Cricut. It’s best to use Infusible Ink to create sensible, vibrant designs with a straightforward expert finish on a variety of initiatives.
Not like iron-on vinyl, which is utilized on prime of material with heat-activated adhesive, Infusible Ink transfers really fuse into the fabric supplies itself. Since Infusible Ink really turns into one with the material, the design will not ever flake, peel, wrinkle, or crack.
Using Infusible Ink is so simple as using Iron-On or heat change vinyl. The tactic is certainly pretty comparable.
Listed beneath are the basic steps to creating a enterprise with Infusible Ink sheets.
- Select an Infusible Ink sheet and a acceptable clear enterprise.
- Create your design in Cricut Design Space. Load the Infusible Ink sheet onto the Cricut lowering mat, and cut back out your design with a Cricut machine. Then, weed the excess Infusible Ink from the design.
- Then, place the Infusible Ink design onto your clear enterprise, and apply heat with a Cricut EasyPress or heat press.
Click on on proper right here additional a step-by-step tutorial on the way in which to make use of Cricut Infusible Ink.
Main Cricut Terminology
As a Cricut beginner, you’ve in all probability encountered an prolonged guidelines of Cricut lingo. Listed beneath are quite a few of essentially the most well-liked phrases you should know:
Vinyl: Typically refers to adhesive vinyl, which is used for decals, stencils, and decoration.
HTV: Heat change vinyl, aka iron-on vinyl. A type of vinyl that adheres to your enterprise with heat.
Weeding: The tactic of eradicating the excess vinyl out of your cut-out design.
Burnish: Use a scraper software program to rub the best of the change tape to make use of it to the vinyl, or to make use of the vinyl to the enterprise.
Cricut Mat: These are the sticking lowering mats that you just’ll load collectively along with your chosen supplies, after which load into your Cricut machine. They arrive in 4 utterly completely different colors representing 4 utterly completely different strengths: blue, inexperienced, purple, and pink.
Check out Decrease: In case you’re using a model new supplies for the first time, it’s a wonderful thought to make a small check out cut back sooner than you resolve to your full enterprise. Meaning, you might take a look at that you have the precise provides settings dialed in.
Mirror: Clicking “mirror” flips the design, so it cuts out as a “mirror image.” That’s what you do to make sure your iron-on initiatives come out precisely! (You do not need to replicate for regular adhesive vinyl initiatives – merely iron-on and Infusible Ink.)
Weld: A software program inside Design Space that joins overlapping shapes. You’ll be able to too use weld to hitch cursive letters.
Join: A software program inside Design Space that retains objects within the an identical place relative to at least one one other on the lowering mat as throughout the Canvas.
Need one different time interval outlined? Let me know throughout the suggestions.
Further Cricut Tutorials
Want way more Cricut information? I’ve obtained you. Strive these completely different Cricut tutorials for newbies.
Have questions? Be part of the Fb Group!
We hope this textual content was useful for you! If in case you’ve got any additional questions, be pleased to hitch my Fb Group. We created this group to be able to share photographs, ask questions, and help each other out.

I hope this textual content was useful for you! If in case you’ve got any additional questions, be pleased to hitch my Fb Group for Cricut Crafts.
Be part of the group to share photographs, ask questions, and help each other out.
What’s Subsequent?
Pin this put up: Save this tutorial to your Pinterest boards in order to return once more to it later.
Go away a comment: We like to hearken to your options. Inform me throughout the suggestions beneath!
Share on Instagram or Fb: When you make this enterprise, share it on social media and tag me @sarahmaker_. We wish to see what you make!
Provides
- paper, cardstock, or vinyl
Devices
- Cricut lowering machine
- Chopping mat
- Cricut blade
- Weeding software program
- Scraper software program
Instructions
- First, choose a design in Cricut Design Space. You’ll select a pre-made image or design your private.
- Then, select your lowering supplies and place it on the sticky lowering mat. The mat will keep the material in place whereas the Cricut cuts the design. Then, press the button to load the mat into the machine.
- Select the precise supplies settings in Design Space, and ship the design to your Cricut lowering machine.
- Press the flashing button in your Cricut machine to start lowering.
- After the machine finishes lowering the design, take away the mat from the machine, and the material from the mat.